

Your Prius key fob suddenly stops working from across the parking lot. You press the unlock button repeatedly, getting closer and closer to your car until you’re practically touching the door handle. Sound familiar? Before you panic about expensive key fob replacement, the solution might be as simple as swapping out a $3 battery. Most Prius owners experience this frustrating scenario at least once, but few realize they can fix it themselves in minutes.
This complete guide walks you through changing your Prius key battery, whether you drive a 2005 classic or a 2023 model. You’ll learn which battery your specific year needs, the exact tools required, and step-by-step procedures that take under 10 minutes. Skip the dealership markup—this straightforward DIY task saves you at least $100 compared to professional replacement services.
Identify Your Prius Key Battery Type
2004-2009 Models: CR2032 Battery
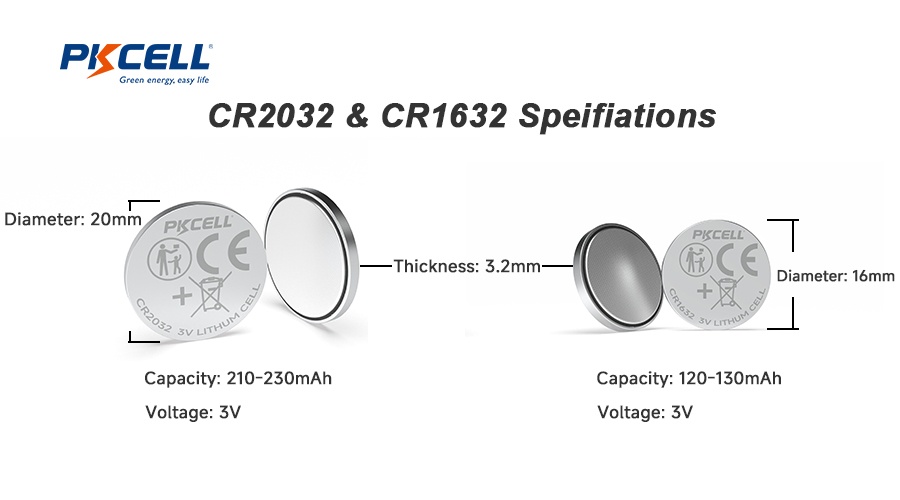
First-generation Prius smart keys use the larger CR2032 coin battery. These silver discs measure 20mm across and sit in a simple snap-together housing. You’ll find CR2032 batteries at any drugstore, usually near the hearing aid batteries. The older Prius models feature a straightforward battery compartment that doesn’t require any tools beyond a flathead screwdriver for opening.
2010+ Models: CR1632 Battery
Newer Prius models switched to the smaller CR1632 battery. This 16mm battery requires removing tiny screws and careful handling of internal components. Don’t attempt to force a CR2032 into newer fobs—they’re not interchangeable despite looking similar. The CR1632 sits in a more delicate housing with four micro screws that demand precision during replacement. Attempting to substitute battery sizes could damage your key fob’s internal circuitry.
Gather Required Tools

Essential Tools
- CR2032 or CR1632 battery (verify your model year first)
- Micro Phillips screwdriver (2010+ models only)
- Small flathead screwdriver or butter knife
Recommended Extras
- Magnetic parts tray (or small bowl) to prevent losing tiny screws
- Plastic pry tools or old credit card to avoid scratching plastic
- Smartphone flashlight for illuminating small components
Pro tip: A $7 precision screwdriver kit from any auto parts store works perfectly and prevents stripped screw heads—a common frustration during Prius key battery replacement.
Quick Visual Inspection Before Opening
Before disassembling your key fob, check these warning signs that confirm battery replacement is needed:
– Reduced range: Needing to be closer than 20 feet for the fob to work
– Dim LED: Red light appears weak or flickers when pressing buttons
– Double-press needed: Buttons require multiple attempts before responding
– Intermittent response: Works sometimes but fails others without pattern
Replace 2004-2009 Prius Battery
Open Key Fob Housing
Insert your flathead screwdriver into the small seam along the fob’s edge. Gently twist until you hear a pop, then work around the perimeter. The two halves separate easily—no screws needed in these older models. Work slowly to avoid cracking the plastic housing, which becomes brittle with age and temperature exposure.
Swap Battery Safely
Pop out the old CR2032 battery with your fingernail. Drop in the new battery positive side up (marked with “+”). The battery should sit flat without forcing. If it doesn’t fit smoothly, double-check the orientation—battery polarity is critical for proper function. Never use metal tools to handle the battery as this could cause short-circuiting.
Test Before Closing
Press any button while the fob is open. The red LED should flash immediately. If nothing happens, flip the battery over—polarity matters more than most owners realize. Testing before reassembly saves you from having to open it again if you’ve installed the battery incorrectly.
Replace 2010+ Prius Battery
Remove Mechanical Key
Press the silver button on the fob’s side and pull the metal key straight out. You’ll need this key to access hidden screws in newer models. Be careful not to lose the small spring mechanism that sometimes comes out with the key—this tiny component is crucial for proper reassembly.
Access Internal Components
Slide the bottom switch left while pulling the back cover (Toyota logo side) away from the fob. Use a plastic card if it’s stubborn—never metal tools that scratch plastic. Apply even pressure around the perimeter rather than forcing one section, which could crack the housing. The internal components are delicate and expensive to replace if damaged.
Handle Tiny Screws Carefully
Four micro Phillips screws secure the internal cover. Remove them gently, keeping track of which hole each came from. Lift the cover using your fingernail or plastic tool. Warning: Overtightening during reassembly is the #1 cause of stripped screw holes—apply only light pressure when reinstalling screws.
Install New CR1632 Battery
Apply light pressure to slide the old battery toward the flange edge—it will pop up for easy removal. Note the battery’s orientation before removing. Install new battery positive side out (toward you). Unlike older models, newer Prius fobs have specific polarity requirements that must be followed precisely for proper operation.
Reassemble in Reverse Order
Replace the internal cover and four screws—snug but not overtightened. Slide the outer casing back until it clicks firmly. Reinsert the mechanical key until it locks in place. Listen for the distinct click that confirms proper reassembly—this prevents accidental disintegration during regular use.
Test All Functions Immediately
Basic Function Check
Stand 15 feet from your Prius and test:
– Lock/unlock buttons (should respond immediately)
– Trunk release (verify full functionality)
– Panic button (hold for 2 seconds)
– Remote start (if equipped on your model)
LED Response Test
Press any button while watching the red LED. Bright, consistent flashing indicates successful battery replacement. Dim or no light suggests installation issues that need immediate correction before closing the fob permanently.
Troubleshooting Post-Replacement

When New Battery Doesn’t Work
Check polarity: Battery reversed is the #1 cause of failure. Remove and verify positive side faces outward (2010+) or upward (2004-2009).
Inspect battery contacts: Look for green corrosion or bent metal tabs. Clean gently with rubbing alcohol and cotton swab if needed—corroded contacts prevent proper electrical connection.
Reset key fob: For 2010+ models, remove battery for 30 seconds, reinstall, then test again. This simple reset often resolves communication issues between the fob and vehicle.
Signs You Need Professional Help
- No LED response with new battery (indicates circuit board failure)
- Physical damage to fob housing (compromises water resistance)
- Water damage evident inside (requires complete component replacement)
- RFID failure (car won’t start even with dead fob battery)
Dealer replacement costs $100-300 including programming, but might be necessary for electronic failures beyond simple battery issues.
Extend Battery Life Tips
Choose Quality Batteries
Skip dollar store batteries that last 6 months. Brands like Energizer, Duracell, or Panasonic typically provide 2-3 years of reliable service. Premium batteries contain more lithium and better sealing against moisture—critical for automotive applications where temperature extremes are common.
Preventive Storage
- Keep spares in your glove compartment (store in original packaging to prevent shorting)
- Avoid heat—don’t leave keys in direct sunlight (extreme heat drains batteries 50% faster)
- Note replacement date with a small label inside fob (use permanent marker on battery compartment)
Warning Signs to Watch
Replace your battery when you notice:
– Range drops below 15 feet (normal range is 30-50 feet)
– LED dims noticeably (indicates 75% battery depletion)
– Buttons require firm pressing (weak battery affects signal strength)
– Car responds only intermittently (final stage before complete failure)
Quick Reference Chart
| Model Year | Battery Type | Screws? | Difficulty | Time |
|---|---|---|---|---|
| 2004-2009 | CR2032 | No | Easy | 2 min |
| 2010-2015 | CR1632 | 4 | Moderate | 5 min |
| 2016+ | CR1632 | 4 | Moderate | 5 min |
Ready to tackle this yourself? Most Prius owners complete this DIY battery swap in under 5 minutes. Keep a spare battery in your car, and you’ll never get stranded by a dead key fob again. This simple maintenance task saves you time, money, and frustration—plus it gives you peace of mind knowing you can handle this common automotive issue without dealer intervention. Next time your key fob starts acting up, skip the service appointment and grab that screwdriver instead.


