
Your Prius dashboard suddenly flickers to life with warning lights. The headlights dim while driving. When you press the power button, nothing happens—not even a click. These aren’t hybrid system failures; they’re dead giveaways your 12V auxiliary battery is failing. While the high-voltage hybrid battery gets all the attention, this smaller 12V unit is the unsung hero controlling your Prius’s safety systems, radio, and even the hybrid startup sequence. Replacing it yourself saves $150-300 in dealership fees and takes less time than your morning coffee run. This guide shows you exactly how to change the Toyota Prius battery for 2003-2009 models—no special skills required.
Most drivers don’t realize the 12V battery powers critical safety features like brake assist and prevents dangerous gasoline-only operation. When it fails, your Prius essentially becomes a very expensive paperweight. The good news? Toyota designed this replacement as a true DIY job. By following these steps, you’ll avoid the common pitfalls that leave owners stranded with half-disassembled trunks.
Pinpoint Your Prius 12V Battery Location

Don’t waste time checking under the hood—that’s where most cars hide their batteries, but Toyota took a different approach for the Prius. The 12V battery lives in the trunk to protect it from engine heat and improve weight distribution. This strategic placement keeps the battery cooler, extending its lifespan, but catches many first-time replacers off guard.
Access the Hidden Battery Compartment
Open your trunk using the interior release button or key fob. Look for the carpeted floor panel covering the spare tire well—this isn’t just storage space. Rotate both black securing knobs counterclockwise until they pop up about an inch. Lift the carpet edges starting near the rear seats, folding them back toward the trunk lid. You’ll reveal a black plastic panel covering the spare tire; pull this panel straight up (it’s not screwed down) to expose the battery assembly beneath. Take a photo of this setup before proceeding—it’ll save headaches during reassembly.
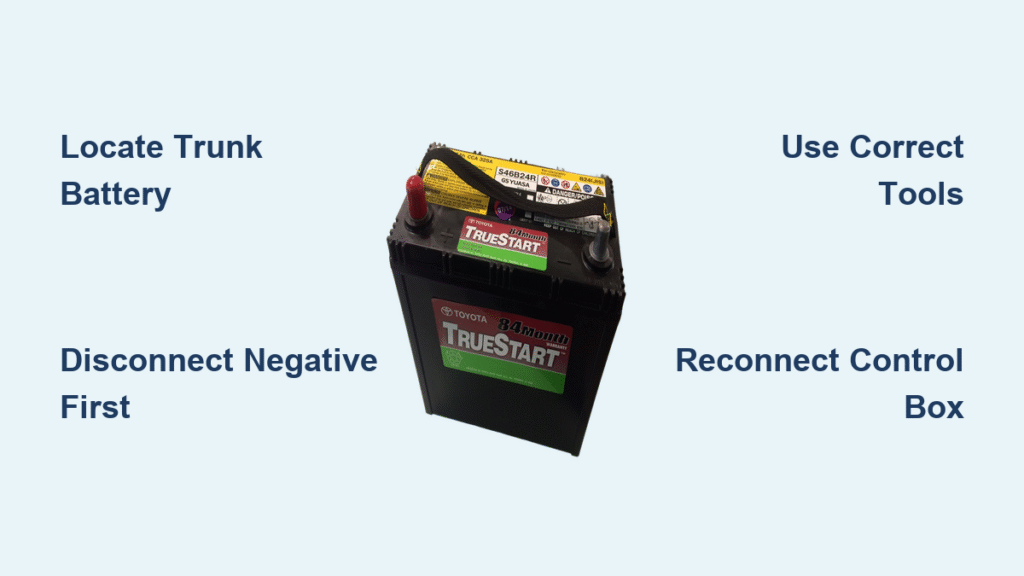
Recognize Critical Components Immediately
You’ll see three key parts: the rectangular black 12V battery (about the size of a small toaster), a control box (a black plastic unit with wires connected to the battery terminals), and a U-shaped metal bracket securing everything. The positive terminal has a distinctive red plastic cover—this is your visual anchor for correct orientation. Note how the control box sits slightly offset toward the passenger side; this positioning matters for reinstallation. If you see corrosion (white/green crust) on terminals, use a wire brush to clean it now before it damages connections.
Grab These Exact Tools Before Starting

Socket Set Essentials for Prius Battery Swap
You only need three specific tools for this job—no special hybrid equipment required. A 10 mm socket handles the battery bracket bolts, while a 12 mm socket tackles the control box connections. Pair them with a socket wrench featuring a 6-8 inch extension—this extra reach is non-negotiable for accessing tight spaces behind the battery. Skip ratchets; a simple breaker bar gives better torque control in cramped quarters. Pro tip: Wrap electrical tape around your socket handle to prevent accidental sparks if it contacts metal.
Non-Negotiable Safety Gear
Wear nitrile-coated gloves—battery acid eats through skin in seconds during terminal contact. Safety goggles are mandatory; a stray wrench could cause dangerous sparks near the battery. Keep a baking soda solution (1 tablespoon per cup of water) nearby to neutralize any acid spills. Never work in damp conditions—moisture increases electrical risks. This battery weighs 30 pounds, so clear your trunk floor of loose items that could cause tripping during removal.
Execute These Safety Protocols First
Achieve Complete Vehicle Shutdown
Turn off all accessories and press the power button until the dashboard goes completely dark—don’t leave it in “Ready” mode. Shift into Park and pull the emergency brake firmly. If you drove recently, wait 15 minutes for high-voltage system capacitors to discharge (you’ll hear a faint click when safe). Check that the hybrid system indicator is off—this confirms no residual voltage. Skipping this could trigger expensive error codes when reconnecting.
Master Terminal Disconnection Sequence
Always disconnect the NEGATIVE terminal first—this black cable marked with a minus (-) sign. Removing positive first risks creating a short circuit if your wrench touches metal. Loosen the control box bolts in diagonal order (top-left, then bottom-right) to prevent warping. When lifting the battery, keep it upright—tilting can spill corrosive acid. If terminals feel stuck, gently wiggle side-to-side while applying upward pressure; never pry with metal tools.
Remove the Failing Battery Correctly
Disconnect the Control Box Safely
Lift the black plastic flaps on the control box sides to access internal latches. Pop off the red positive terminal cover by pressing the release tab—this snaps off cleanly. Using your 12 mm socket, remove the two lower bolts securing the control box (ignore any third top bolt on newer models). Gently rock the control box side-to-side while pulling straight up—don’t yank, as fragile wiring harnesses connect underneath. Set it aside on the trunk floor with terminals facing up.
Release the Battery Retention System
Locate the U-shaped metal bracket spanning the battery top. Remove both 10 mm bolts using your extension—these often have corrosion buildup, so apply steady pressure without rounding the heads. Lift the bracket straight up; if it snags on wiring looms, rotate it slightly toward the passenger side. Keep bolts organized: the longer one typically goes on the driver’s side. Never force components—Prius wiring is notoriously fragile.
Extract the Old Battery Without Damage
Place one hand under the battery base and the other on the handle (if present). Lift vertically until the battery clears the tray lip—any tilting risks acid spills. Set it on cardboard away from metal surfaces; battery acid eats through paint instantly. Check the tray for debris: leaves or coins could cause future shorts. Note the exact terminal orientation—positive always faces the passenger side in second-gen Priuses.
Install Your New 12V Battery Precisely
Position the Replacement Correctly
Lower the new battery (size group 55D23L recommended) matching the old unit’s orientation. Ensure the positive terminal faces passenger side—reversing this fries electronics. Set it flat in the tray; if it rocks, reposition until stable. Verify the battery’s hold-down lip aligns with the tray channel—this prevents shifting during driving. Never force it; if misaligned, rotate 180 degrees.
Secure Components Without Overtightening
Place the metal bracket over the battery, aligning bolt holes. Hand-thread both 10 mm bolts before tightening—this prevents cross-threading. Snug bolts to 89 inch-pounds (about 3 finger-tight turns past hand-tight); overtightening cracks battery cases. Reconnect the control box by pressing firmly until you hear two distinct clicks. Reinstall 12 mm bolts finger-tight first, then give each a quarter-turn with the socket—excessive torque strips plastic threads.
Complete Critical Final Connections
Snap the red positive cover securely over the terminal—listen for the click. Press the black control box casing down until all perimeter tabs lock. Test-fit the black plastic battery cover before closing the trunk; it should sit flush without gaps. If warning lights appear later, this cover’s improper seating is the likely culprit—don’t skip this check.
Finish Reassembly and System Reset
Restore Trunk Components Properly
Lay the carpet panel starting from the trunk lid side, ensuring no wrinkles under the battery area. Insert both securing knobs and turn clockwise until they click and sit flush with the carpet. Test the trunk latch by closing and reopening—it should operate smoothly. If the carpet bunches, lift and reposition; trapped wires cause electrical faults.
Initialize Vehicle Systems Successfully
Start the Prius and let it idle for 2 minutes—this allows control modules to recalibrate. Watch dashboard lights: hybrid system indicators should extinguish within 90 seconds. Test functions immediately: roll down windows, blast the radio, and flash headlights. If systems behave erratically, disconnect the new battery for 10 minutes to force a full reset, then reconnect.
Fix These Post-Installation Issues Fast
No Power After Battery Replacement
Check terminal voltage with a multimeter—it must read 12.6+ volts. Inspect control box connections for bent pins (use a flashlight to peer inside sockets). Verify battery orientation; reversed polarity triggers fail-safes. If still dead, temporarily connect jumper cables to the 12V battery terminals (not the hybrid system) to rule out a defective new battery.
Hybrid System Warning Lights Persist
Drive continuously for 15 minutes—some modules require motion to reset. Check the black battery cover; improper seating causes intermittent errors. If “Check Hybrid System” appears, visit an auto parts store for free code reading—90% of cases stem from loose control box wiring. Never ignore these warnings; they indicate critical safety system failures.
Stop Future Battery Failures Proactively
Implement This Maintenance Routine
Clean terminals every 6 months using a baking soda paste and wire brush—corrosion causes 70% of premature failures. Check voltage monthly with a $10 multimeter; replace at 12.2 volts (not 12.0 as in conventional cars). Replace proactively at 4 years—Prius 12V batteries rarely last beyond 5 years even with perfect care. Always keep a charged emergency jump pack in the trunk.
Recognize These Early Warning Signs
Dimming headlights during slow driving indicates voltage drop under load. Radio resetting to factory settings means the battery can’t maintain memory. Delayed power-up (more than 3 seconds from button press to dashboard lights) signals imminent failure. Don’t wait for complete breakdown—replacing a weakening battery takes 30 minutes; recovering from total failure requires professional reprogramming.
Replacing your Toyota Prius 12V battery is a straightforward DIY victory that prevents costly towing and dealership markups. By following these precise steps, you’ve restored critical safety systems while saving significant money—most shops charge $250+ for this 25-minute job. Remember that this small battery controls life-saving features like brake assist, so never delay replacement when symptoms appear. For true hybrid battery issues (distinct from this 12V system), always consult a Toyota-certified technician. Keep your maintenance records handy; if you encounter persistent electrical gremlins, your local dealer can often reset modules for free during routine service. Drive confidently knowing you’ve mastered one of the most common—and most avoidable—Prius failures.


