

That familiar battery-shaped warning light glowing on your dashboard during morning rush hour strikes panic into every driver’s heart. Instead of blindly heading to the repair shop, you can diagnose your battery’s health in under 10 minutes using simple visual checks and basic tools. This guide reveals exactly how to check car battery indicator signals—whether it’s dashboard warnings, built-in color windows, or voltage readings—so you’ll know precisely when to recharge, replace, or keep driving confidently. Skip the guesswork and costly service calls by mastering these field-tested diagnostic methods that mechanics use daily.
Decoding Your Dashboard Battery Warning Light
That glowing battery symbol isn’t just decoration—it’s your vehicle’s urgent distress signal requiring immediate attention. When illuminated solidly or blinking erratically, this indicator confirms your charging system has failed and your battery is operating on borrowed time.
Critical Warning Light Patterns Explained
- Solid red battery icon: Signifies complete charging system failure—your alternator isn’t replenishing battery power
- “ALT” or “GEN” text display: Indicates alternator malfunction specifically
- Intermittent blinking: Points to loose connections or failing voltage regulator
Immediate action required: Safely pull over within 1 mile, disable all non-essential electronics (AC, radio, heated seats), and begin diagnostic checks. Continuing to drive risks total electrical shutdown—stranding you when your battery depletes completely. Never ignore this warning; even a 5-minute drive could drain your last reserves.
Reading Built-in Battery Condition Indicators
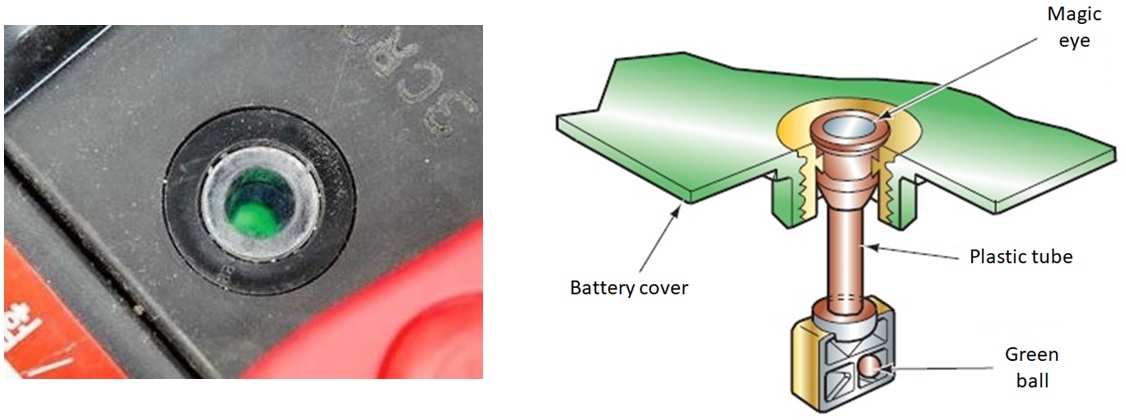
Interpreting the Color Window on Modern Batteries
Most gel-type batteries feature a built-in hydrometer “magic eye” on the top casing—no tools required for this instant health check. Locate the small circular window near the positive terminal (often labeled with color interpretation decals) and decode these critical signals:
- Bright green: Fully charged and healthy battery—no action needed
- Black or dark appearance: Battery requires immediate charging
- Clear or yellow hue: Permanent damage detected—replacement is essential
Pro tip: Test this indicator after the vehicle has rested for 1 hour. Recent driving distorts readings as electrolyte movement temporarily affects color visibility. If you see no color at all, your battery is completely dead and needs professional replacement.
Recognizing Traditional Battery Warning Signs
For older batteries without color windows, inspect these critical visual indicators:
– White or blue crust on terminals: Corrosion blocking power flow—requires immediate cleaning
– Swollen or bulging battery case: Overheating damage from overcharging
– Low electrolyte levels: Visible through translucent case walls (in non-sealed batteries)
Warning: Never attempt to open sealed batteries—this releases dangerous acid vapors. If you spot terminal corrosion, wear rubber gloves and neutralize deposits with a baking soda/water solution before cleaning with a wire brush.
Executing Precise Voltage Testing Procedures
Essential Safety Setup Before Testing
- Turn ignition completely off and remove keys
- Remove all metal jewelry (watches, rings) to prevent short circuits
- Locate battery (check trunk for BMW/Mercedes models)
- Pop off plastic terminal covers—clip, lift, or unscrew as needed
Terminal identification: Positive terminal has red cover with “+” marking; negative terminal is black with “-” symbol. Always connect to positive first and disconnect negative first to prevent sparks.
Step-by-Step Multimeter Testing Method
Equipment preparation:
– Set digital multimeter to DC voltage (solid line above dashed line symbol)
– Select 20V range for optimal precision
– Connect red probe to positive terminal, black to negative
Critical timing rule: Test after minimum 1-hour rest period—overnight is ideal. Morning testing before first start provides the most accurate resting voltage. Never test immediately after driving.
Voltage Reading Interpretations That Save Money
Resting voltage scale (engine off):
– 12.6-12.7V: Excellent condition—no action required
– 12.4-12.5V: Good charge—monitor monthly
– 12.2V: Weak battery—struggles in cold weather
– 12.0V: Discharged—needs immediate charging
– Below 11.8V: Severely damaged—likely unrecoverable
Engine running test (vital for diagnosis):
– 13.6-14.4V: Healthy charging system
– Below 13.6V: Alternator undercharging—requires repair
– Above 14.4V: Dangerous overcharging—damages battery rapidly
Pro tip: A reading of 12.0V or lower indicates sulfation—permanent damage from prolonged discharge. External charging may recover it, but capacity will remain reduced.
Performing Quick Load Testing Without Special Equipment

Engine Cranking Voltage Test (Most Accurate Home Method)
- Connect voltmeter to battery terminals
- Have assistant crank engine for 15 seconds while you watch
- Record lowest voltage reading during cranking
Pass/fail criteria:
– Pass: Maintains 9.6V+ throughout cranking—battery healthy
– Fail: Drops below 9.6V—immediate replacement needed
Why this matters: This simulates real-world starting demand. Batteries can show good resting voltage but collapse under load—a sure sign of internal failure.
Emergency Headlight Test for Roadside Emergencies
When no tools are available:
1. Turn ignition to “ON” (don’t start engine)
2. Switch on headlights
3. Observe behavior:
– Steady bright lights: Adequate charge
– Dim or flickering lights: Low charge—seek charging immediately
– Lights brighten when revving: Alternator failure—drive directly to repair facility
Critical insight: Dim headlights at idle with normal brightness when accelerating confirm alternator issues—not battery problems.
Alternative Diagnostic Methods for Specific Battery Types
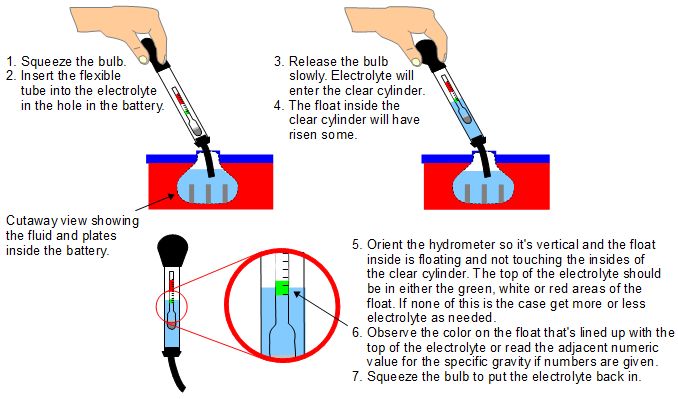
Hydrometer Testing (Traditional Flooded Batteries Only)
Safety first: Wear acid-resistant gloves and eye protection—battery acid causes severe burns.
Testing process:
1. Remove cell caps carefully
2. Insert hydrometer into first cell
3. Squeeze bulb to draw electrolyte
4. Read specific gravity at eye level
Gravity scale interpretation:
– 1.265+: Good condition
– 1.220-1.225: 50% charged—requires charging
– Below 1.150: Discharged—likely damaged
Warning: Never perform this on sealed AGM or gel batteries—they lack removable caps. Attempting access will destroy the battery.
When to Seek Professional Testing
Most auto parts stores provide free battery testing using commercial load testers. These deliver definitive results through:
– Cold cranking amp (CCA) measurement
– Controlled load testing to 50% voltage
– Complete charging system analysis
Get professional help when:
– Home tests give inconsistent results
– Battery is 3+ years old with performance issues
– You suspect parasitic drain (battery dies overnight)
Recognizing Battery Degradation Factors Before Failure
Parasitic Drain Management Strategies
Modern vehicles constantly draw power for computer memory, alarm systems, and keyless entry—even when parked. Combat excessive drain by:
– Driving 20+ minutes daily to fully recharge
– Using a smart battery maintainer for stored vehicles
– Disconnecting negative terminal during extended storage
Red flag: If your battery dies within 48 hours of parking, investigate parasitic drain immediately—could indicate faulty module.
Climate Impact on Battery Lifespan
- Temperate zones: Expect 4-5 year lifespan
- Hot climates (90°F+): Batteries degrade 50% faster—replace at 2-3 years
- Deep discharges: Each full drain causes permanent 50% capacity loss
Pro tip: In hot climates, park in shade and use hood insulation to reduce underhood temperatures by 20°F—extending battery life significantly.
Deciding Between Replacement and Recharging
Immediate Replacement Indicators
- Fails cranking test (drops below 9.6V)
- Resting voltage consistently under 12.0V
- Age exceeds 4 years with slow cranking
- Won’t hold charge after full external charging
Critical mistake: Replacing a battery without checking the alternator. If your voltage test shows under 13.6V while running, alternator repair must come first—otherwise the new battery will fail quickly.
Essential Charging System Verification
Before buying a new battery:
1. Confirm alternator output is 13.6-14.4V at idle
2. Address any under/overcharging issues
3. Use an external charger for deeply discharged batteries—alternators can’t recover below 11.8V
Warning: Jump-starting a severely discharged battery (below 11.8V) often causes immediate failure—external charging is the only safe recovery method.
Preventative Maintenance Schedule for Reliable Starts
Monthly Battery Health Checks
- Visual inspection for corrosion and swelling
- Terminal cleaning with wire brush and baking soda solution
- Quick voltage test with multimeter
Quarterly Critical Tasks
- Load test for batteries over 3 years old
- Inspect battery hold-down bracket (loose mounting causes internal damage)
- Check electrolyte levels in traditional batteries
Annual Professional Evaluation
Schedule comprehensive testing including:
– Complete charging system analysis
– Alternator and starter performance check
– Parasitic drain measurement
Emergency warning signs requiring immediate action:
– Slow engine cranking (especially in cold weather)
– Dim headlights at idle that brighten when revving
– Clicking sound during start attempts
– Electrical accessories malfunctioning (windows, radio)
Mastering how to check car battery indicator signals transforms you from a stranded motorist into a confident driver who solves problems before they strand you. By monitoring dashboard warnings, interpreting color windows, and performing simple voltage tests, you’ll catch failures early and avoid preventable breakdowns. Implement this monthly 5-minute inspection routine—checking for corrosion, measuring voltage, and verifying charging output—and you’ll double your battery’s lifespan. Remember: that small investment in diagnostic knowledge pays off every time your engine starts reliably, no matter the weather or time of day. Keep this guide in your glove compartment, and you’ll never pay for unnecessary battery replacements again.


