

That dead battery warning light flashing as you try to start your car on a freezing morning is every driver’s nightmare. Nearly one-third of all roadside breakdowns stem from battery failure, often catching drivers completely off guard. Knowing how to check car battery size and age transforms you from a potential victim of unexpected failure into a proactive vehicle owner who can prevent disasters before they happen. This guide delivers clear, actionable steps to decode your battery’s manufacturing date and verify its exact specifications—information that could save you from being stranded.
Find Your Battery’s Hidden Age Code
Most car batteries silently keep track of their age through manufacturer codes that many drivers never notice. Learning to read these codes helps you assess when replacement is needed before you’re left stranded with a dead engine.
Crack Date Sticker Codes in Seconds
Start by flipping open your hood and examining your battery’s top and sides for date stickers—these are your quickest path to determining age. Round stickers display straightforward numeric codes like “8/16” meaning August 2016, usually in bright colors against the black casing. Rectangular labels use a more complex system with two rows of circles at the bottom: the top row shows month abbreviations (JA, FE, MR, etc.) while the bottom row indicates years. The punched or highlighted circle reveals the exact manufacturing date—no decoder ring needed once you know where to look.
Read Heat-Stamped Manufacturing Codes
When stickers have worn away or been removed, manufacturers embed age information directly into the battery case through heat-stamped alphanumeric codes. These raised letters and numbers typically appear on the cover or side and follow a simple pattern: the first character represents the last digit of the manufacturing year (0-9), while the second character indicates the month (A-M, skipping I). For example, “8C” or “C8” means March 2018, while “9K” translates to November 2019. Keep this quick reference handy: A=January, B=February, C=March, D=April, E=May, F=June, G=July, H=August, J=September, K=October, L=November, M=December.
Estimate Age When Codes Are Missing
Sometimes corrosion or damage makes age codes completely unreadable. In these situations, visual clues provide rough age estimates. Noticeable white, ashy deposits around terminals increase with battery age, though newer batteries can show corrosion too if maintenance has been neglected. Examine the battery case for swelling or cracks—these physical deformities typically indicate batteries approaching the end of their service life. While not as precise as reading official codes, these visual indicators help you determine if immediate replacement should be your priority.
Confirm Your Exact Battery Group Size

Battery group size determines whether a replacement will physically fit your vehicle and connect properly to the electrical system. Using the wrong size creates dangerous electrical risks and installation headaches that could damage your entire electrical system.
Decode Battery Label Specifications
Your current battery’s label holds the key to finding the correct replacement size. Look for the “Group Size” designation, typically displayed prominently as a combination of numbers and letters like “24F,” “65,” or “H6.” This code specifies exact physical dimensions (height × width × length), terminal placement and orientation, and hold-down configuration. Never assume your vehicle’s requirements—compact cars commonly use 51R, 35, or 26R sizes, while SUVs and trucks typically need 65, 34, or 78. Luxury vehicles often require specialized sizes like 48, 49, or 94R that won’t fit standard models.
Match Specifications to Your Vehicle Manual
Your owner’s manual lists the exact battery group size required for your specific make, model, and year. Manufacturers sometimes change specifications between model years, so never rely on previous experience with similar vehicles. Installing a battery with incorrect group sizing creates real dangers: electrical connection issues can damage sensitive electronics, physical fit problems prevent proper installation, and warranty complications may arise if improper sizing causes secondary damage. Taking five minutes to verify your vehicle’s exact requirements prevents hours of expensive headaches later.
Test Battery Health Before Failure Strikes
Age alone doesn’t determine when your battery needs replacement—a three-year-old battery might fail while a five-year-old one still performs adequately. Testing reveals the true condition and helps you avoid unexpected breakdowns.
Perform DIY Voltage Testing in Minutes
A simple multimeter test provides immediate insights into your battery’s health without professional help. For a resting voltage test (engine off), connect your multimeter to the terminals: 12.6+ volts indicates excellent condition, 12.4-12.5 volts means good condition, 12.2-12.3 volts signals a marginal battery needing close monitoring, and below 12.2 volts suggests immediate replacement consideration. For a starting voltage test, have someone start the engine while you monitor voltage—normal operation shows a drop to 10-11 volts followed by recovery above 12, while a drop below 10 volts or failure to recover indicates replacement is needed.
Get Professional Testing for Complete Analysis
Most auto parts retailers—including AutoZone, O’Reilly, and Advance Auto Parts—offer free battery testing using professional equipment. These tests provide comprehensive health reports, remaining life estimates, charging system analysis, and printed documentation for your records. AAA service calls and many dealership service departments also offer this valuable service. Professional testing becomes especially important after your battery reaches three years old, as subtle performance degradation often precedes complete failure by several months.
Calculate Your Battery’s Expected Lifespan
Different battery technologies age at dramatically different rates, making it essential to know what type you’re working with when planning replacements.
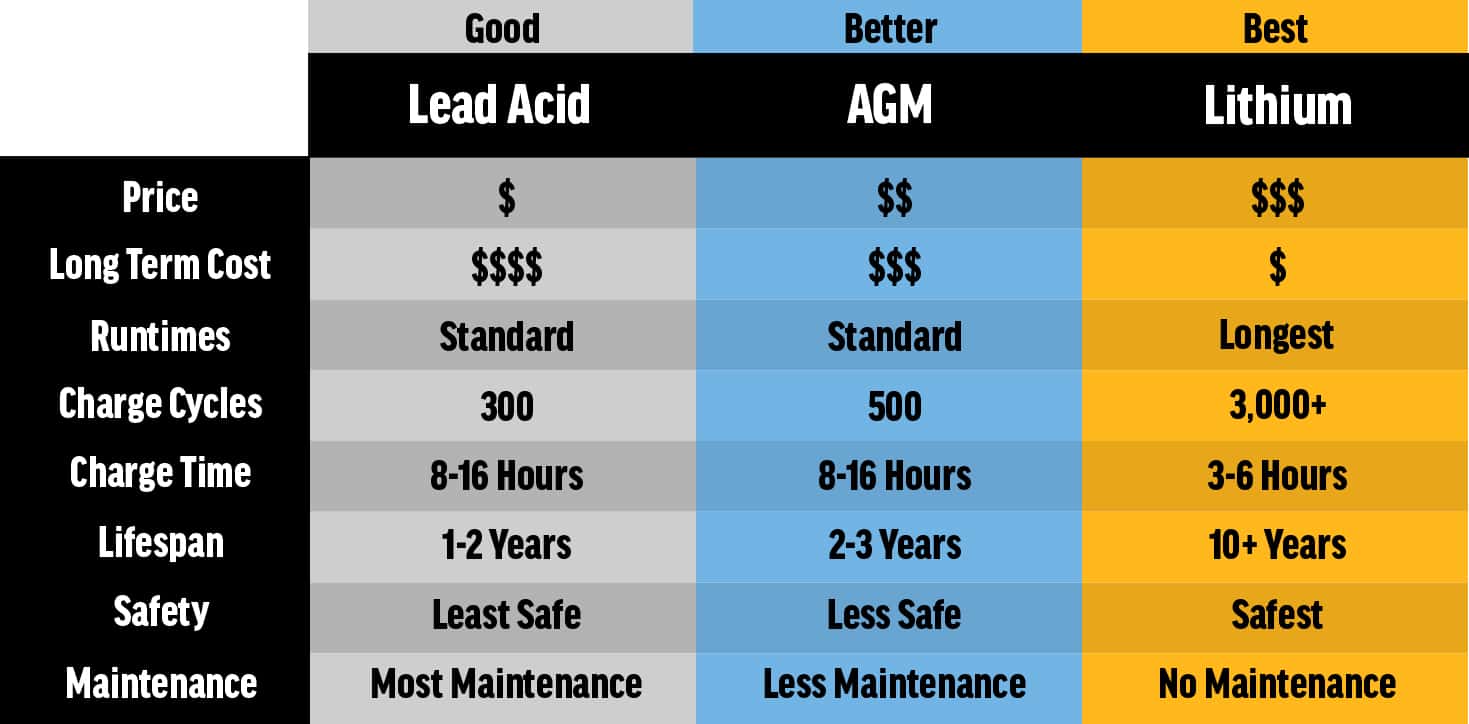
Match Battery Type to Expected Service Life
Lead-acid batteries—the most common type—typically last 3-5 years and show warning signs like slow cranking and dim lights as they age. AGM (Absorbent Glass Mat) batteries last 4-7 years and work best in vehicles with start-stop systems, while EFB (Enhanced Flooded Battery) options provide 4-6 years of service for entry-level start-stop vehicles. Lithium-ion batteries in hybrid and electric vehicles can exceed 10 years but cost significantly more. Your vehicle’s owner’s manual specifies which type your car requires—never substitute a different technology without manufacturer approval.
Factor in Climate’s Impact on Battery Aging
Extreme temperatures dramatically accelerate battery aging in opposite ways. Hot climates cause fluid evaporation that damages internal components, potentially shortening lifespan by 15-20%. If you live in desert regions, test your battery annually after year two. Cold climates reduce capacity by up to 35% in freezing weather, increasing stress and failure rates. Drivers in northern regions should test before winter each year after year three to avoid being stranded in dangerous conditions.
Implement Smart Replacement Timing
Proactive replacement prevents unexpected breakdowns, but replacing too early wastes money. Industry experts recommend specific timing strategies based on age and performance data.
Follow Evidence-Based Replacement Schedules
Edmunds recommends replacing batteries every four years regardless of symptoms, while Consumer Reports suggests annual testing after three years with replacement based on results. AAA guidance notes that batteries over four years face significantly higher failure rates during extreme weather. Create your own testing schedule: years 1-3 require only visual inspection, years 3-4 need annual professional testing, year 4+ demands semi-annual testing, and any age warrants immediate testing if symptoms appear. This tiered approach balances cost with reliability.
Document Battery History for Future Reference
Keep a simple log tracking your battery’s purchase date, group size, annual test results, replacement date, and any symptoms noticed. This documentation helps identify patterns in your driving conditions and makes warranty claims easier if needed. Smart drivers photograph their battery’s age code and group size when newly installed—this record proves invaluable when shopping for replacements years later.
Execute Safe Battery Inspections Every Time

Battery maintenance requires basic safety measures to prevent injury and vehicle damage, especially when handling older units that may show signs of wear.
Apply Essential Safety Protocols
Always wear safety glasses and gloves when inspecting batteries, and remove any jewelry that could cause dangerous electrical shorts. Work in well-ventilated areas to avoid hydrogen gas buildup, and never smoke near batteries. When disconnecting, always remove the negative terminal first followed by the positive terminal. If you encounter acid spills, neutralize them immediately with a baking soda and water mixture, and dispose of old batteries at designated recycling centers—most auto parts stores accept them for proper recycling at no charge.
Your car battery works tirelessly until it doesn’t. By mastering how to check car battery size and age, you transform from reactive to proactive maintenance. Take five minutes today to locate your battery’s age code and verify its group size—this simple knowledge could prevent hours of frustration and expensive towing fees tomorrow. Most batteries provide clear indicators once you know where to look, turning what seems like technical mystery into straightforward vehicle maintenance.


