That hollow click when you turn the key. The dashboard lights fading to black. A dead battery transforms your reliable vehicle into a stranded metal box in seconds. If you’re searching for how to crank car with dead battery solutions right now, you’re not alone—over 24 million drivers face this emergency annually. The good news? You can revive your vehicle in under 10 minutes with the right approach. This guide cuts through the confusion, delivering precise steps to safely jump-start your car without damaging electronics or risking injury. Forget vague advice—you’ll learn the exact cable sequence mechanics use, critical safety checks most guides miss, and why your alternator needs 30 minutes of highway driving to truly recharge.
Dead Battery Safety Check: Avoid Dangerous Mistakes
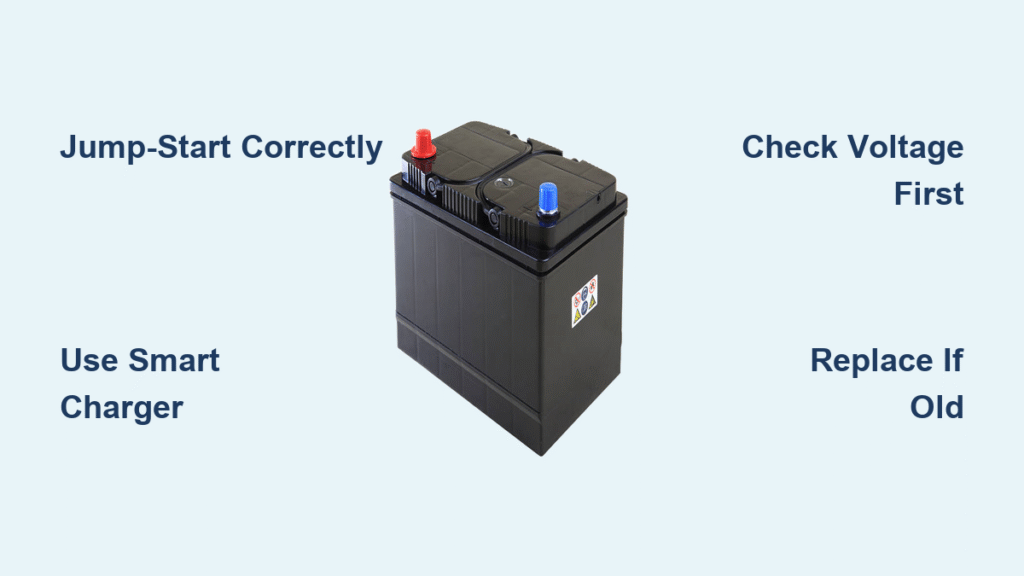
Before touching a single cable, your life depends on this inspection. Pop your hood and examine the battery for cracks, leaks, or swollen sides—if you spot any damage or leaking fluid, stop immediately. A compromised battery can explode when jump-started, sending sulfuric acid flying. Check for greenish-white corrosion around terminals; heavy buildup often mimics a dead battery but requires cleaning, not jumping. If the battery case feels cold and solid (frozen), do not attempt a jump—thaw it completely first.
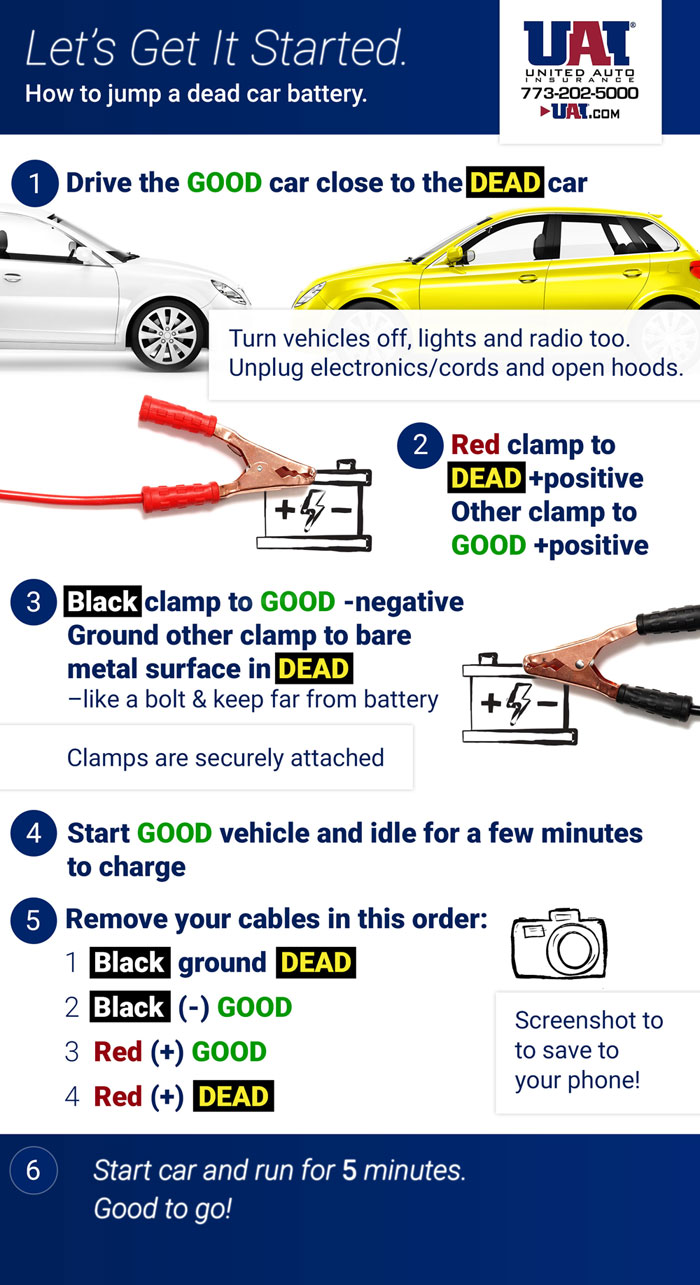
Remove all metal jewelry, watches, and phones from your pockets. Battery gases ignite easily, so work in open air—never in a garage. Contrary to popular myth, rain or snow won’t electrocute you; your car’s 12-volt system can’t penetrate dry skin. Park the donor car within 2 feet of your dead vehicle (side-by-side or nose-to-nose), but never let them touch. Set both in Park (automatic) or Neutral (manual) with parking brakes engaged. Crucially, turn off all accessories—lights, radio, and phone chargers drain power needed for cranking.
Essential Jump Equipment: Cables vs. Portable Packs

Why Cheap Cables Cause Jump-Start Failures
Never use 10-gauge jumper cables—they overheat and deliver insufficient power. Opt for 4-gauge or 6-gauge copper cables (thicker = better conductivity) with minimum 12-foot length. Verify color-coded clamps (red = positive, black = negative) and fully insulated grips that won’t slip. Weak cables cause “clicking only” symptoms even with good connections.
Portable Jump-Starter Pack Advantages
A lithium-ion jump pack (rated for your engine size) eliminates dependency on another vehicle. These connect directly: red clamp to dead battery positive, then black clamp to engine block ground. They’re lifesavers for keyless cars where the dead battery locks the hood release—store one in your trunk with jumper cables.
Correct Cable Connection Sequence: No Sparks Guaranteed

Follow this exact order to prevent dangerous sparks near explosive battery gases:
- Red to Dead Battery Positive: Clamp red (+) securely to + terminal on your dead battery (scrape corrosion with a key first if needed).
- Red to Donor Battery Positive: Attach other red clamp to + terminal on booster car.
- Black to Donor Battery Negative: Connect black (-) to – terminal on booster battery.
- Black to Engine Ground: Final black clamp goes to unpainted metal on your car’s engine block—never the dead battery’s negative terminal.
Pro Tip: This final ground connection (step 4) creates a spark away from the battery. Look for a clean bolt on the strut tower or engine bracket—avoid fuel lines or moving parts.
Starting Your Car After Jump: Critical Waiting Periods
Start the donor car and let it idle 2 minutes (5 minutes in freezing temps). Gently revving to 1,500 RPM speeds charging but isn’t mandatory. Now attempt to start your car—if it doesn’t crank within 10 seconds, wait 60 seconds before retrying. After three failed attempts, inspect connections; corroded terminals are the #1 cause of “dead battery” misdiagnosis.
Once your engine roars to life, keep both cars idling 1-2 minutes. This stabilizes the electrical load before cable removal. Rushing this step risks immediate stalling.
Safe Cable Removal: Reverse Order Prevents Damage
Disconnect cables in exact reverse sequence to avoid short circuits:
- Black from Engine Ground (your car)
- Black from Donor Negative
- Red from Donor Positive
- Red from Your Positive Terminal
Never shut off your engine immediately after jumping. Close both hoods carefully to avoid pinching cables—a common oversight that damages wiring.
Recharge Your Battery: Drive Time & Avoiding Short Trips
Your alternator needs 20-30 minutes of continuous driving at 35+ mph to recharge a dead battery. Short trips to the grocery store won’t cut it—they actually deepen the discharge cycle. Disable non-essentials like heated seats and rear defrosters during this drive. Park in an accessible spot (not your garage) in case you need another jump—batteries under 50% charge often fail when restarted.
Troubleshooting Failed Jumps: Clicking, No Crank, or Stalling
| Symptom | Likely Cause | Immediate Fix |
|---|---|---|
| Clicking only | Corroded terminals or loose clamp | Clean terminals with wire brush, reclamp tightly |
| No crank, no lights | Battery beyond revival | Replace battery—don’t waste time jumping |
| Cranks slowly then dies | Alternator failure | Test voltage: below 13.8V at idle = bad alternator |
| Stalls after cable removal | Loose serpentine belt | Visually check belt tension before driving |
| Smoke from cables | Reversed polarity | Disconnect immediately—inspect for melted insulation |
Critical Note: If cables smoke, do not reconnect. Damaged wiring requires professional repair before further attempts.
Special Cases: Keyless Cars, Hybrids, and Manual Transmissions
Keyless Entry with Dead Battery
Your key fob hides a mechanical key—slide the release button or pull the emergency blade. Door lock cylinders often sit under rubber covers near the handle (consult your manual). Once inside, locate the hood release fuse (typically under driver’s seat) to access the battery.
Hybrid and EV Jump-Starting
Never jump the high-voltage battery. Find the 12V auxiliary battery (usually in trunk or rear seat) or jump-start lugs under the hood fuse box. Use a conventional car as donor—EVs can’t supply sufficient current. The process mirrors standard jumping but requires locating hidden battery points.
Manual Transmission Push-Start
Only works with residual battery power (completely dead = no fuel pump). Depress clutch, turn ignition to ON, select 2nd gear, push to 5-10 mph, then pop clutch while adding throttle. Wet roads increase success rates by reducing wheel spin.
Preventing Future Dead Batteries: Maintenance Checklist
Batteries over 3-5 years old needing frequent jumps must be replaced—they’re ticking time bombs. Monthly, clean terminals with a baking soda paste and wire brush to prevent corrosion. Secure the hold-down bracket; vibration cracks internal plates faster than age. If your battery dies repeatedly, test for parasitic draws using a multimeter (anything over 50mA indicates a drain).
Pro Tip: Tape this emergency jump checklist inside your glove box:
– [ ] Inspect battery for damage/leaks
– [ ] Position cars close, brakes set
– [ ] Connect red→dead +, red→donor +
– [ ] Connect black→donor -, black→engine ground
– [ ] Start donor car, wait 2 min
– [ ] Start dead car
– [ ] Reverse cable removal order
– [ ] Drive 30+ minutes at highway speed
A dead battery shouldn’t ruin your day. By following this precise sequence—safety first, sequence second, speed third—you’ll confidently crank your car with a dead battery in under 10 minutes. Remember: the real emergency isn’t the jump-start itself, but skipping the critical 30-minute recharge drive. Keep quality cables and a jump pack in your trunk, and you’ll never pay for roadside assistance again. When in doubt, consult your owner’s manual for model-specific quirks—your vehicle’s electrical system deserves that respect.