
Your car won’t start after sitting idle for weeks, or you’re preparing for winter storage when that familiar battery warning light flashes. Maybe you’re replacing a failing unit or preventing electrical shorts during repairs. Whatever your reason, disconnecting your car battery improperly can trigger expensive electronic damage or dangerous acid spills. This guide delivers the exact sequence professional technicians follow—without the $100 service fee. You’ll learn why removing the negative cable first is non-negotiable, how to avoid sparks that fry your ECU, and the storage secrets that prevent dead batteries after months in storage.
Most DIYers underestimate the hydrogen gas and sulfuric acid lurking under that plastic case. One slip with your wrench could mean a battery explosion or fried computer modules costing thousands. But with the right tools and sequence, you’ll complete this in under 15 minutes. Let’s transform this intimidating task into a safe, foolproof process.
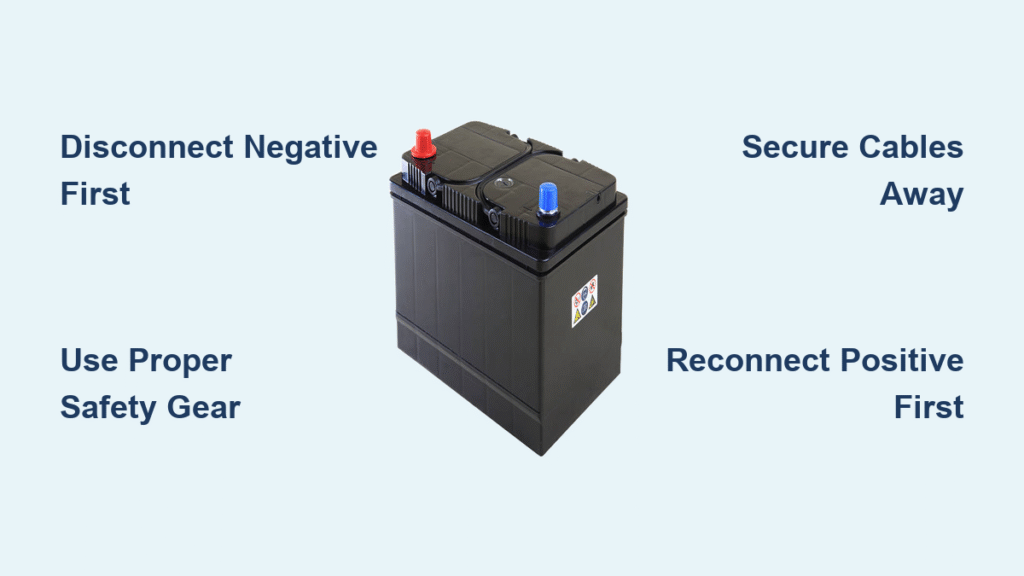
Why Removing Negative Cable First Prevents Costly Electronic Damage
The single most critical rule—always disconnect negative first—exists for a physics-based reason. Your car’s entire metal frame connects to the negative terminal. If you remove the positive cable first and your wrench touches any metal surface (like the engine block), you create a direct short circuit. This sends massive current through your tool, causing sparks hot enough to melt cables or destroy sensitive electronics like the engine control unit.
Here’s what happens when you ignore the sequence:
– 🔥 Short circuits can blow fuses controlling ABS, airbags, or fuel systems
– 💻 Modern cars lose adaptive memory in transmission and throttle modules
– 🔋 Hydrogen gas from the battery ignites from sparks (causing explosions)
Never assume cable colors match terminals—some imports use black for both. Always verify with the (-) and (+) symbols stamped on the battery case. If corrosion obscures markings, trace cables: negative always connects to bare metal on the chassis.
Essential Safety Gear That Stops Acid Burns and Explosions

Skip this, and you risk chemical burns requiring hospital visits. Sulfuric acid in batteries causes third-degree burns on contact, while hydrogen gas ignites from tiny sparks. Your non-negotiable protection kit:
- Dielectric gloves rated for acid resistance (not regular work gloves)
- Full-face safety goggles—acid splashes can blind you
- Long-sleeved cotton shirt and closed-toe shoes (synthetics melt on contact)
- Zero metal jewelry—a wedding ring bridging terminals causes instant welding
Work only in open-air spaces. Garages with closed doors trap explosive hydrogen gas. If you smell rotten eggs (hydrogen sulfide) or see battery case swelling, stop immediately—this is hazardous material requiring professional disposal. Never work near lit cigarettes or phone sparks.
Tools That Actually Free Seized Battery Terminals (No Stripping)

Most auto stores sell $20 “battery kits” with useless plastic tools. Use what you likely own:
| Tool | Critical Purpose | Pro Tip |
|---|---|---|
| 10mm wrench | Fits 80% of domestic/Japanese vehicles | Wrap handle in electrical tape for extra grip |
| 8-13mm socket set | Removes hold-down clamps without slipping | Use 3/8″ drive for tight engine bays |
| Battery terminal puller | Releases corroded cables without twisting posts | Tap gently with hammer if stuck |
| Zip ties | Secures cables away from posts during work | Never let bare terminals touch metal surfaces |
Skip adjustable wrenches—they round off soft lead terminals. If cables resist removal, spray with baking soda solution (1 tbsp per cup water) to neutralize corrosion before loosening.
Locate Hidden Batteries in 60 Seconds (Trunk & Seat Models)
Don’t waste hours searching—modern cars hide batteries in surprising places:
- Engine bay: Check passenger side first (common in Hondas, Fords)
- Trunk: Lift floor mat in BMWs or Chevrolet Malibus—often under false panels
- Under rear seats: Access via pull-tabs in Mercedes or Lexus models
If you see two cables converging toward the firewall but no battery, consult your owner’s manual. Some Volvos tuck batteries behind front-wheel wells—a $150 dealer trick you can avoid.
Step-by-Step: Disconnecting Negative Cable Without Sparks
This sequence prevents 90% of electrical disasters:
- Park on level ground with parking brake engaged
- Place 10mm wrench on negative terminal nut (black cable, marked “-“)
- Turn counterclockwise with steady pressure—never jerk
- When loose, wiggle cable straight up (no side-to-side motion)
- Immediately secure cable to shock tower with zip tie
Critical check: If the wrench sparks during removal, you touched metal elsewhere—stop and reposition. Never let the cable hang loose near the battery.
Removing Positive Cable: Avoiding the “Dead Battery” Mistake
Positive cable removal seems simple—until you cause permanent damage. Most DIYers skip this critical step:
- Wrap wrench jaws in rubber electrical tape (prevents accidental grounding)
- Loosen positive nut (red cable, marked “+”) with counterclockwise turns
- Cover exposed terminal with a rubber cap or thick rag before setting aside
- Double-check both cables are secured 6+ inches from battery
Why this matters: Leaving positive terminals exposed can drain stored charge through accidental contact. If your battery dies after “successful” disconnection, this is why.
Removing Battery Hold-Down Clamps Without Damaging Hardware
Stripped bolts are the #1 reinstallation headache. Identify your clamp type first:
- J-hook bar: Runs across battery top (common in Toyotas)—remove two 10mm bolts
- Side clamp: Bolts through tray (Fords)—loosen 13mm nuts at base
- Wedge block: Plastic piece pressed by single bolt (GM)—tap out with rubber mallet
Pro move: Place a shop rag over hold-down hardware as you unscrew—it catches falling bolts in oily trays. Never force rusted clamps; spray with penetrating oil and wait 10 minutes.
Lifting 40-Pound Batteries Safely: Prevent Acid Spills

Car batteries weigh 30-50 pounds with sloshing acid inside. Lift wrong, and you’ll spill corrosive liquid or herniate a disc:
- Always grip from the bottom—never lift by the top posts (they crack)
- Keep battery perfectly level during removal—tilting causes acid leaks
- Place on wooden board—concrete drains charge through moisture
- Use leg muscles—bend knees, keep back straight
If no handle exists, cradle the battery against your torso with both arms. Never carry it dangling from one hand.
Clean Corrosion in 5 Minutes to Extend New Battery Life
With the battery out, attack hidden problems causing premature failure:
- Scrub tray with baking soda solution using old toothbrush
- Rinse thoroughly with water—corrosion residue conducts electricity
- Inspect cable ends: replace if green/white crust covers >25% of surface
- Apply anti-corrosion spray to terminals before reinstalling
Warning: Never pour baking soda directly on battery—it can seep inside and damage cells. Always apply to brush first.
Short-Term vs. Long-Term Storage: What Mechanics Don’t Tell You
For vacations or seasonal storage:
- Under 30 days: Only disconnect negative cable—keeps clock/radio memory intact
- Over 30 days: Remove battery completely and store on wood shelf
- Ideal storage temp: 40-60°F (garage corners beat attics or sheds)
- Critical step: Connect smart trickle charger in “float mode” (12.6-12.8V)
Myth busted: Storing batteries on concrete doesn’t drain them—but temperature swings do. Always check voltage monthly with a multimeter.
Reconnect in Reverse Order: Avoid Resetting All Your Car’s Computers
Reconnecting wrong triggers system-wide resets. Follow this exact sequence:
- Place battery in tray and torque hold-down to 8-12 ft-lbs
- Connect positive cable FIRST—tighten snugly (1/4 turn past contact)
- Connect negative cable LAST—final connection should have no sparks
- Test immediately: start engine, check headlights, power windows
Expect these resets:
– Radio presets and clock
– Seat/mirror memory positions
– Throttle response “learning” (drive gently for first 10 miles)
Never skip: Clean terminals with wire brush before connecting—corrosion causes voltage drops.
Top 4 Disconnection Mistakes That Cause Towing Bills
| Mistake | Real-World Consequence | How to Fix |
|---|---|---|
| Positive cable first | Blown ECU fuse ($800 repair) | Always negative first |
| Loose hold-down clamp | Broken cables from battery shift | Torque to 10 ft-lbs max |
| Dropping battery | Acid leaks into trunk carpet | Lift with legs, keep level |
| Skipping terminal clean | Slow cranking after reconnection | Scrub with baking soda solution |
One Honda Civic owner fried his transmission module by reconnecting negative before positive—resetting adaptive shift points. The $1,200 repair took 3 weeks.
Quick Reference Checklist for Every Battery Job
- ✅ Engine off, keys removed, parking brake engaged
- ✅ Gloves/goggles on, no metal jewelry
- ✅ Negative cable disconnected FIRST, secured away
- ✅ Positive cable disconnected SECOND, terminal covered
- ✅ Hold-down clamps fully removed
- ✅ Battery lifted level onto wood surface
- ✅ Tray cleaned with baking soda solution
- ✅ Reconnect: positive FIRST, negative LAST
- ✅ Test lights, horn, engine start
- ✅ Reset radio presets and clock
Disconnecting your car battery safely isn’t about strength—it’s about sequence. Follow these steps precisely, and you’ll avoid the $500+ electronic repairs that turn a 10-minute job into a nightmare. When in doubt, photograph each step before disconnecting. Remember: negative first, positive last, and never skip securing those cables. Your car’s computer systems will thank you.


