
That sharp sulfur smell hitting your nostrils isn’t just unpleasant—it’s your vehicle screaming that battery acid is escaping. Whether you spotted crystalline corrosion spreading across terminals or caught the unmistakable rotten-egg odor, a leaking car battery demands immediate intervention. The critical truth? You cannot truly fix a leaking car battery—only safely contain the hazard and replace the unit. This guide delivers precise steps to diagnose the threat, neutralize acid damage, and prevent $1,000+ repairs to wiring and engine components. Within minutes, you’ll know exactly when to call for professional help versus attempting temporary containment.
Ignoring this issue risks chemical burns, electrical fires, and catastrophic vehicle damage. Sulfuric acid eats through metal brackets, wiring harnesses, and paint within hours. But by following this protocol, you’ll protect yourself and your investment while avoiding costly missteps like dangerous DIY “repairs.”
Stop Driving Now: Critical Safety Steps for Acid Leaks
Engine off is non-negotiable the moment you detect battery leakage. Sulfuric acid causes severe chemical burns on contact with skin, while escaped hydrogen gas creates explosive mixtures under your hood. Follow this sequence immediately:
- Kill ignition and exit within 30 seconds—never linger near fumes
- Wait 15 minutes with hood open for gases to dissipate before approaching
- Photograph evidence from all angles before touching anything (vital for warranty claims)
- Call roadside assistance—driving spreads acid damage to $200+ components
Pro Tip: Keep chemical-resistant gloves and baking soda in your trunk. Acid exposure to metal wiring harnesses costs 10x more than battery replacement if ignored. Every minute of continued operation multiplies repair bills exponentially.
Why “Fixing” Leaks Yourself Is Dangerous
Sealing cracks with epoxy transforms your battery into a pressure bomb. Internal gases build behind patches until explosive failure occurs—sending acid shrapnel toward your face. Similarly, adding distilled water to leaked cells creates chemical imbalances that accelerate corrosion. Industry rule: Any visible crack, bulge, or pooled acid means replacement is mandatory.
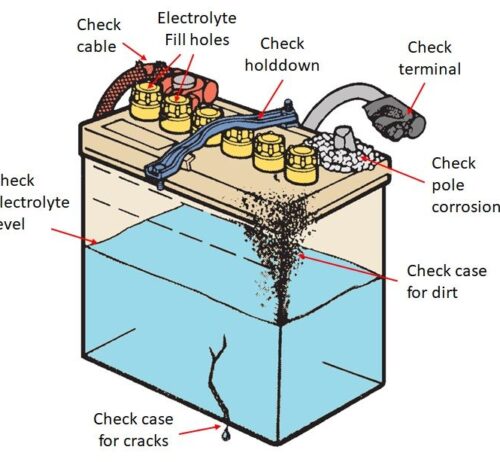
Identify Leak Type From Visual Clues
| Leak Location | What You’ll See | Urgency Level |
|---|---|---|
| Top-side leaks | Wet residue around vents, swollen case, bubbling near terminals | ⚠️ High (overcharging imminent) |
| Bottom leaks | Acid pooling under battery, crystalline buildup in tray | ☠️ Critical (replace NOW) |
| Terminal seepage | Blue-green crust bridging posts, but no liquid trails | ⚠️ Medium (may be vapor condensation) |
Visual Cue: Shine a flashlight at a 45-degree angle across the battery top. Acid trails appear as oily streaks reflecting light—often missed in flat lighting. Use a mirror to inspect the tray underside; 80% of leaks pool there first.
Pinpoint the Exact Cause in 5 Minutes
Overcharging is the silent killer behind 60% of leaks. Your alternator should output 13.8–14.8 volts—anything higher boils electrolyte, forcing acid through vents. Test this:
- Start engine and set multimeter to DC voltage
- Touch probes to battery terminals
- Readings above 15.0V = dangerous overcharging (requires alternator repair)
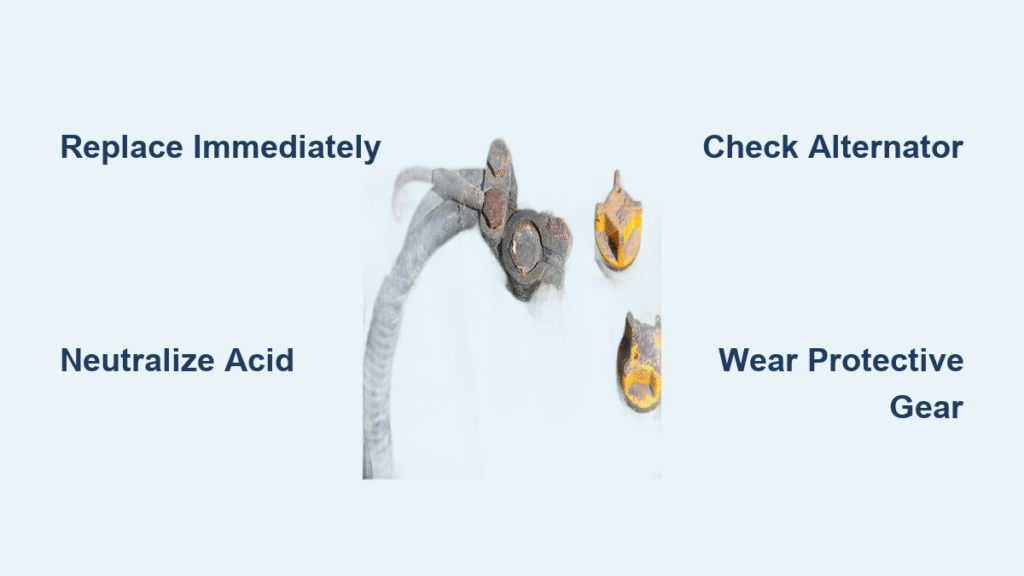
Physical damage shows as hairline cracks along case seams or punctures from loose mounting. Gently wiggle the battery—if it moves more than ¼ inch, vibration caused the breach. Age failure strikes most flooded batteries at 3–5 years when internal grids corrode and crack the case.
Warning: AGM batteries rarely leak but fail catastrophically when they do—any bulge means immediate replacement.
Safe DIY Inspection Without Touching Acid
Never skip PPE: Chemical-resistant gloves, safety goggles, and long sleeves are mandatory. Follow this inspection sequence:
- Document first: Take photos before disturbing corrosion (insurance requires proof)
- Check hold-down: Ensure battery doesn’t rock—loose mounting causes vibration cracks
- Test terminal voltage: Below 12.4V after full charge indicates sulfation (irreversible damage)
- Inspect case seams: Run gloved finger along edges—cracks feel like hairline ridges
Critical Mistake: Rinsing acid with water alone. Always neutralize first with baking soda paste (3 parts soda to 1 water) to stop corrosion. Water spreads acid damage.
Why Professional Replacement Beats DIY “Repairs”
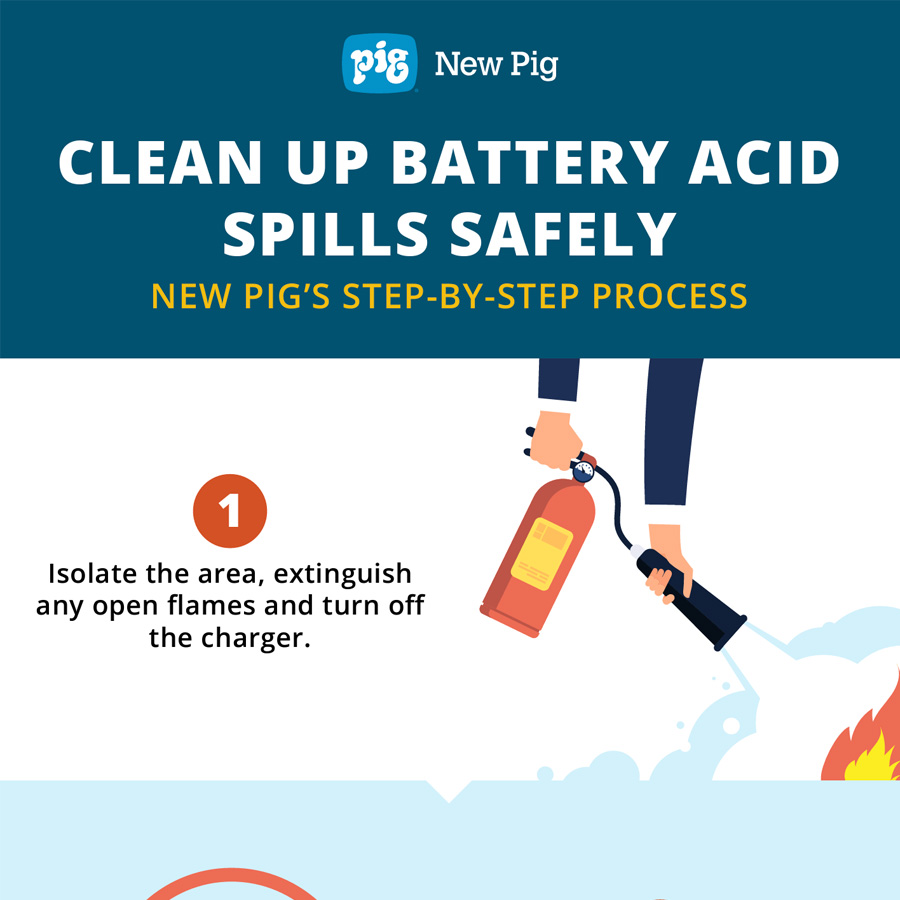
Epoxy sealing fails 100% of the time—internal pressure reopens cracks explosively. Mechanics follow this verified workflow:
- Place battery in acid-resistant containment tray before removal
- Neutralize spills with baking soda slurry until pH hits 7 (tested with strips)
- Clean corroded tray with wire brush and baking soda solution
- Install exact group-size replacement with dielectric grease on terminals
- Test charging system to prevent repeat failure
Cost Reality: A $150 battery replacement prevents $1,200+ in wiring harness repairs. Retailers recycle 97% of components—always use core exchange programs.
Neutralize Acid Spills in Under 10 Minutes
| Surface | Immediate Action | Timing Deadline |
|---|---|---|
| Battery terminals | Apply baking soda paste until fizzing stops, rinse with distilled water | Within 24 hours |
| Metal brackets | Same paste + wire brush scrub, apply rust inhibitor after drying | <1 hour to prevent etching |
| Paint/body panels | Spray commercial acid neutralizer, rinse thoroughly | 5 minutes or permanent etching |
| Skin/clothing | Remove contaminated fabric, flush skin 15+ minutes, seek ER | Seconds matter for burns |
Disposal Rule: Seal contaminated rags in double zip-lock bags—never trash. Auto parts stores accept hazardous waste.
Prevent Leaks With 4-Minute Monthly Checks
Skip this routine and your battery will leak:
- Every oil change: Inspect for case cracks and clean terminal corrosion with baking soda paste
- Every 6 months: Verify hold-down torque (70–89 in-lbs for top posts)
- Before winter: Test charging voltage—below 13.8V risks freezing electrolyte and case cracks
- At 3 years: Proactively replace flooded batteries (label install date on case)
Pro Tip: In extreme heat, shade-park your vehicle. Temperatures above 104°F accelerate grid corrosion by 300%.
Replacement Decision Flowchart
Use this to avoid costly delays:
- Case bulging or cracked? → Replace immediately (no exceptions)
- Voltage below 12.4V after full charge? → Replace if battery is 3+ years old
- Failed load test at auto store? → Replace regardless of age
- Overcharging symptoms (melted vents)? → Replace battery AND repair alternator
Warning: “Refilling” flooded batteries with distilled water after leaks causes immediate failure—electrolyte ratios are permanently unbalanced.
Emergency Response Checklist
Print and keep in your glove box:
- Smell sulfur? → Pull over, engine OFF, exit vehicle
- Gear up → Gloves/goggles on before opening hood
- Photo evidence → Capture all angles for warranty
- Ventilate → Wait 15 minutes with hood open
- Call tow → Never drive with active leak
- Demand charging test → After new battery install
Final Reality Check on Battery Safety
That $150 replacement cost vanishes next to $1,000+ in acid-damaged wiring repairs. Traditional flooded batteries leak 3x more often than AGM designs—but no battery survives a case breach. How to fix a leaking car battery? You don’t. You replace it immediately while containing the hazard.
Remember: 97% of lead-acid batteries get fully recycled. Use retailer exchange programs to avoid hazardous waste fines and recover your core charge. Your safety—and your wallet—depend on treating leaks as nuclear-level emergencies. The moment acid escapes, your battery’s life is over. Act fast, call pros, and drive with confidence knowing you’ve neutralized the threat.


