
That red battery icon just flashed on your dashboard, and your heart skips a beat. You know the drill: dimming headlights, sluggish power windows, and the sinking feeling that your car could die at any moment. This isn’t just a nuisance warning—it means your charging system has failed, and you’re burning through battery power with no recharge. The critical truth? Most battery light issues stem from simple fixes you can handle in under 30 minutes with basic tools. Whether you’re stranded on the highway or noticing flickering lights at stoplights, this guide delivers the exact steps to diagnose and resolve the problem before you’re left stranded.
Don’t panic—this isn’t usually a battery replacement emergency. That light actually monitors your alternator’s output, not battery health. A perfectly good battery will die in minutes if the charging system fails. By following this systematic approach, you’ll pinpoint whether it’s a loose cable, corroded terminal, failing alternator, or belt issue. You’ll learn to perform critical voltage tests, spot dangerous wiring problems, and know when to DIY versus call a tow truck. Most importantly, you’ll regain control before your car stalls completely.
Why Your Battery Light Stays On While Driving
Your dashboard battery light activates when voltage drops below 13.5 volts, signaling your alternator isn’t recharging the battery. During normal operation, this light should extinguish within 3-5 seconds after starting your engine. Persistent illumination means your electrical system is running on borrowed time—your battery is discharging faster than it’s being replenished.
Critical Warning Signs Beyond the Light
- Headlights that dim when idling but brighten when revving the engine
- Power windows moving slower than usual or stopping mid-operation
- Radio cutting out when using climate controls or turning on AC
- Unusual engine heat indicating serpentine belt failure (drives both alternator and water pump)
Immediate Danger Indicators
If you notice power steering suddenly becoming heavy or engine temperature spiking, pull over immediately. These signal complete serpentine belt failure—you’re minutes away from engine overheating and total electrical shutdown. Never ignore these symptoms; continuing to drive risks catastrophic engine damage.
Emergency Power-Saving Steps When Light Appears
When the battery light flashes on during your commute, your window to reach safety is shrinking by the second. These critical actions maximize your remaining driving range and prevent complete immobilization.
How to Extend Your Driving Range by 50%
- Kill non-essential electronics: Turn off AC, heated seats, phone chargers, and infotainment systems immediately
- Reduce lighting load: Switch to daytime running lights only if legal in your area
- Avoid stop-and-go traffic: Maintain steady highway speeds above 35 mph to minimize restart drain
- Disable auto-stop features: Prevent unnecessary engine cycling at traffic lights
Pro Tip: If your headlights dim significantly at idle, shift to neutral at stoplights to slightly increase RPMs and maintain charging voltage. This buys crucial extra minutes to reach a repair shop.
Fix Corroded Battery Terminals in 15 Minutes
Over 40% of battery light issues stem from corroded or loose terminals—fixable with household items. This visual inspection takes 90 seconds and solves most cases.
Step-by-Step Terminal Repair
- Identify corrosion: Look for blue-green crust around terminals (sign of sulfuric acid leakage)
- Disconnect safely: Remove NEGATIVE cable first using a 10mm wrench, then POSITIVE
- Clean thoroughly: Scrub posts and clamps with baking soda paste and wire brush until shiny
- Reconnect properly: Attach POSITIVE cable first, tighten firmly (no movement when twisted), then NEGATIVE
Warning: Never let wrenches touch both terminals simultaneously—this causes dangerous sparks. Always wear nitrile gloves and safety glasses to protect against battery acid.
Diagnose Alternator Failure with a $10 Multimeter
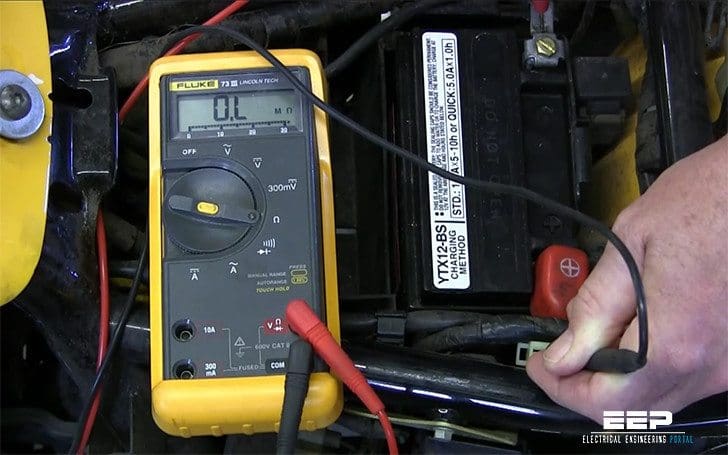
You don’t need expensive tools to confirm alternator problems. This 2-minute voltage test tells you exactly what’s failing and whether you can drive home safely.
What Your Voltage Readings Mean
| Test Condition | Healthy Reading | Danger Zone |
|---|---|---|
| Engine OFF | 12.4-12.7V | Below 12.0V = Weak battery |
| Engine IDLING | 13.8-14.4V | Below 13.2V = Charging failure |
| Engine at 2000 RPM | 14.0-14.7V | Above 15.0V = Overcharging risk |
How to Perform the Test
- Set multimeter to 20V DC setting
- Touch red probe to battery positive terminal, black to negative (engine off)
- Start engine and repeat measurement
- Turn on headlights/AC—voltage must stay above 13.5V under load
If readings stay low even after cleaning terminals, your alternator is failing. Critical note: Below 12.8V while driving means you have less than 10 minutes of driving range left.
Spot Deadly Serpentine Belt Failures Before They Strand You

A snapped or slipping serpentine belt instantly triggers the battery light and disables critical systems. Learn these visual cues during your next oil check to avoid roadside breakdowns.
Belt Failure Warning Signs
- Excessive cracks: More than 3 transverse cracks per inch across the ribs
- Glazed surface: Shiny, hardened rubber that slips on pulleys
- Missing chunks: Sections of the belt visibly worn away
- Tensioner bounce: Arm oscillates more than 1/2 inch when pressed
Action Step: Press the belt midway between pulleys—healthy tension allows only 1/2 inch of deflection. If it moves more than 1 inch, replace the belt and tensioner immediately. Ignoring this risks simultaneous alternator and water pump failure.
Test Battery Health Without Expensive Equipment
A failing battery can falsely trigger the battery light even with a working alternator. Here’s how to assess your battery’s true condition using free resources.
Free Diagnostic Options
- Auto parts store testing: Most offer free load tests showing remaining CCA capacity
- Hydrometer check (for non-sealed batteries): Each cell should read 1.265 specific gravity
- Age assessment: Batteries over 3 years old in hot climates often fail unexpectedly
Replacement Rule: Replace if capacity drops below 70% of original rating or if the case is swollen. A battery older than 5 years is a ticking time bomb—replace proactively before winter.
Reset Battery Light After Repairs Without Scanners
After fixing the underlying issue, your battery light may stay illuminated until the system resets. Avoid expensive shop visits with these DIY reset methods.
Three Guaranteed Reset Techniques
- Drive cycle reset: Run engine at 2,000 RPM for 2 minutes with headlights on
- Battery disconnect: Remove negative cable for 5 minutes (relearns system parameters)
- Fuse pull method: Locate charging system fuse (check manual) and pull for 10 seconds
Important: Disconnecting the battery resets radio presets and engine adaptive memory. Use a $10 memory saver device plugged into the cigarette lighter to preserve settings during repairs.
Prevent Battery Light Emergencies With Monthly Checks
Avoid 90% of charging system failures with this 5-minute monthly routine performed during oil changes.
Critical Maintenance Checklist
- Visual inspection: Look for corrosion, loose cables, or belt cracks
- Terminal wiggle test: Grab cables—zero movement should be possible
- Belt tension check: Press midway—should deflect only 1/2 inch
- Ground connection verification: Clean engine block connection point
Pro Tip: Spray terminals with dielectric grease after cleaning to prevent future corrosion. This $3 product extends terminal life by 2-3 years and costs nothing to apply.
Save $300 on Alternator Repairs With Smart Diagnosis

Misdiagnosing alternator issues wastes money—many “failed alternators” are actually simple wiring problems. Use this cost-saving approach before replacing expensive parts.
DIY Diagnosis Flowchart
- Confirm voltage drop: Test between alternator output stud and battery positive—more than 0.2V difference indicates bad wiring
- Check ground strap: Measure voltage from battery negative to engine block—should be near 0V
- Inspect small sense wire: Often brown/red—must be intact for proper voltage regulation
Cost Reality: Alternator replacement averages $650 at shops but only $400 DIY. However, 30% of “bad alternators” are actually faulty wiring harnesses costing under $50 to fix. Always verify before buying parts.
Never Disconnect Your Battery the Wrong Way
Working on car electrical systems risks expensive damage if safety protocols are ignored. These non-negotiable rules protect you and your vehicle.
Critical Safety Protocol
- ALWAYS disconnect NEGATIVE cable first—prevents accidental short circuits
- NEVER reconnect POSITIVE last—creates dangerous sparking risk
- Wear eye protection—battery acid causes permanent vision damage
- Remove metal jewelry—rings or watches can weld to terminals causing burns
Life-Saving Tip: Place disconnected negative cable where it can’t accidentally touch the battery post. Tape it securely to the fender—stray contact during repairs can fry your ECU.
That battery light is your car’s final warning before electrical collapse—but it doesn’t have to mean disaster. By methodically checking terminals, testing voltage, and inspecting belts, you’ll solve most issues before they strand you. Remember: 80% of charging system failures stem from loose connections or corrosion fixable in 20 minutes with basic tools. For persistent problems, professional diagnosis beats guesswork—many auto parts stores test alternators and batteries for free. Most importantly, act immediately when the light appears; every minute of driving with this warning light drains your battery closer to total failure. Implement the monthly checks outlined here, and you’ll transform this terrifying warning into a manageable maintenance task.


