
Your engine sputters but won’t turn over, or you hear that ominous single click instead of ignition. Before you panic about a dead battery, know this: 70% of “no-start” cases stem from faulty battery connections, not the battery itself. Corrosion, loose clamps, or damaged cables sabotage power flow even with a fully charged battery. The best part? Most how to fix car battery connection issues take under 30 minutes with basic tools you likely own. This guide delivers precise, step-by-step fixes—from a quick tightening trick to full cable replacement—so you can diagnose and solve connection problems like a pro mechanic.
Match Your Symptoms to the Right Fix
Don’t waste time on unnecessary repairs. Pinpoint your exact issue using these real-world failure signs:
- Single loud click when turning the key? → High-resistance corrosion or loose clamp blocking power to the starter
- Car starts after wiggling cables? → Vibration-loose connection (common after hitting bumps)
- Headlights dimming while driving? → Intermittent connection starving your electrical system
- White/green crust around terminals? → Acid corrosion creating electrical resistance
If your battery case shows cracks, leaks, or bulging, stop immediately—replace the battery first. Connection fixes won’t help a failing battery.
Critical Safety Steps Before You Start
Skipping these risks acid burns, electrical shorts, or explosions:
- Engine OFF, key out, parking brake engaged—never work on live circuits
- Remove negative (black) cable FIRST, then positive (red)—reconnect in reverse order
- Wear acid-resistant gloves and sealed goggles—battery acid causes severe eye damage
- Remove metal jewelry—rings or bracelets can spark against tools, melting instantly
- Work in open air—batteries vent explosive hydrogen gas; no smoking or sparks nearby
Pro Tip: Place disconnected cables where they can’t accidentally touch metal surfaces. A dropped wrench bridging positive and ground can melt like lava.
Must-Have Tools for Fixing Battery Connections
| Tool | Why It’s Non-Negotiable |
|---|---|
| 8mm or 10mm wrench/socket | Standard bolt sizes on 95% of vehicles |
| Brass-wire brush | Cleans corrosion without scratching soft lead posts |
| Baking soda + water (1 tbsp/cup) | Neutralizes acid safely (vinegar worsens corrosion) |
| Dielectric grease | Seals out moisture—petroleum jelly degrades in heat |
| Terminal shim kit | Fixes stretched clamps (soda-can aluminum works temporarily) |
Skip the specialty cleaner: A stiff-bristled toothbrush and baking soda paste work for light corrosion. But never use steel wool—it creates conductive debris.
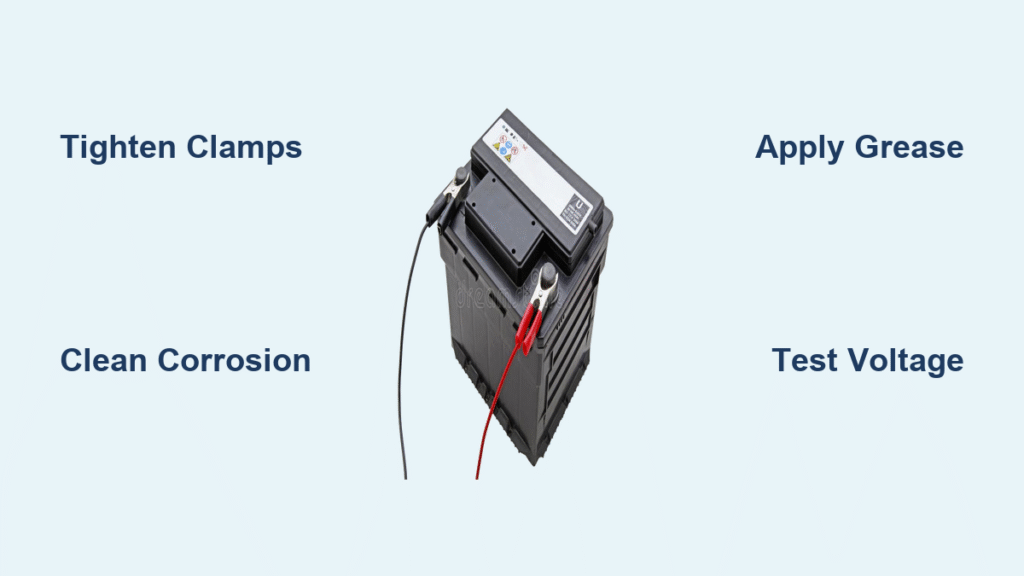
Tighten Loose Connections in 5 Minutes Flat
This fixes 40% of “dead battery” scares:
- Test for looseness: Grab each cable near the clamp and twist. If it moves more than 2mm (1/8 inch), it’s too loose
- Hold the cable steady with one hand to prevent wire twisting
- Tighten the clamp bolt clockwise until snug, then give one-eighth extra turn—no more! Over-tightening strips soft lead posts
- Verify: Clamp shouldn’t budge when you press firmly with your thumb
Warning: If the bolt bottoms out but the clamp still rocks, you need shims—not brute force. Forcing it cracks the terminal.
Eliminate Corrosion That’s Killing Your Connection
Heavy white/green crust requires this 20-minute deep clean:
Disconnect Without Sparking
- Always remove negative (black) cable first, then positive (red)
- Isolate cables so clamps can’t touch metal surfaces
Neutralize and Scrub Properly
- Sprinkle dry baking soda over corrosion until covered
- Dribble water slowly—it will fizz as acid neutralizes
- Scrub posts and clamp interiors with brass brush until shiny metal shows
- Wipe residue with damp rag, then dry thoroughly with paper towels
Reconnect Without Recontamination
- Apply thin dielectric grease layer to post and clamp interior (thick globs trap heat)
- Attach positive cable first, then negative—snug bolts to 5-7 N·m (hand-tight plus 1/8 turn)
Expert Note: Green corrosion under cable insulation means internal wire damage—replace the cable immediately.
Fix Wobbly Clamps with Shims (No Replacement Needed)

When tightening fails because the clamp is stretched:
- Clean post and clamp until bare metal shows
- Cut 0.02-inch brass shim (or soda-can aluminum) into a strip
- Wrap shim once around the battery post—overlap ends slightly
- Slide clamp over shim/post and tighten bolt until snug
- Trim excess shim flush with clamp edge using snips
Why brass? Aluminum corrodes faster. Pre-cut shim kits ($3 at auto stores) outlast DIY fixes by 2+ years.
Replace Only the Damaged Terminal Clamp
Do this if the clamp is cracked, melted, or stripped:
Prepare the Cable
- Cut old clamp off with cable cutters as close as possible
- Strip ½ inch (13mm) of insulation—don’t nick copper strands
- Pull strands straight so they fit fully into the new clamp
Secure the New Connection
- For screw clamps: Insert cable until insulation touches barrel, then tighten screws evenly
- For crimp clamps: Use proper ratcheting crimper—hammer-crimping creates weak spots
- Critical check: 1/8 inch of bare wire must show beyond the barrel for inspection
Time Saver: Match the clamp size to your cable gauge—6 AWG for cars, 4 AWG for trucks. Wrong sizes cause overheating.
Replace Entire Cables When Corrosion Creeps Inside
Replace full cables if you see:
– Green corrosion under insulation
– Brittle, stiff, or melted cable sections
– Multiple repair attempts shortening the cable
Installation Checklist
- Photograph original routing—cables follow specific paths to avoid heat sources
- Disconnect at the far end first: Starter/solenoid (positive) or engine block (negative)
- Remove all protective loom and clips—reinstall on new cable
- Route new cable identically—never stretch or kink
- Connect battery end LAST (negative always goes on last)
Pro Tip: Match OEM cable gauge exactly. Undersized cables cause voltage drops; oversize ones won’t fit clamps.
Verify Your Fix with 3 Critical Tests
Don’t assume it’s working—prove it:
- Physical test: Tug cables firmly—zero movement at clamps
- Visual check: No gaps between post and clamp; all surfaces coated with dielectric grease
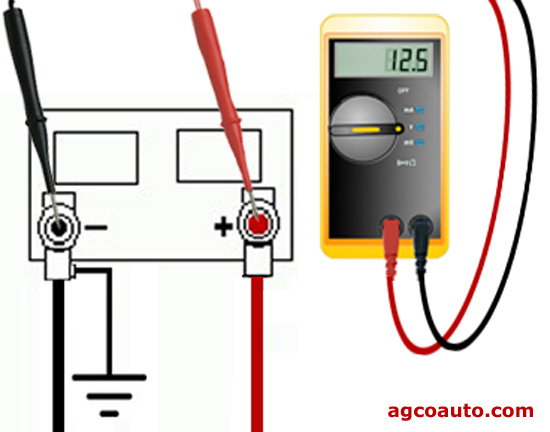
- Voltage drop test:
- Set multimeter to DC volts
- Probe battery post (+) and clamp (+) simultaneously
- Crank engine—reading must stay below 0.2V (higher = poor connection)
If voltage drops exceed 0.2V, repeat cleaning or replace clamps. A healthy connection shows 12.4-12.6V engine-off and 13.8-14.4V running.
Prevent Repeat Failures with Smart Maintenance
Make connection issues vanish for years:
- Every oil change (5,000-7,500 miles):
- Quick visual inspection for early corrosion
- Retighten bolts if needed (lead posts settle over time)
- Every 6 months:
- Full cleaning with wire brush
- Reapply dielectric grease to posts/clamps
- When installing new batteries:
- Always clean terminals first—never slap on new clamps over corrosion
Critical Insight: Green corrosion under insulation means acid penetrated the cable—replace immediately to avoid fire risks.
When to Call a Professional Immediately
Stop DIY repairs if you see:
– Battery posts spinning inside the case (internal failure imminent)
– Cracks or acid leaks from the battery casing
– Melted cable insulation (indicates dangerous charging system faults)
– Electronics resetting after your fix (points to deeper wiring issues)
These signal complex electrical problems beyond simple connection fixes. A mechanic can diagnose alternator faults or wiring harness damage that DIY methods miss.
A rock-solid battery connection means reliable starts for years. By mastering these targeted fixes—from 5-minute tightening to precision corrosion cleaning—you’ll solve 90% of “no-start” emergencies faster than a tow truck arrives. Remember: always disconnect negative first, use dielectric grease religiously, and verify with voltage tests. Keep this guide in your glovebox, and you’ll never pay $150 for a $15 connection fix again. For persistent issues, consult a professional—your safety is worth more than any shortcut.


