
Your key fob suddenly goes silent when you press unlock—no chirp, no flashing lights, just frustrating silence. Before calling roadside assistance or heading to the dealership, understand this: 9 out of 10 remote failures stem from a dead battery, not a broken fob. This common issue costs under $5 to fix and takes less time than your morning coffee break. Whether you’re stranded at the grocery store or preparing for future emergencies, this guide delivers the exact steps to revive your key fob immediately. You’ll discover how to identify battery failure signs, select the correct replacement, and avoid critical installation mistakes that leave you locked out.
Recognize Dead Car Remote Battery Symptoms
Spotting battery failure early prevents unnecessary panic and wasted money on professional services. These unmistakable signs confirm your battery needs replacement rather than complex repairs.
No Vehicle Response When Pressing Buttons
- Your car shows zero reaction when pressing unlock or lock buttons
- Rapidly pressing remote multiple times fails to trigger any action
- Critical indicator: Smacking the fob against your palm produces no temporary improvement
- Complete absence of door movement, horn chirps, or light flashes
Decreasing Remote Range and Functionality
- Remote only works when standing directly next to your vehicle
- Some buttons function while others remain unresponsive
- Increasingly firm button presses required to get any response
- Gradual reduction in operational distance over weeks signals impending failure
Total Remote Failure Signs
- LED indicator (if visible) stays dark during button presses
- New batteries fail to restore functionality (indicates deeper issues)
- Red flag: Physical damage like cracks or water exposure visible on fob exterior
Collect Your Battery Replacement Toolkit

Having the right tools ready prevents mid-repair frustration and potential fob damage. Most items are household staples, while batteries cost less than a cup of coffee.
Essential Opening Tools for Any Fob Design
- Small flathead screwdriver: Your primary tool for prying seams (1/8-inch width ideal)
- Quarter or nickel: Perfect for notch-based fobs when screwdrivers are unavailable
- Butter knife: Flexible alternative that won’t scratch plastic surfaces
- Tiny Phillips screwdriver: Required only for older models with visible screws
Selecting the Correct Replacement Battery
- CR2032: The industry standard (80% of modern vehicles including Toyota, Ford, GM)
- CR2025: Thinner alternative for compact fobs (common in Mercedes and BMW)
- CR1620: Specific to Honda CR-V and older Acura models
- Dual-battery systems: Required for performance vehicles like Ford Mustang Shelby
Pro Tip: Always buy multipacks ($5-$10 at pharmacies or auto stores)—you’ll need spares within 2-4 years. Verify your exact battery type by checking the old battery’s engraved code before disposal.
Extract Physical Key Before Opening Fob
Removing the emergency key first creates crucial access points and prevents damage to internal components during opening.
Ford, Chevy, and Dodge Key Removal
- Locate the small release button along the fob’s side edge
- Press firmly while pulling upward on the silver key portion
- Warning: Forcing without pressing the release button cracks internal clips
- Creates a perfect slot for screwdriver insertion after removal
Honda and Acura Key Extraction
- Find the sliding switch on the fob’s back panel
- Push the switch while pulling the key straight out
- Critical step: Never twist the key—Honda mechanisms break easily
- Reveals a deep cavity ideal for prying tools
Volkswagen Key Release Technique
- Press the front button to extend the key from the top housing
- The key swings away but remains attached to the fob body
- Advantage: Creates immediate separation space without tools
- Works identically on Audi and Porsche key fobs
Open Key Fob Without Damage
Forcing open your remote cracks plastic housings and breaks fragile internal clips. These manufacturer-specific techniques preserve your fob’s integrity.
Notch-Based Opening (Most Common Method)
- Locate the tiny slot along the fob’s seam (often near key release)
- Insert coin edge or screwdriver tip into the notch
- Apply gentle twisting motion—never force violently
- Work around the entire perimeter until halves separate
- Pro move: Use your extracted key as a prying tool in the cavity
Seam Separation for Slotless Fobs
- Choose any inconspicuous point along the fob’s seam
- Slide butter knife or screwdriver between halves and lift
- Continue prying at 3-4 strategic points around the perimeter
- Critical: Apply steady upward pressure—not sideways force
- Common on newer Hyundai and Kia models without visible slots
Screw-Release Fob Opening
- Identify the tiny Phillips screw on the fob’s back (near keyring loop)
- Turn counterclockwise with micro-screwdriver—stop immediately if resistance increases
- Store screw in a resealable bag to prevent loss
- Warning: Stripped screws require fob replacement—apply minimal pressure
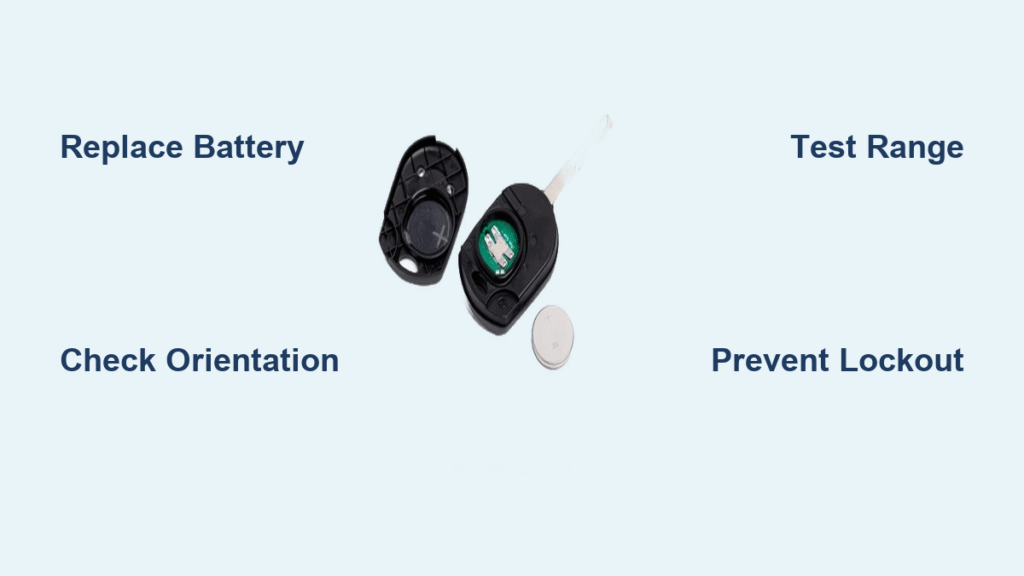
Install Replacement Battery Correctly

Battery orientation errors cause 70% of “failed” replacements. These steps ensure perfect installation every time.
Remove Dead Battery Safely
- Locate: Silver coin battery sits centered in the compartment
- Extract: Slide screwdriver under edge and lift gently—never pull straight up
- Clip handling: If metal clips secure the battery, lift them outward slowly
- Critical: Broken clips mean fob replacement—handle with extreme care
Position New Battery Flawlessly
Orientation is everything—follow these steps precisely:
1. Examine the fob’s back cover for engraved “+” and “-” symbols
2. Match the old battery’s positioning exactly (take phone photo before removal)
3. Most fobs require the positive (+) side facing upward
4. Press firmly until battery seats completely—no wobbling
– Pro tip: Clean terminal contacts with alcohol wipe before installation for optimal conductivity
Test and Troubleshoot Immediately
Rushing reassembly causes avoidable failures. Proper testing confirms success and catches errors before sealing the fob.
Reassemble with Precision
- Alignment is critical: Match top/bottom halves perfectly before pressing
- Apply even pressure around entire perimeter until distinct clicks occur
- For screw-held fobs: Tighten just until resistance—overtightening cracks plastic
- Visual check: Ensure no gaps along the seam before final testing
Functional Testing Protocol
- Stand 10-15 feet from your vehicle (critical distance test)
- Press any button—doors should respond instantly
- Test all features: Lock, unlock, trunk release, panic button
- Redo if: Response requires standing within 3 feet of vehicle
Fix Common Post-Replacement Failures
If fob remains unresponsive:
– Immediate fix: Reverse battery orientation (90% success rate)
– Check seating: Reopen and verify battery isn’t tilted in compartment
– Clip inspection: Confirm no broken retention clips inside housing
– Moisture check: Dry any condensation with microfiber cloth
Persistent failure means:
– Internal circuit damage requiring professional replacement
– Older vehicles needing fob reprogramming (rare for battery changes)
– Never attempt duct tape fixes—moisture destroys electronics
Prevent Future Battery Emergencies
Smart drivers avoid lockouts through simple maintenance habits that extend battery life and prepare for failures.
Proactive Battery Maintenance
- Clean terminals: Wipe contacts with alcohol pad during each replacement
- Spare battery stash: Keep two extras in glove compartment (check expiration yearly)
- Range monitoring: Test operational distance monthly—decline signals replacement time
- Button hygiene: Disinfect buttons weekly to prevent sticky residue buildup
Environmental Protection Tactics
- Extreme temperatures: Remove batteries from spare fobs during winter storage
- Moisture defense: Apply silicone sealant around seams after battery changes
- Recycling protocol: Return dead batteries to auto store collection bins—never trash
- Storage rule: Keep spare fobs in anti-static bags away from electronics
Know When to Seek Professional Help
Battery replacement solves most issues, but recognize these situations requiring expert intervention.
Broken Fob Warning Signs
- New battery fails to restore any functionality
- Visible internal damage like cracked circuit boards
- Buttons feel mushy or don’t click when pressed
- Water damage evident around battery compartment
Smart Replacement Options
- Dealership: Most expensive ($200-$400) but includes programming
- Locksmith: 40% cheaper than dealers with same-day service
- Aftermarket fobs: Budget option ($25-$60) for vehicles over 5 years old
- Programming note: Most post-2010 vehicles require professional programming after battery replacement
Final Tip: Mark your calendar when replacing your car remote battery—these power sources typically last 2-4 years under normal use. Keeping this record prevents unexpected lockouts and ensures you always have a spare battery ready when the next failure strikes. With this knowledge, you’ve transformed from a frustrated driver into a self-sufficient problem-solver who never pays for simple battery replacements again.


