
That white, crusty buildup on your battery terminals isn’t just ugly—it’s actively sabotaging your car’s electrical system. When corrosion blocks the connection between your battery posts and cables, your engine struggles to crank or may not start at all. The good news? You can completely eliminate dangerous battery corrosion using common household items in under 30 minutes. This guide reveals the exact professional-grade cleaning process, plus critical prevention methods to stop corrosion from returning. Skip the expensive dealership visit and save yourself from roadside assistance calls by mastering these essential car maintenance skills.
Spot Corrosion Before It Leaves You Stranded
Corrosion manifests as white, ashy deposits on battery posts and cable clamps, with blue-green crust appearing when copper components oxidize. This buildup creates electrical resistance that starves your starter motor of power. Ignoring early warning signs often leads to complete failure when you least expect it—like during your morning commute or after a grocery run.
Critical symptoms demanding immediate action include:
– Noticeably slower engine cranking than usual
– Flickering dashboard battery warning light
– Intermittent stalling while driving
– Headlights dimming significantly at idle
Pro inspection technique: Always check after the engine cools for 30 minutes to avoid burns. Pop your hood and examine both terminals—even a thin, powdery layer thinner than a dime can cause starting issues. Shine a flashlight at an angle to reveal subtle buildup hiding under clamps. If you see crust extending beyond the terminal posts onto cables, you’ve got advanced corrosion requiring urgent cleaning.
Why Battery Corrosion Forms and Keeps Returning
Hydrogen Gas Reactions During Charging
Your battery naturally releases hydrogen gas as it charges and discharges. This invisible gas reacts with lead posts and copper cables, creating the white powder you see. Under-hood temperatures above 90°F dramatically accelerate this chemical reaction—explaining why corrosion explodes in summer months. The fizzing you hear during cleaning confirms this neutralization process in action.
Overcharging System Malfunctions
An alternator outputting more than 14.4 volts forces excessive electrolysis, boiling your battery’s electrolyte and venting acid vapor. If corrosion returns within weeks of cleaning, your charging system is likely faulty. Test with a multimeter: with the engine running, voltage should read 13.8-14.4V at idle. Anything higher indicates dangerous overcharging that requires professional diagnosis.
Aging Battery Breakdown
Batteries over 3-4 years develop internal weaknesses that increase gas venting. Micro-cracks form around posts as the case ages, allowing sulfuric acid vapor to escape directly onto terminals. If your battery shows swelling or leaks, cleaning won’t solve the problem—replacement becomes necessary immediately to prevent under-hood damage.
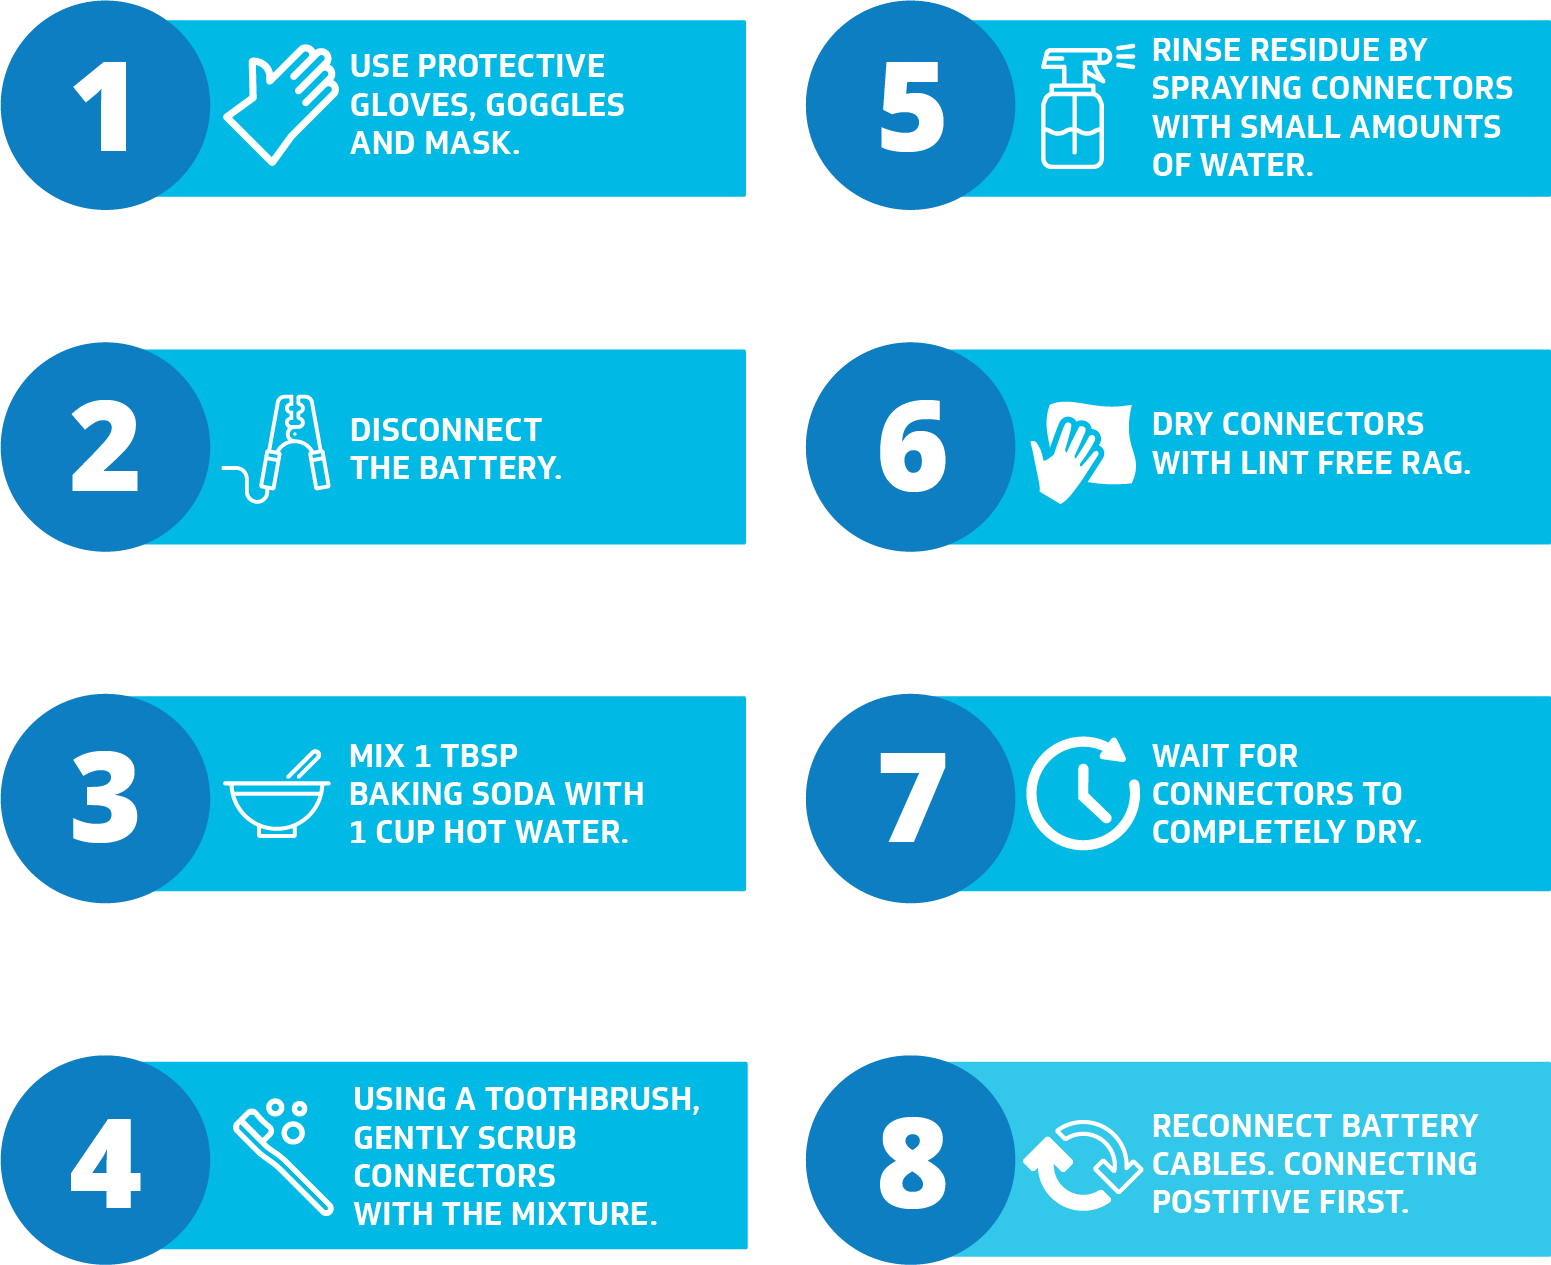
Essential Safety Setup Before Cleaning
Non-negotiable protection gear:
– Safety goggles (battery acid causes permanent eye damage)
– Chemical-resistant nitrile gloves
– Well-ventilated workspace (hydrogen gas is explosive)
Critical disconnection sequence:
1. Turn off ignition and remove keys
2. Disconnect NEGATIVE (black) cable FIRST using a wrench
3. Cover exposed positive terminal with a dry cloth
4. Secure cables away from battery
Memory preservation trick: Connect a $20 battery tender to your cigarette lighter before disconnecting cables. This maintains radio presets, clock settings, and engine computer memory without risking sparks. Never disconnect positive first—that creates dangerous short-circuit potential against grounded metal.
Proven Cleaning Solutions That Actually Work
Baking Soda Power Formula
- Light corrosion: Mix 1 tbsp baking soda + 1 cup water in spray bottle
- Heavy buildup: Create thick paste with 4 tbsp baking soda + ¼ cup warm water
- Application tip: Pour directly onto corrosion—vigorous fizzing confirms acid neutralization
Commercial Product Truths
- Battery terminal cleaner spray: Penetrates deep in 2 minutes but requires thorough rinsing
- WD-40 Specialist Electrical Contact Cleaner: Dissolves residue without sticky aftermath
- Critical warning: Avoid regular WD-40—it leaves conductive residue attracting more dirt
Step-by-Step Corrosion Removal Process
Critical Pre-Cleaning Inspection
Examine the battery case for swelling, cracks, or leaks before proceeding. If sides bulge outward or acid stains appear, STOP—cleaning won’t fix internal failure. Replace the battery immediately following proper disposal protocols at auto parts stores.
Terminal Removal Techniques
1. Loosen negative terminal bolt while clearing debris with wire brush
2. For seized bolts: Apply penetrating oil, wait 5 minutes, then tap wrench gently with hammer
3. Wiggle clamps side-to-side—never force them (risk breaking posts)
4. Warning: Severely corroded clamps often crumble—have universal replacement kit ready
Deep Cleaning Protocol
- Pour baking soda solution directly onto corrosion (expect vigorous fizzing)
- Let sit 2-3 minutes on heavy deposits—do not let dry
- Scrub posts with dedicated battery brush (circular motion)
- Clean inside clamps thoroughly with toothbrush
- Pro move: Brush away from vent caps to prevent solution entering cells
Rinse and Dry Essentials
Flush with clean water until runoff runs clear—residual cleaner accelerates new corrosion. Dry completely using compressed air or lint-free cloth; moisture trapped under clamps reignites corrosion within days. Never skip this step—evaporation takes too long in humid climates.
Reassembly and Long-Term Protection

Correct Connection Sequence
- Slide positive (red) clamp onto post FIRST
- Snug bolt to manufacturer torque (usually 5-8 ft-lbs—hand-tight plus 1/4 turn)
- Repeat for negative terminal
- Critical: Never overtighten—stripped posts require costly repairs
Corrosion-Proofing Layers
- Dielectric grease: Apply thin layer ONLY on outside surfaces (never between post and clamp)
- Felt washers: Soak in petroleum jelly, place under clamps to absorb acid vapor
- Terminal protector spray: Creates invisible moisture barrier—reapply every 6 months
Prevent Future Corrosion with Smart Maintenance
Seasonal Prevention Schedule
- Every oil change: Quick visual check for early buildup
- Spring/Fall: Full cleaning and protection renewal
- After jump-starts: Immediate terminal inspection (acid spray risk)
Environmental Controls
Tighten battery hold-down clamps monthly—vibration widens post gaps for acid escape. Park in shaded areas during summer heat waves. Replace batteries older than 4 years proactively—even “good” units develop micro-leaks. If corrosion returns within 30 days, get your alternator tested immediately.
When Cleaning Isn’t Enough: Advanced Fixes
Terminal Clamp Replacement
If clamps crumble during cleaning, cut ½ inch off cable ends using wire cutters. Slide on new universal clamp, crimp securely with pliers, then seal with heat-shrink tubing. Test conductivity with multimeter before reassembly—resistance should read near zero ohms.
Charging System Diagnostics

Persistent corrosion demands voltage testing:
– Engine off: Battery should read 12.6V
– Engine running: Must stay between 13.8-14.4V
– Higher readings indicate alternator failure
– Fluctuating readings suggest bad voltage regulator
Dangerous Mistakes That Worsen Corrosion
Never use Coca-Cola despite viral hacks—phosphoric acid dissolves corrosion but leaves sugar residue attracting insects and new corrosion. Skipping the rinse step guarantees rapid reformation—baking soda residue becomes conductive when wet. Touching corrosion powder risks chemical burns—always wear gloves and wash hands thoroughly afterward. Most critically, assuming corrosion means dead battery leads to unnecessary replacements—always perform a load test first.
7-Step Corrosion Emergency Checklist
- Gear up: Safety goggles and nitrile gloves on
- Disconnect: Negative cable first, cover positive terminal
- Inspect: Check for battery swelling or leaks
- Neutralize: Apply baking soda paste to fizzing corrosion
- Scrub: Use dedicated battery brush on posts and clamps
- Dry: Compressed air in tight spaces, lint-free cloth elsewhere
- Protect: Install felt washers, apply dielectric grease, reconnect positive-first
Clean battery terminals deliver 100% electrical power to your starter—critical for reliable starts in cold weather. By dedicating just 15 minutes twice yearly to corrosion prevention, you’ll avoid $100+ roadside assistance calls and extend your battery’s life by 2+ years. Remember: that harmless-looking white powder is actively robbing your car of starting power right now. Grab your baking soda and wrench today—your future self will thank you when the engine fires right up on that freezing winter morning. Stay proactive, stay mobile.


