
Your car battery dies overnight—again. You charged it yesterday, but this morning it’s stone dead. This frustrating cycle means you’re battling parasitic drain on car battery—a hidden electrical leak that murders even healthy batteries in hours. Most drivers waste money replacing batteries when the real culprit is a 200mA drain they can fix in under an hour. In this guide, you’ll learn exactly how to diagnose and stop parasitic drain before it strands you, saving hundreds in unnecessary replacements.
Modern vehicles need 40-85mA to maintain radio presets and computer memory—that’s normal. But when drain exceeds 100mA, your 74Ah battery could die in just 3 days. A 1-amp draw? Flat by breakfast. The good news: 90% of parasitic drain cases stem from simple fixes like stuck relays or miswired accessories. Let’s pinpoint and eliminate your drain.
Identify Battery-Killing Drain Symptoms Immediately
Spot Danger Signs Before Your Battery Dies
- Battery dies after 48 hours parked (normal drain takes weeks)
- Voltage drops below 12.4V overnight (healthy battery should stay above 12.6V)
- Dashboard lights flicker when inserting key
- Radio resets presets daily
- Door locks cycle randomly when parked
These aren’t “bad battery” signs—they’re red flags for parasitic drain. A 400mA Bluetooth unit wired wrong can kill a 74Ah battery in 7 days. Catch it early before deep discharges ruin your battery.
Know Critical Drain Thresholds by Vehicle Age
Normal drain levels:
– Pre-2000 vehicles: Under 50mA (older systems have fewer modules)
– Modern cars: 40-85mA (ECU, keyless entry, and infotainment need power)
Emergency drain levels:
– 100-200mA: Battery dies in 3-7 days (investigate now)
– 200mA+: Dead overnight (immediate action required)
– 1+ amp: Flat within hours (common with stuck relays)
Your 74Ah battery won’t survive 24 hours with a 1-amp drain. Measure properly before assuming the worst.
Eliminate Drain Without Spending a Dime
Night Inspection for Hidden Power Hogs
Close all doors and wait 5 minutes. Use your smartphone camera in video mode to scan:
– Glove box and trunk lights (common culprits in Hondas and Fords)
– Aftermarket LED strips under dash (glow faintly even when “off”)
– OBD-II ports (dash cams or trackers drawing power)
Smartphone cameras detect light invisible to the naked eye. One Jeep owner found a 300mA drain from a pinched tailgate wire glowing through his trunk liner.
Heat-Check Relays and Modules
After 30 minutes shutdown, feel these components:
– Fuel pump relay (top offender in Ford vans)
– HVAC blower relay (common in GM trucks)
– Amplifier housing (aftermarket stereos often back-feed)
Warm relays mean current flow. A stuck Ford fuel pump relay often hits 3 amps—enough to kill your battery before coffee. Don’t skip this free diagnostic step.
Purge Power-Sucking Accessories
Remove these modern battery killers:
– USB chargers (many 12V ports stay live)
– Hardwired dash cams (check wiring diagrams)
– Radar detectors with constant memory
– Phone mounts with wireless charging
A single scotch-locked dash cam wire can add 400mA. Unplug everything non-essential before testing.
Critical Tools for Accurate Drain Diagnosis

Must-Have Multimeter Setup
Your DMM must:
– Read mV accurately (0.1mV resolution for voltage-drop method)
– Use the 10A fused port (unfused ports melt during initial tests)
– Have alligator clip leads (prevents dangerous disconnections)
Skipping these specs risks melting meter leads. Always start on 10A scale—switch to mA only after confirming <200mA draw.
Pro Tools That Save Hours
- Inductive amp clamp (non-invasive testing for high drains)
- Fuse voltage-drop tables (ATO/Mini/Micro2 fuses)
- Battery disconnect switch (preserves radio memory during repairs)
For modern cars with complex modules, voltage-drop testing prevents waking computers during diagnosis.
Measure Total Quiescent Draw Correctly
4-Step Measurement Protocol
- Fully charge battery (12.6V+ open-circuit reading)
- Disable under-hood light (pull bulb or wedge switch)
- Wait 15-90 minutes for full sleep mode
- Connect DMM inline on negative cable (10A scale first)
Critical mistake: Opening doors after sleep mode resets computers. Tape door latches closed during testing.
Decode Your Ammeter Reading
- 25-85mA: Normal (Jaguar XJR drops to 74mA after 45 minutes)
- 100-200mA: Investigate immediately (common in older Jeeps)
- 200mA+: Definite problem (Bluetooth units often hit 400mA)
⚠️ Warning: If reading exceeds 2 amps, switch to inductive clamp—prolonged 20A testing melts meter leads.
Pinpoint Drain with Voltage-Drop Method
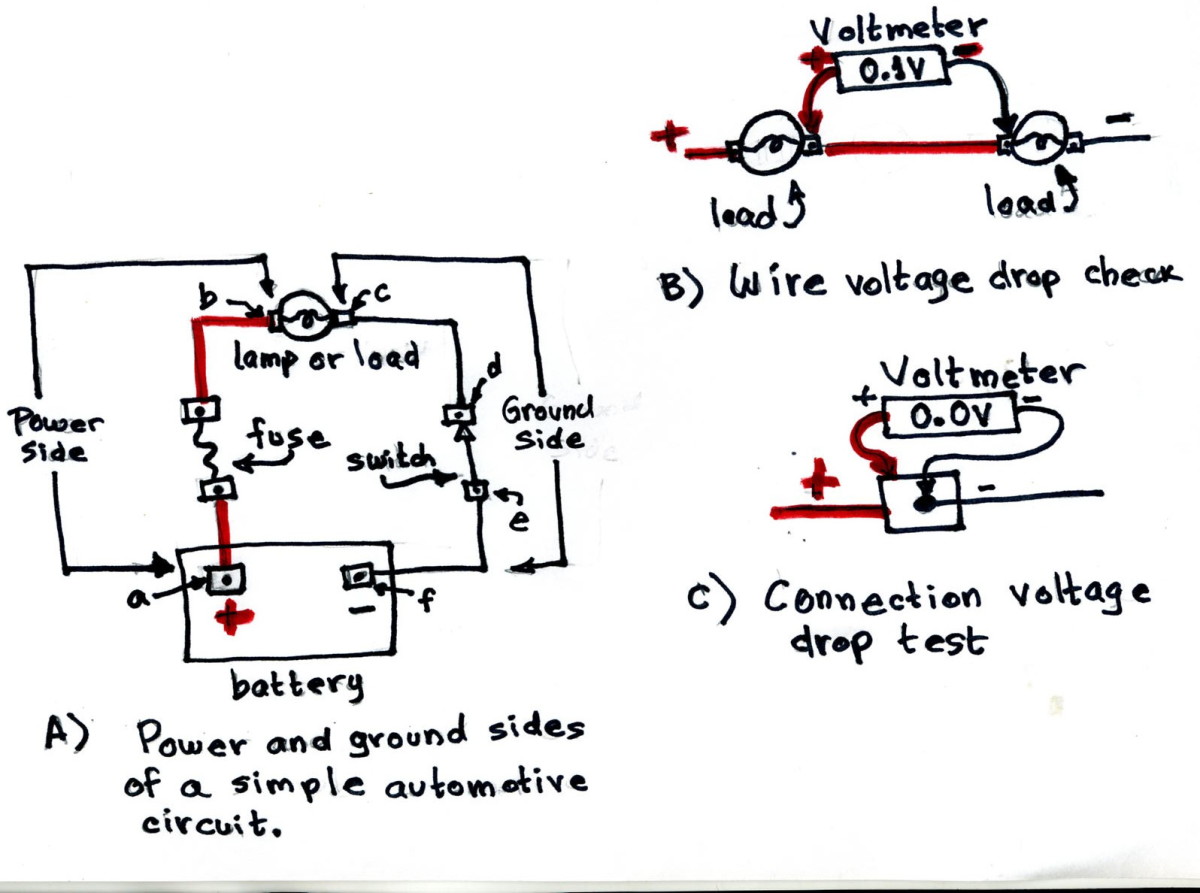
Why This Beats Fuse Pulling in Modern Cars
Pulling fuses wakes sleeping modules, giving false readings. Voltage-drop measures current through fuses without disturbing sleep mode—essential for post-2000 vehicles.
3-Step Fuse Testing Sequence
- Set DMM to mV DC after car achieves sleep mode
- Probe both test points on every fuse (consult service manual for hidden boxes)
- Calculate current using voltage-drop tables (9mV on 15A mini-fuse = 1.77A)
Target fuses showing >5mV (≈1A draw). Common culprits: radio memory (5-50mA), alarm systems (20-100mA), and BCM modules (20-60mA).
Traditional Fuse Pulling for Older Vehicles
When to Use This Method
Stick with fuse pulling if:
– Your vehicle predates 2000
– It has minimal electronics (no CAN bus)
– You lack voltage-drop tables
Older systems won’t reset when you pull fuses.
Foolproof Fuse Removal Process
- Keep DMM connected inline recording total draw
- Pull fuses one by one (wait 10 seconds after each)
- Note sudden drops in amperage
- Reinstall each fuse before moving to next
Pro Tip: Swap suspect relays with identical non-critical ones (horn relay). If drain stops, you’ve found the culprit.
Fix Top 4 Parasitic Drain Sources
Aftermarket Accessory Wiring Fixes
Problem: Bluetooth unit wired to constant 12V (Parrot units often draw 400mA)
Solution:
– Rewire to ignition-switched circuit using relay
– Use 16-18 AWG wire with 5-10A inline fuse
– Secure connections with heat shrink (no scotch locks)
Improper crimping alone can add 200mA. Always use relay-triggered wiring for accessories.
Stuck Relay Emergency Repair
Diagnose:
– Pull relay and feel for warmth (indicates welded contacts)
– Swap with identical relay (e.g., horn relay)
Fix:
1. Replace relay (common in fuel pump/starter circuits)
2. Inspect socket for heat damage
3. Clean terminals with electrical contact spray
Ford vans frequently have HVAC blower relays stuck at 3A—replacing the $5 relay solves 80% of cases.
Alternator Diode Failure Test
Symptoms:
– 0.5-3A drain with battery overcharging (15V+)
– Headlights brighten as RPM increases
Test:
1. Disconnect alternator B+ wire
2. If drain vanishes, replace alternator
3. Check for corrosion on ground straps
Shorted diodes create a direct battery-to-ground path—common in high-mileage vehicles.
Wiring Short Circuit Repair
Locate problem areas:
– Door harnesses (flexing wires near hinges)
– Tailgate wiring (Jeep Cherokee latch harness pinch points)
– Engine bay (heat-damaged insulation)
Repair sequence:
1. Cut damaged harness section
2. Solder new wire with heat shrink
3. Re-wrap with cloth tape (never PVC in engine bay)
A chafed wire drawing 300mA can kill your battery in 10 days—fix before corrosion worsens.
Prevent Future Battery Drain Forever
Monthly Maintenance Routine
- Check battery voltage (12.6V = healthy, 12.2V = 50% discharged)
- Clean terminals with baking soda/water mix
- Tighten connections (shouldn’t wiggle)
- Test charging system (13.8-14.4V while running)
A loose terminal creates resistance that mimics parasitic drain—always verify connections first.
Long-Term Storage Protocol
- Install quick-disconnect switch on negative post
- Use smart maintainer (0.8-1.5A with float mode)
- Add solar trickle charger (1.5W panel for classics)
Never disconnect positive first—always negative to prevent shorts. For storage over 2 weeks, a disconnect switch preserves memory without drain.
Real Drain Fixes That Worked
2010 Honda Civic Bluetooth Drain
- Problem: Parrot unit wired to constant 12V → 400mA drain
- Fix: Rewired to ignition-switched circuit with relay
- Result: Battery lasts 3+ weeks parked
1998 Jeep Grand Cherokee Key Issue
- Problem: Ignition switch allowing ACC position → 1A drain
- Fix: Installed bracket blocking ACC selection
- Result: Zero drain for 2+ years
Jaguar XJR Trunk Switch Fix
- Problem: Boot open switch keeping BCM awake → 74mA
- Fix: Adjusted micro-switch on latch
- Result: Normal 47mA sleep restored
Your Parasitic Drain Repair Checklist
Before testing:
– [ ] Battery fully charged (12.6V+)
– [ ] All lights/accessories confirmed off
– [ ] Waited 15+ minutes for sleep mode
During diagnosis:
– [ ] Measured total draw (target <85mA)
– [ ] Used voltage-drop method on fuses
– [ ] Identified circuit causing abnormal draw
After repair:
– [ ] Retested quiescent draw
– [ ] Verified <85mA final reading
– [ ] Documented fix for future reference
Most parasitic drain cases stem from simple errors like miswired accessories or stuck relays. By following this systematic approach, you’ll diagnose and fix how to fix parasitic drain on car battery issues efficiently—often in under an hour. Stop replacing batteries and start solving the real problem. Your next jump-start could be your last.


