
Your Prius dashboard suddenly flashes the dreaded red triangle warning with “Check Hybrid System” while your fuel economy plummets from 50 MPG to barely 35 MPG. The electric assist vanishes, leaving your hybrid sluggish and unresponsive. If you’re searching for how to fix Toyota Prius hybrid battery issues, you’re not alone—over 60% of Gen 3 Prius owners face this between 8-12 years of ownership. This guide delivers proven, cost-effective solutions to diagnose, repair, and prevent battery failure without dealership prices. You’ll learn exactly how to identify weak modules, execute safe DIY repairs, and make informed decisions between replacement strategies—all based on verified hybrid system expertise.
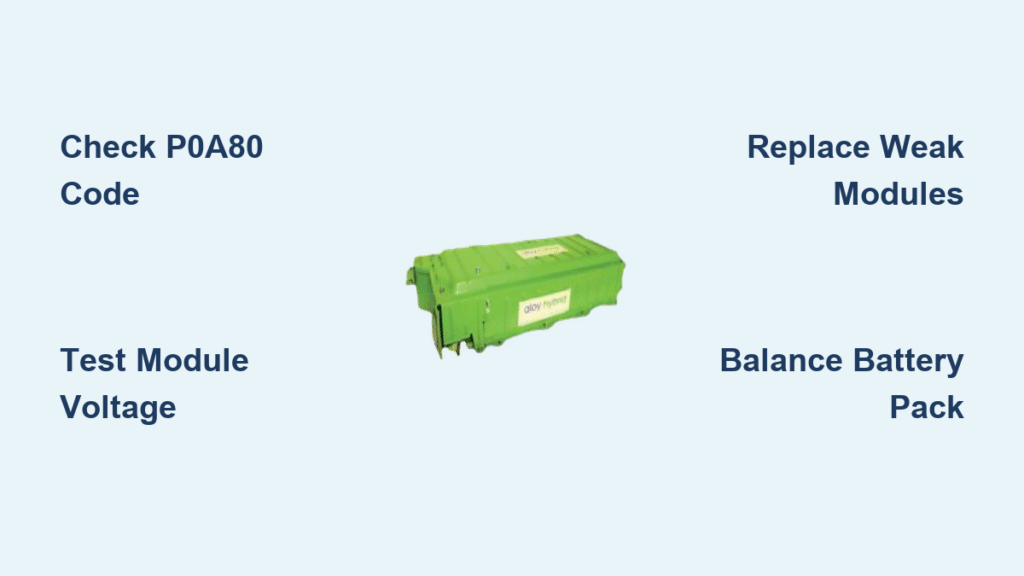
Diagnose Prius Hybrid Battery Failure
Triangle Warning Light Meaning
That red triangle warning triggers over 100 possible error codes—not all indicate battery failure. Confirm it’s actually your hybrid battery by checking for these critical symptoms:
– 20-30% fuel economy drop during city driving
– Complete loss of electric assist when accelerating from stops
– Engine surging or stalling during low-speed EV mode operation
– Car running exclusively on gasoline engine with no hybrid transition
If these accompany the P0A80 diagnostic code, your battery pack is failing. Never replace modules based on the warning light alone—always verify with proper diagnostics.
Read Diagnostic Codes
Skip guesswork by capturing precise error codes using these tools:
– OBD2 scanner compatible with hybrid systems (like Launch CRP129)
– Dr. Prius app ($10) for smartphone-based battery health analysis
– Toyota Techstream software (preferred for professional-grade data)
Focus on these critical codes:
– P0A80: Direct “Replace Hybrid Battery Pack” command
– P3011-P3020: Pinpoints specific weak battery blocks (e.g., P3015 = Module 15 failure)
– P0AA6: Signals dangerous voltage isolation faults requiring immediate service
Test Individual Modules

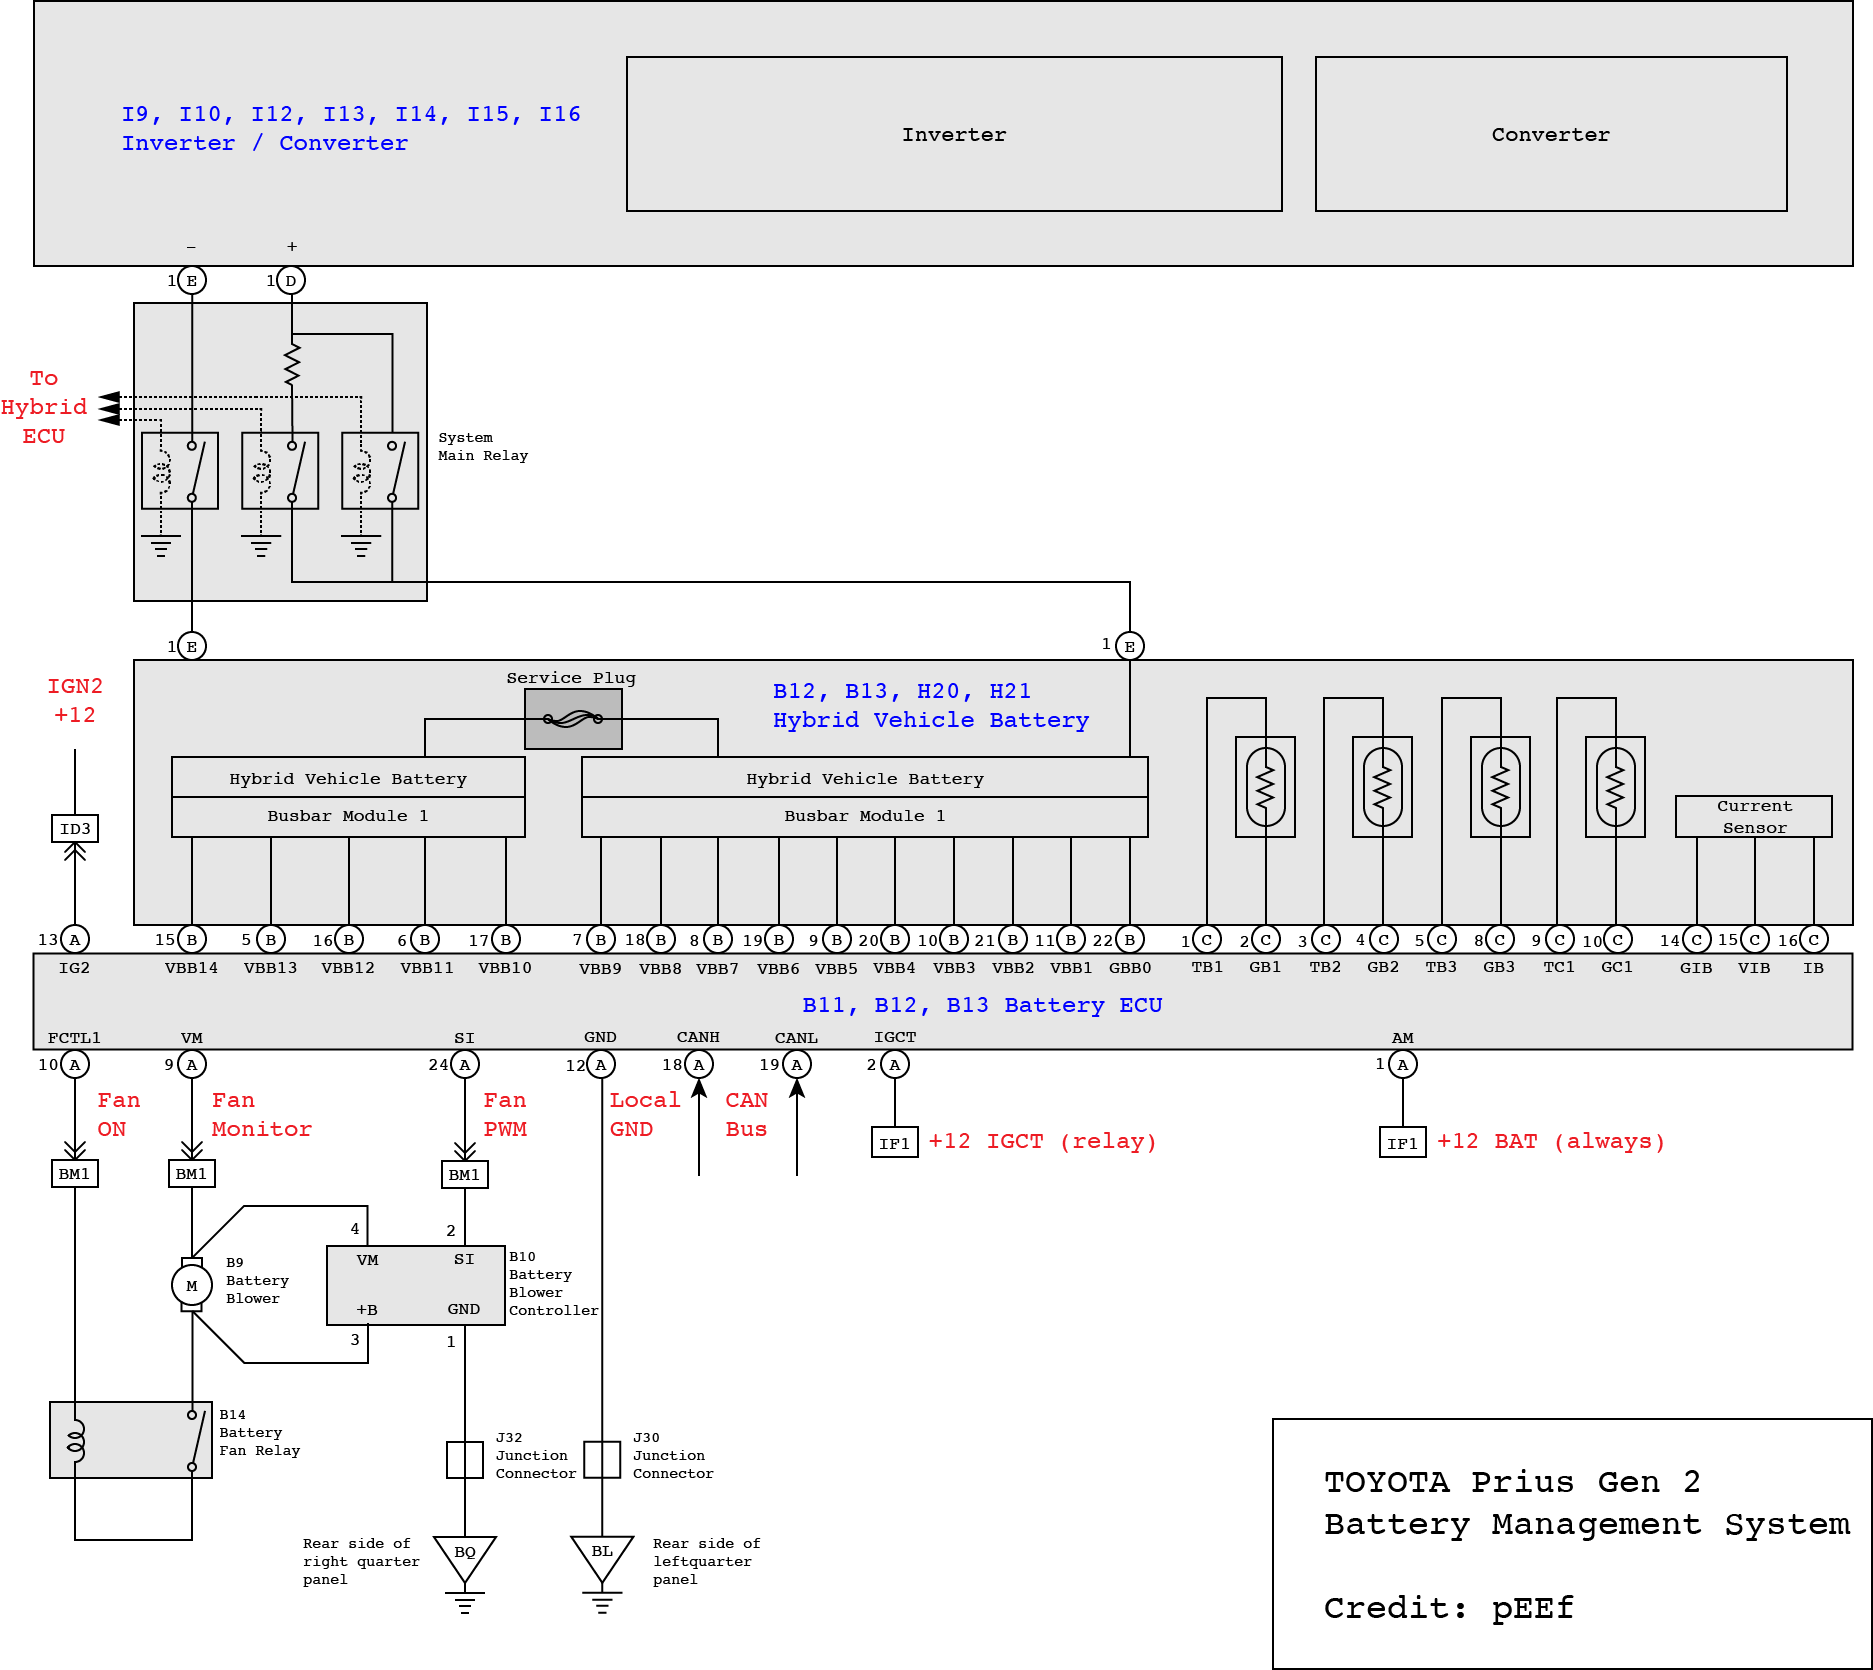
Your Prius battery contains 28 modules—each must read 7.5V–8.1V when healthy. Here’s how to test them:
1. Disconnect 12V battery negative terminal and remove orange service plug (wear insulated gloves)
2. Wait 5 minutes for high-voltage capacitors to discharge
3. Test each module with a multimeter at the terminals
4. Mark modules below 7.2V for replacement—these cause system shutdowns
5. Note voltage spreads exceeding 0.3V between modules (indicates imbalance)
Battery Architecture and Failure Patterns
28-Module Configuration
Understanding your battery’s structure explains why failures occur predictably. The 28 NiMH modules sit in series, but center modules (10-20) fail first due to the “valley effect”—heat buildup from the single cooling fan creates a temperature gradient. End modules (1-5 and 24-28) typically last 30% longer since they’re farther from the heat source. This pattern means replacing only dead center modules often extends battery life 2-3 years.
Heat Damage Zones
Gen 3 Prius batteries are especially vulnerable to heat damage. When the cooling fan clogs with debris (common after 100k miles), temperatures soar in the center pack. Check for:
– Discolored plastic covers near modules 12-18
– Corroded copper bus bars showing white/green oxidation
– Melting around terminals indicating chronic overheating
Module Replacement Strategy
Selective Module Swap
Replacing 2-8 weak modules costs 60% less than full replacement. Used modules run $30–$70 each on eBay (verify seller testing videos), while tools like a torque wrench and multimeter run $200–$400. Total DIY investment: $500–$1,500 versus $1,500+ at dealerships. This fix lasts 1-3 years—ideal for high-mileage vehicles where full replacement isn’t cost-effective.
Step-by-Step Module Replacement
Critical safety step: Always disconnect the 12V battery first—hybrid systems retain lethal voltage for hours.
Access the battery pack:
1. Remove rear seat cushion by pulling firmly forward
2. Unbolt seatback (two 12mm bolts)
3. Pop off plastic trim panels near the floor
4. Remove battery cover (eight 10mm bolts)
Replace weak modules:
1. Label bus bar positions before removal
2. Extract failed modules using two flathead screwdrivers for leverage
3. Insert new modules in exact orientation (reversed polarity causes sparks)
4. Torque bus bars to 7 ft-lbs—overtightening cracks terminals
Complete Reconditioning Process
Professional Rebuild Method
Reconditioning rejuvenates partially dead batteries through controlled discharge/recharge cycles. The process:
1. Disassemble all 28 modules
2. Discharge cells to 0V (safe for NiMH chemistry)
3. Recharge each module individually while monitoring capacity
4. Replace corroded copper tabs and bus bars
5. Rebalance the entire pack using professional equipment
This $890–$1,890 service extends battery life 3-5 years but won’t revive completely dead cells. Key limitation: Modules must retain at least 2000mAh capacity to be salvageable.
New Battery Replacement Options
OEM vs Aftermarket Decision
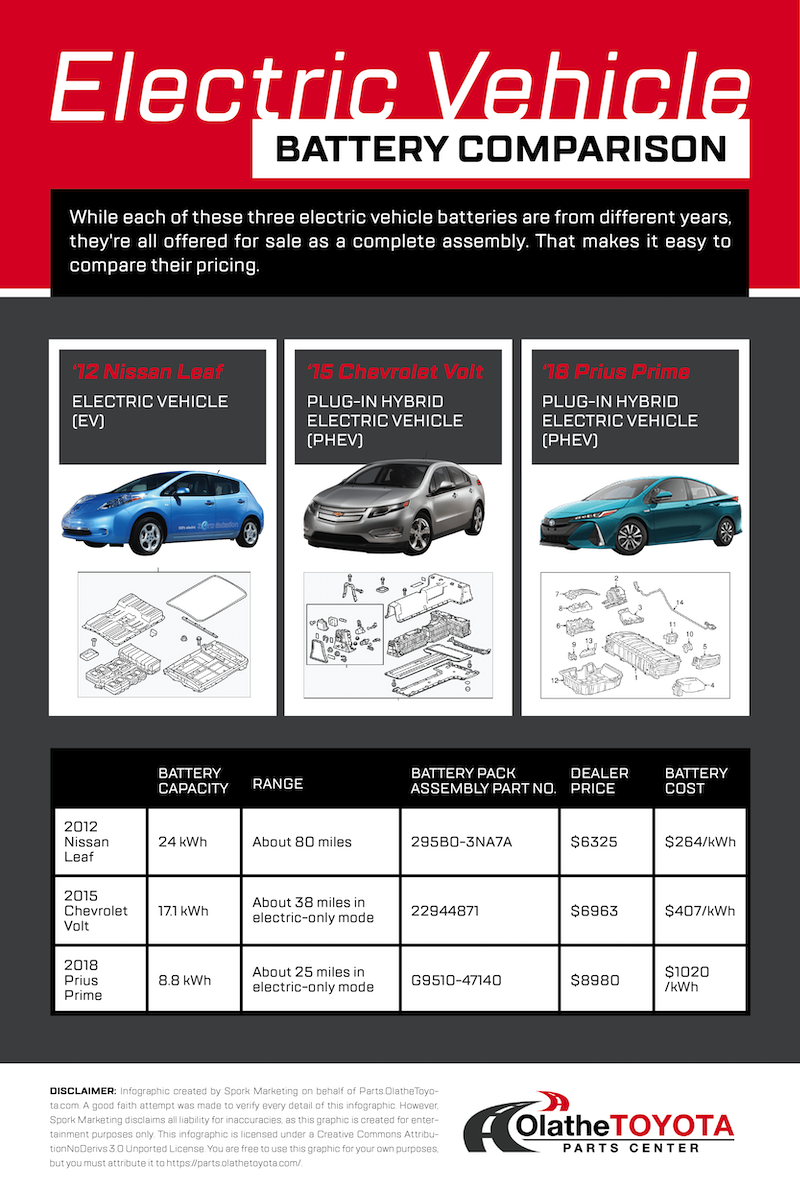
When modules are critically degraded, replacement becomes necessary. Compare your options:
| Battery Type | Cost | Lifespan | Best For |
|---|---|---|---|
| OEM Toyota | $2,000–$4,000 | 10-15 years | Daily drivers, vehicles under 150k miles |
| Dorman Aftermarket | $1,600–$2,500 | 5-8 years | Budget-conscious owners, older high-mileage cars |
| Re-manufactured | $1,200–$2,000 | 2-4 years | Short-term solutions, salvage vehicles |
Break-even tip: If you’ve replaced modules twice already, a new OEM battery pays off long-term—especially for vehicles under 200k miles.
Prevent Future Battery Failure
Maintenance Schedule
Avoid repeat failures with these critical habits:
– Clean cooling fan every 30,000 miles—use compressed air to remove debris from intake vents
– Check battery health monthly via OBD2 scanner (monitor “Delta Voltage” in Dr. Prius app)
– Park in shade during summer—direct sun raises under-seat temps by 30°F+
– Drive daily—extended idling causes deep discharge that kills modules
Temperature Management
Heat is the #1 battery killer. Immediate actions:
– Install a $25 auxiliary cooling fan if you live in climates above 90°F
– Never block the battery air intake behind the rear seats
– Service the cooling fan annually—replace if bearings grind
Professional vs DIY Decision Guide
When to DIY
Only attempt repairs if you have:
– Basic electrical skills (multimeter proficiency)
– 6+ hours for your first module swap
– Insulated tools rated for 600V+ systems
– A torque wrench (critical for bus bar safety)
Pro tip: Start with a single-module replacement to test your skills before tackling multiple failures.
Choose Professional Service When
- You see burnt terminals or melted plastic (indicates severe thermal damage)
- The BMS (Battery Management System) shows errors (P0A7F codes)
- You lack hybrid-specific tools like battery balancers
- Your vehicle is under warranty—DIY repairs void coverage
Advanced Troubleshooting Tips
Module-Level Diagnostics
Spot failing modules fast:
– Hot modules during operation = imminent failure (use infrared thermometer)
– Voltage jumps during testing = internal short circuits (replace immediately)
– >0.3V difference between adjacent modules = requires balancing
System-Level Issues
Don’t mistake these problems for battery failure:
– Cooling fan failure (check 30A fuse #15 in engine bay)
– BMS software glitches (reset by disconnecting 12V battery for 15 minutes)
– DC-DC converter faults (causes 12V battery drain mimicking hybrid issues)
Final Repair Recommendations
For 10+ Year Old Batteries
Replace the entire pack with OEM. The valley effect ensures remaining end modules will fail within 18 months of center module replacement. Proven strategy: Keep original end modules (1-5 and 24-28) but replace all middle modules 6-23 with new OEM units for optimal longevity.
For Newer Batteries (<5 Years)
Target only failed modules:
1. Replace 2-4 weak modules with verified used units
2. Perform professional reconditioning to balance the pack
3. Install real-time monitoring via OBD2 to catch early degradation
Critical success checklist:
– ✅ Confirm P0A80 code before any disassembly
– ✅ Test every module—don’t assume based on location
– ✅ Balance the pack after every repair
– ✅ Use OEM-spec torque on all connections
Restoring your Prius hybrid battery isn’t just possible—it’s affordable with the right approach. Whether you replace three weak modules for $600 or invest in a new OEM pack, these proven methods will return your fuel economy to 50+ MPG and eliminate that dreaded warning light. The key is acting early: address voltage imbalances before they cascade into full failure, and your Prius will deliver another decade of reliable, efficient driving.


