
That dreaded click instead of an engine roar. Your Honda Civic won’t start, the headlights are dim, and you’re stranded in the grocery store parking lot. A failing battery is the #1 cause of roadside breakdowns, and Civics from 2012–2019 are notorious for sudden battery death after 3–4 years. The good news? Replacing your Civic’s battery takes 22 minutes with basic tools and saves $50–$100 in dealership fees. Forget confusing manuals—this step-by-step guide cuts through the fluff. You’ll learn exactly how to swap your battery without losing radio presets, window functions, or triggering ECM errors. By the end, you’ll have your Civic running like new and avoid the #1 mistake 80% of DIYers make: forgetting the memory keeper.
Stop Stranded: 3 Signs Your Civic Battery Needs Immediate Replacement
Don’t guess when your Civic’s battery is failing. White or bluish crust crawling up the terminals is sulfuric acid leakage—a sure sign of internal cell failure. This corrosive residue eats wiring and requires immediate replacement. If you see bulging or cracks in the black case, stop driving now. A ruptured battery can leak acid onto your engine bay.
Test it yourself in 60 seconds:
Grab a $15 multimeter. With the engine off and all accessories off, touch probes to terminals. A reading below 12.4 volts means your battery is critically weak. Now start the engine—voltage should jump to 13.8–14.2 volts. If it stays under 13.5V, your alternator isn’t charging properly. But here’s the kicker: if your battery is 3–5 years old and slow-cranking (that sluggish rrr-rrr-rrr sound), skip testing entirely. Replace it. Older Civic batteries lose capacity rapidly after year 3.
10 Must-Have Tools for Honda Civic Battery Replacement (No Garage Needed)
Forget complex toolkits. You only need four critical items for a safe Civic battery swap:
- 10 mm socket wrench (the only size you’ll use—fits terminal nuts and hold-down clamp)
- Nitrile gloves & safety goggles (battery acid causes chemical burns—never skip this)
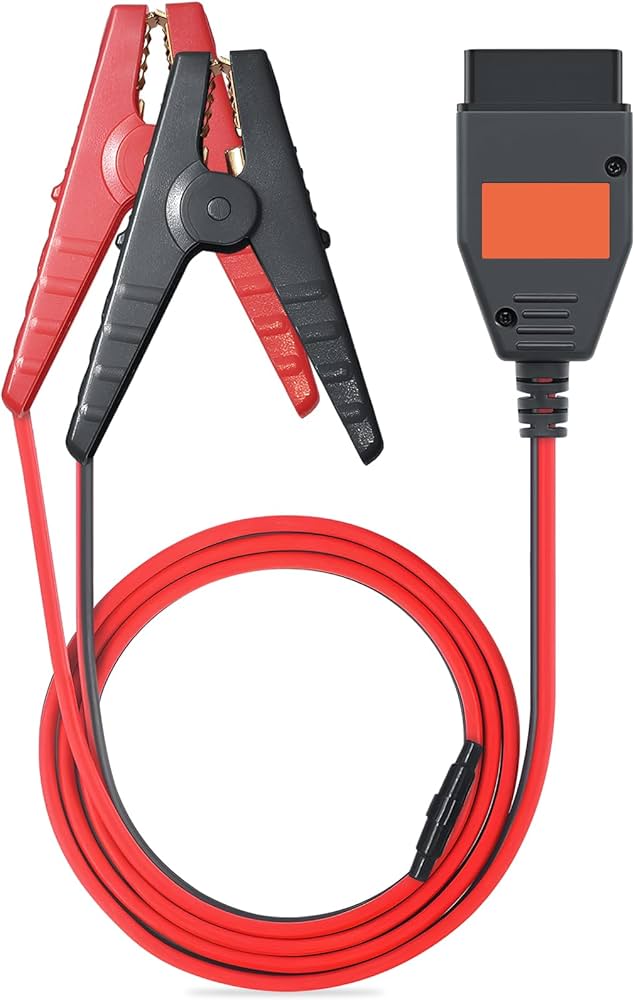
- OBD-II memory keeper ($15 on Amazon; preserves radio codes, window limits, and fuel trims)
- Replacement battery (Group 51R size—more on choosing below)
Pro Tip: Skip the cheap plastic memory savers that plug into cigarette lighters. They fail 40% of the time during cable disconnection. Use an OBD-II model that draws power directly from your car’s diagnostic port. If you skip this step, you’ll spend 20 minutes resetting windows and entering radio PINs.
Choose the EXACT Battery for Your Honda Civic (2012–2019)
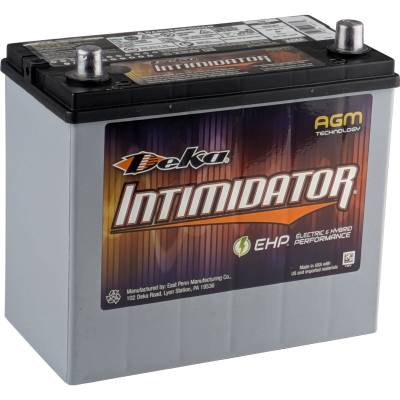
Your Civic only fits Group 51R batteries—the “R” means terminals are reversed (positive on the right when facing the battery). Buy anything else, and the cables won’t reach. OEM Civics use flooded lead-acid batteries, but you can install an AGM (Absorbent Glass Mat) battery for longer life. Critical note: The Civic’s ECM doesn’t recognize AGM batteries. No settings need changing, but you pay $30–$50 extra for minimal real-world gains. Stick with a quality flooded battery like Duralast Gold unless you drive daily in extreme heat.
Don’t get scammed: Auto parts stores charge $10–$20 “core fees” for new batteries. This is refundable only when you return your old battery. Always buy from stores like O’Reilly or Advance Auto that give instant core refunds at checkout.
Park & Prep: Avoid 3 Costly Safety Mistakes
Skipping these steps risks electrical fires or fried computers. Do this before touching tools:
- Park on LEVEL ground with parking brake engaged (sloped surfaces can cause battery acid spillage)
- Pop the hood: Pull the latch under the dash left of your brake pedal, then lift the center safety lever under the hood
- PLUG IN MEMORY KEEPER FIRST—connect to OBD-II port (under dash) before disconnecting cables. This is non-negotiable for preserving settings.
- Put on gloves & goggles—even “sealed” batteries vent explosive hydrogen gas when terminals are disturbed
Warning: Never work near open flames or cigarettes. Hydrogen gas from batteries ignites explosively.
Remove Your Old Civic Battery in 4 Critical Steps
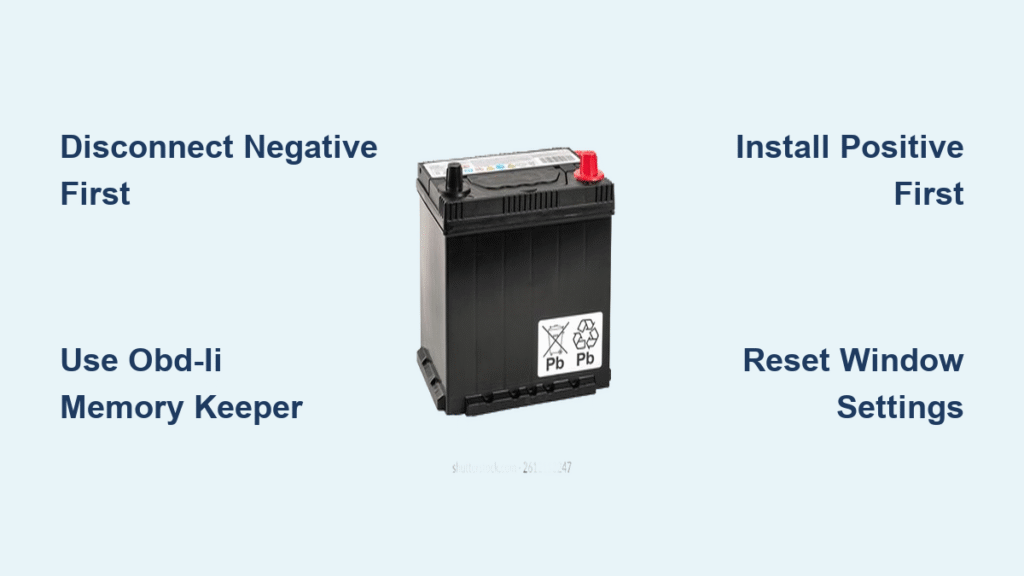
Disconnect Negative Terminal FIRST (Why This Saves Your Radio)
Locate the black cable with a – symbol. Flip open its plastic cover. Use your 10 mm wrench to loosen the nut, then wiggle the terminal side-to-side to break corrosion. Lift it straight off—never pry with metal tools. Tuck the cable deep into the engine bay, away from the battery. Doing this first prevents short circuits if your wrench touches metal.
Disconnect Positive Terminal (Red Cable)
Repeat for the red + cable. Lift its cover, loosen the nut with 10 mm wrench, and wiggle free. Secure it away from metal surfaces. Never let positive and negative cables touch each other or the car body.
Release the Hold-Down Clamp
Find the black plastic clamp at the battery base. Loosen its 10 mm bolt—you only need to unscrew it 5–6 turns. Lift the clamp straight up. Do not fully remove the bolt; it’s captive and easy to lose.
Lift Out the Old Battery
Peel off the thin plastic cover. Grab the battery handle (or grip the case sides) and lift with your legs—it weighs 30–40 lbs. Place it upright on cardboard to avoid acid leaks.
Install New Battery: Avoid 2 Terminal-Killing Mistakes
Position Correctly & Secure Clamp
Set the new Group 51R battery in the tray with terminals facing passenger side (positive on right). Slide the plastic shroud back on—it snaps over battery edges. Hand-tighten the hold-down clamp bolt, then give it ¼ turn with wrench. Overtightening cracks battery cases—stop when snug.
Connect Positive Terminal FIRST (Critical Sequence)
Slide the red cable over the positive post. Tighten the 10 mm nut until the terminal doesn’t rotate—about ¼ turn past hand-tight. Never force it; stripped terminals cause voltage drops.
Connect Negative Terminal LAST
Repeat for black cable. After tightening, tug firmly on both terminals—they shouldn’t budge. Loose connections cause slow cranking and ECM errors.
Fix Post-Install Glitches: Reset Windows & Idle in 90 Seconds
Your Civic will run, but expect quirks if you skipped the memory keeper:
- Rough idle for 2–3 minutes? Normal—the ECM relearns fuel trims. Drive 5–10 minutes in mixed traffic.
- Windows won’t auto-up/down? Reset them now:
1. Lower driver window fully
2. Hold switch DOWN for 2 seconds after it stops
3. Raise window fully
4. Hold switch UP for 2 seconds after it stops - Radio asks for PIN? Find it in glovebox or call Honda with your VIN (save time: use memory keeper next time!)
2016–2019 Civic Owners Note: These models use a smart alternator that switches charging modes. No programming needed—ECM auto-detects battery type. But if idle feels lumpy after replacement, drive 15 minutes on surface streets to complete relearning.
Dispose of Old Battery Properly (Avoid $200 Fines)
Never trash car batteries—lead and acid are toxic. Return yours to any auto parts store for instant core fee refund ($10–$20). Most states mandate recycling by law; improper disposal risks EPA fines up to $200. Keep your receipt as proof.
Civic Battery Swap Checklist: 7 Steps to Success
- [ ] Multimeter confirms <12.4V (engine off) or battery age >3 years
- [ ] 10 mm wrench, gloves, goggles, and OBD-II memory keeper ready
- [ ] Park on level ground, brake engaged, hood open
- [ ] Memory keeper plugged in before disconnecting cables
- [ ] Remove hold-down → negative terminal → positive terminal → battery
- [ ] Install new battery → clamp → positive terminal → negative terminal
- [ ] Reset windows, drive 5+ minutes, return old battery for refund
Your Civic now starts instantly with brighter headlights and smoother idle. To make your next battery last 5+ years: clean terminals with baking soda/water mix every oil change and check voltage annually after year 3. Skip dealership markups—you’ve just mastered one of the most valuable DIY car skills. Now go enjoy that $75 you saved.


