
You’re deep in the wilderness, your portable fridge humming along, when suddenly your headlights dim and the engine won’t turn over. That sinking feeling? It’s your starter battery completely drained by camping gear. This exact scenario sends thousands of drivers scrambling for a solution every year. Installing a second battery in your car creates a dedicated power source for accessories while protecting your starter battery—transforming your vehicle into a reliable off-grid power station. In this guide, you’ll learn exactly how to install second battery in car safely and effectively, whether you’re powering camping gear, high-end audio, or emergency equipment.
Why Your Starter Battery Fails When Running Accessories
Accessory loads like fridges, winches, or amplifiers create a dangerous electrical conflict. When connected directly to your starter battery, these devices drain the critical 12 volts needed for engine cranking. A single 60W camping fridge running 24 hours consumes 120 amp-hours—more than enough to kill a standard 60Ah starter battery. The result? Stranded vehicles in remote locations despite having a “charged” auxiliary battery. This happens because your vehicle’s charging system isn’t designed for deep-cycle demands. Installing a second battery in car solves this by creating two independent circuits: one solely for engine starting, the other exclusively for accessories.
Pick the Best Second Battery Location for Your Vehicle
Engine Bay Mounting Without Heat Damage
Under-hood installation works only with heat-tolerant flooded lead-acid batteries. Verify 2-inch clearance above terminals and mount at least 12 inches from exhaust manifolds. Toyota LandCruiser owners often use OEM brackets near the airbox, but always confirm airflow around the battery. Critical mistake: Never place lithium batteries here—engine heat above 140°F permanently damages cells.
Cabin Installation for Lithium Safety
Mounting behind the rear seat or under front seats keeps lithium batteries in optimal 60-80°F temperatures. Secure with SAE J537-certified brackets using 3/8-inch steel bolts through reinforced vehicle frame points. For Hilux or Ranger trucks, the factory under-seat storage area provides perfect space. Always use rubber isolation pads to absorb road vibration—unsecured batteries become dangerous projectiles in collisions.
Canopy Bed Setup for Maximum Capacity
Overlanders often install large lithium banks in truck canopies. Run cables through the cab firewall using rubber grommets to prevent chafing. For every 3 feet of cable beyond 6 feet, upgrade from 2 AWG to 1/0 AWG wire to avoid voltage drop. This location requires weatherproof battery boxes with IP67 ratings—moisture in the bed compartment will corrode terminals within months.
Choose Between Lead-Acid, AGM, and Lithium Batteries
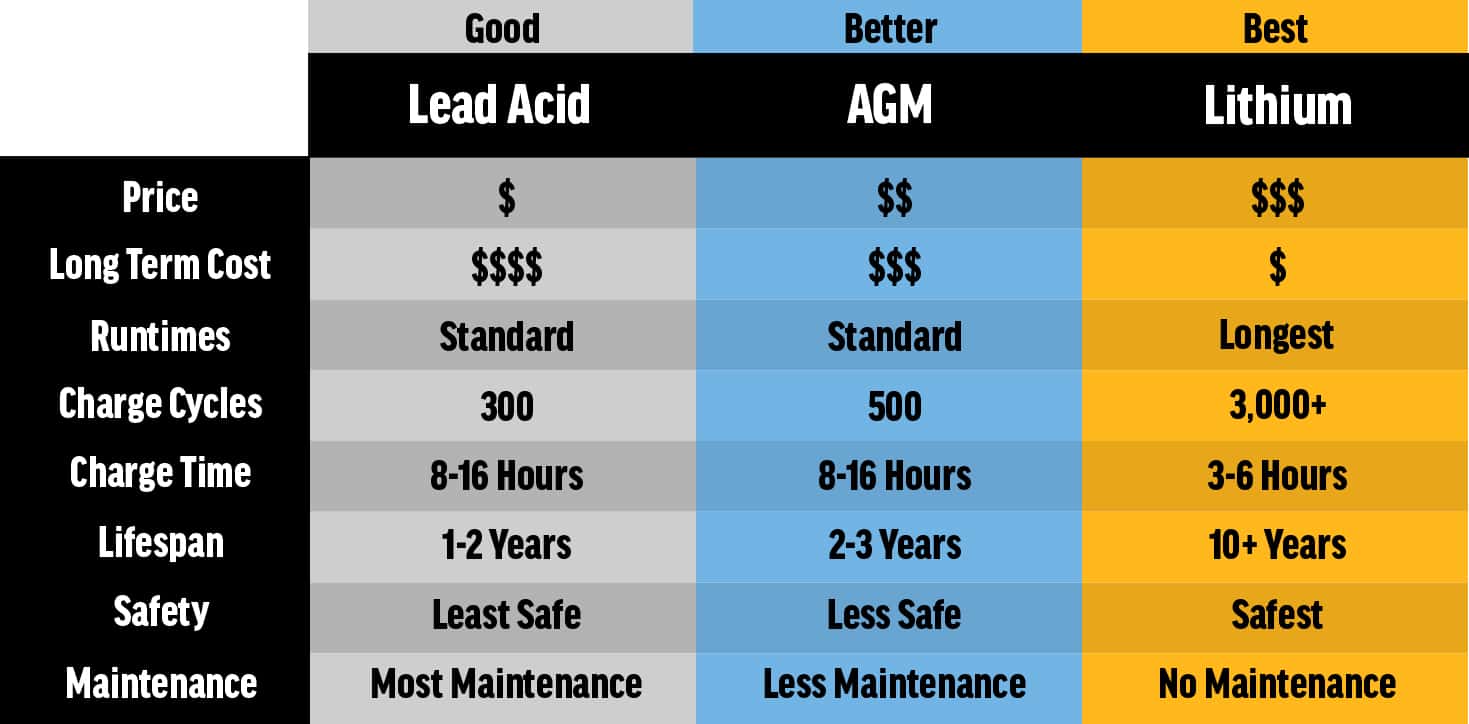
Flooded Lead-Acid: Best for engine bay mounting at $80-$120. Requires monthly water top-ups and venting tubes to outside air. Handles heat but weighs 50+ pounds—only practical if space is limited.
AGM Batteries: The sweet spot for most installations ($150-$250). Sealed construction mounts sideways under seats. Withstands vibration 3x better than lead-acid. Use 100Ah models to power a fridge for 18 hours without engine running.
Lithium (LiFePO4): Justifies its $400-$600 price with game-changing performance. Weighs 31 pounds for 100Ah capacity (vs 62 for AGM). Delivers 90% usable power versus 50% for lead-acid. Critical requirement: Must pair with DC-DC chargers—alternators alone won’t charge lithium properly.
Gather Critical Tools and Materials for Installation

Skip these items and risk fire or system failure:
- Non-negotiable safety gear: 150A ANL fuse holders ($12) and fuses within 6 inches of each battery positive terminal
- Proper cable sizing: 2 AWG for runs under 6 feet (100A capacity), 1/0 AWG for longer runs ($1.50/ft)
- Hydraulic crimper: Hand crimpers fail on 2 AWG cables—rent one for $15 at auto parts stores
- Torque wrench: Essential for M8 battery lugs (10-12 ft-lb spec)
- Milliohm meter: Verifies ground connections under 0.1 ohm resistance ($40)
Most DIY failures happen from undersized fuses or loose grounds. Spend $30 extra on quality copper lugs with heat-shrink insulation—they prevent 90% of voltage drop issues.
Calculate Your Power Needs to Prevent Dead Batteries
A 50Ah fridge running 12 hours consumes 50 amp-hours daily. But your battery needs 1.5x that capacity (75Ah) because discharging below 50% depth kills lead-acid batteries prematurely. For lithium, size at 1.2x daily use since you can safely drain to 90%.
Real-world example:
– Waeco CFX3 40L fridge: 45W = 3.75A
– 3 LED lights: 18W = 1.5A
– Daily total: 5.25A × 12 hours = 63Ah
– Required battery: 95Ah AGM or 75Ah lithium
Skip this calculation and you’ll face dead batteries within weeks. Always add 20% buffer for inverter inefficiency and cold weather.
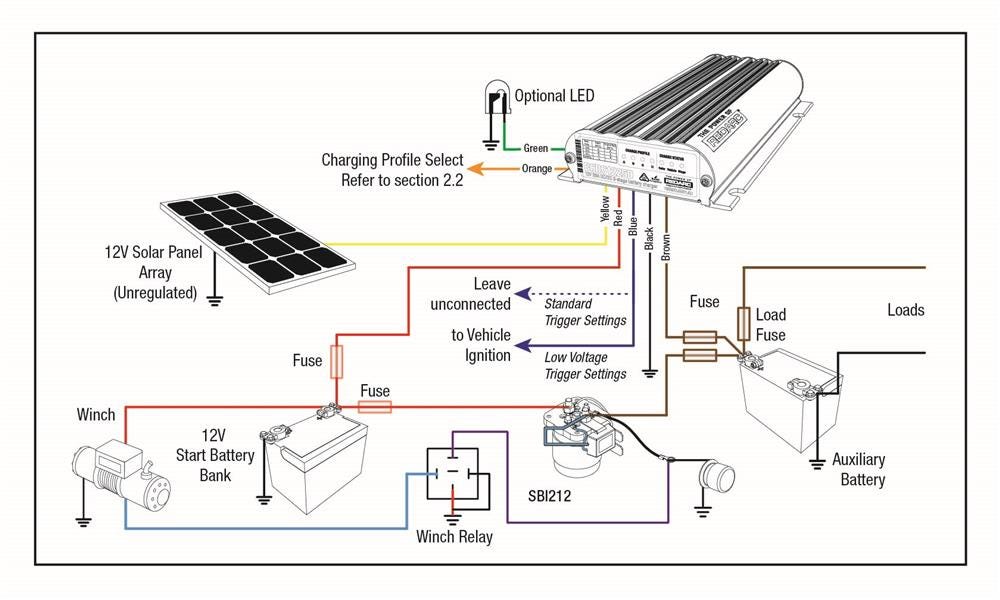
Install a Voltage-Sensitive Relay Without Errors
VSRs automatically connect batteries when charging (13.3V+) and isolate at 12.8V. Mount within 3 feet of the starter battery—never in the engine bay where heat exceeds 180°F.
Critical wiring sequence:
1. Connect thick red cable from starter battery (+) through 100A ANL fuse to VSR “IN” terminal
2. Run second red cable from auxiliary battery (+) through 100A fuse to VSR “OUT” terminal
3. Attach small 16-gauge red wire to VSR “IGN” terminal and tap into accessory fuse (cigarette lighter circuit)
4. Ground VSR case directly to chassis with star washer on sanded metal
Test immediately: Engine running should show 13.8V on both batteries. Engine off? Starter battery must hold 12.6V while auxiliary drops to 12.2V under load. If not, your VSR is faulty or miswired.
Step-by-Step Wiring for Safe Dual-Battery Setup
1. Disconnect Primary Battery Properly
Always remove negative terminal first—accidental positive-ground contact causes catastrophic sparks. Cover terminals with electrical tape after disconnection.
2. Route Cables Through Bulkheads Safely
Feed cables through firewall using rubber grommets. Never drill new holes—use existing conduit near brake lines. Wrap cables in split-loom tubing before securing with nylon ties every 12 inches. Avoid sharp edges like door seams that wear insulation over time.
3. Establish Bulletproof Grounds
Scrape 2-inch diameter paint circles on chassis metal. Use star washers under lug terminals and torque to 10 ft-lb. For audio systems, run auxiliary negative directly to starter battery negative—chassis grounds cause annoying hum.
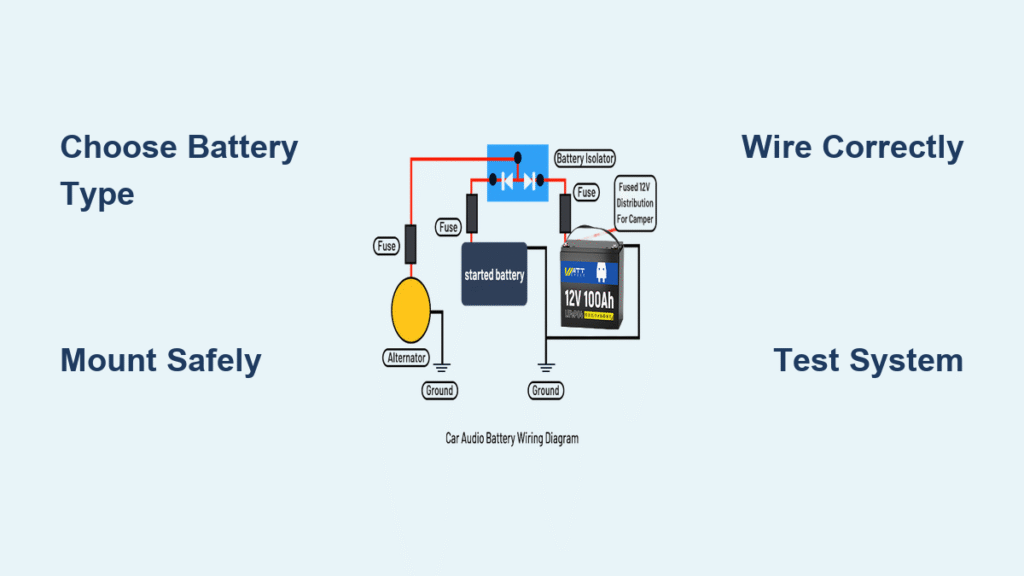
4. Connect Accessories Correctly
Power fridges through a fused distribution block (50A max per circuit). For amplifiers, use dedicated 4 AWG wire from auxiliary battery—never daisy-chain from the main accessory circuit. Critical pro tip: Install a manual override switch between batteries for emergency jump-starts.
Test and Troubleshoot Your Second Battery System
Immediate post-installation tests:
– Engine running: Both batteries show 13.8-14.4V within 5 minutes
– Engine off: Starter battery holds 12.6V after 1 hour of accessory use
– Multimeter check: <0.1V difference between batteries when charging
Fix these common failures:
– Starter battery drains overnight: VSR stuck closed—replace relay immediately
– Auxiliary battery never charges: Check voltage at VSR “IGN” wire—must show 12V with key on
– Fridge shuts off randomly: Install 100W solar panel directly to auxiliary battery
– Audio cuts out at high volume: Upgrade ground cable to 1/0 AWG and verify chassis contact
Perform monthly checks: Tighten all terminals to spec, clean corrosion with baking soda solution, and verify fuse integrity. Lithium users should check Bluetooth battery monitors for cell imbalances.
Installing second battery in car properly transforms roadside emergencies into non-issues. The key is matching components to your specific usage—lithium for weight-sensitive overlanders, AGM for budget-friendly reliability, or flooded lead-acid for engine bay simplicity. Always prioritize correct fusing and cable sizing over cost savings; a $15 ANL fuse prevents $2,000 in ECU damage from short circuits. Within 4 hours and $300 in parts, you’ll create a system that powers your adventures without ever stranding you again. Before your next trip, verify your dual-battery system can handle 12 hours of accessory use with the engine off—your peace of mind depends on it.


