
Your car won’t start, the engine just clicks weakly, and you’re stuck in your driveway with no help in sight. Unlike instant jump starters, a battery charger won’t crank your engine immediately—but it will reliably revive your dead battery when you have time to spare. This guide reveals exactly how to jump a car with a battery charger safely and effectively, transforming that frustrating clicking sound into a smooth engine start after proper recharging. You’ll learn why this method beats rushed solutions when you’re at home, how to avoid dangerous sparks, and critical safety checks most DIYers skip.
Why Battery Chargers Recharge Instead of Jump-Starting
Understanding your equipment prevents dangerous mistakes. A battery charger plugs into household current and delivers a steady, low-amperage charge—typically 2-15 amps—over 8-24 hours. It rebuilds your battery’s energy reserves but cannot provide the 400+ amps needed for instant cranking. Think of it as a slow IV drip for your car’s electrical system, not an emergency defibrillator.
Conversely, portable jump starters deliver high-current bursts (400-600 amps) to crank your engine immediately but don’t recharge your battery. They’re lifesavers for roadside emergencies but useless when you’re home with time to properly restore your battery. Use a charger when:
– You’re stranded at home with no second vehicle
– Your battery is only partially discharged
– You want a full, reliable recharge—not just a temporary fix
Essential Safety Checks Before Connecting
Never skip these critical safety steps—batteries contain explosive hydrogen gas and corrosive acid. First, gear up: wear safety glasses and acid-resistant gloves, and remove all metal jewelry. Work only in well-ventilated areas—never in enclosed garages. Confirm your car is in Park with parking brake engaged, and remove ignition keys.
Inspect your battery for deal-breaking issues:
– Cracks, leaks, or swelling in the case
– White or green crusty corrosion covering terminals
– Frozen electrolyte (batteries bulge when frozen)
– Strong sulfur smell (like rotten eggs)
Stop immediately if you see any of these—attempting to charge a damaged battery risks explosion. For maintenance-free batteries, check the charge indicator window: green means good, black/clear indicates low charge, and yellow signals failure.
Selecting the Right Charger for Your Vehicle
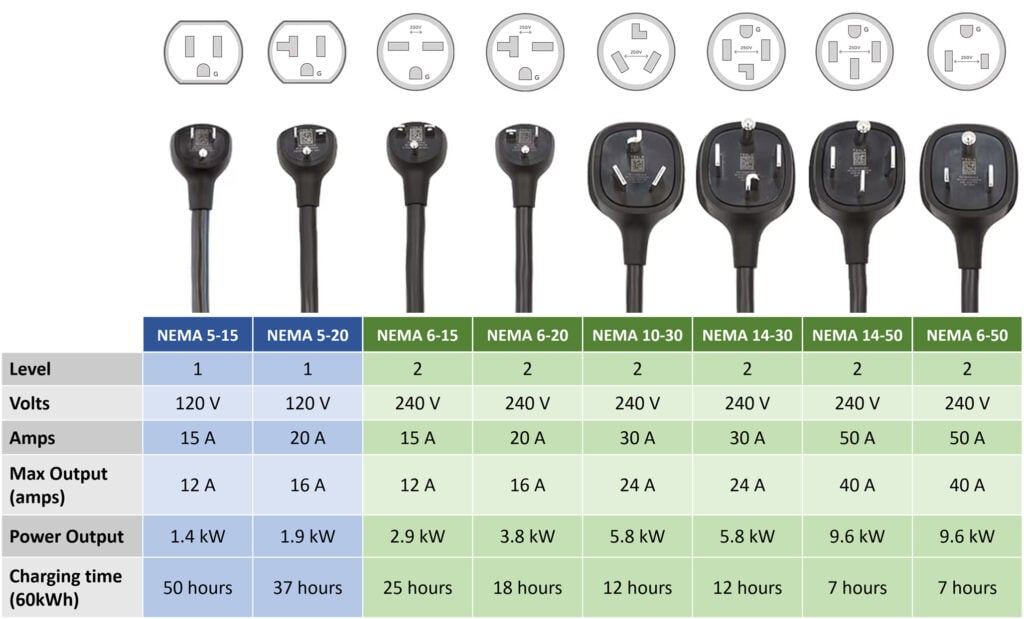
Using mismatched equipment causes failures or damage. All modern gasoline cars require 12V chargers—never use 6V or 24V units. Amperage determines charging speed:
– 2-4A trickle chargers: Safe for long-term use but take 24+ hours
– 6-10A standard chargers: Best balance for most users (8-12 hours)
– 15A+ fast chargers: Risk overheating if left unattended
Prioritize these non-negotiable features:
– Automatic shutoff to prevent overcharging
– Reverse polarity protection (flashing lights warn of wrong connections)
– Temperature sensors that halt charging if battery overheats
– Dedicated ground clamp (not just a terminal clip)
Avoid cheap chargers without indicator lights—they offer no feedback on charging progress. Never use extension cords; voltage drops can damage both charger and battery.
Proper Connection Sequence to Prevent Explosions

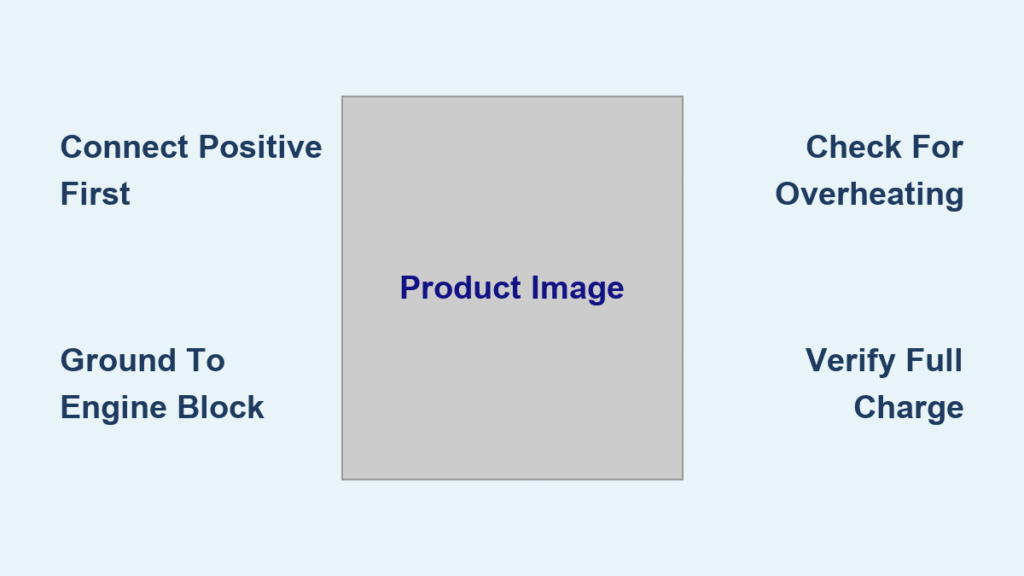
This step prevents deadly sparks near battery vents. Hydrogen gas ignites easily, so your connection order is critical. Always connect positive first, ground last:
- Attach red clamp to positive (+) terminal
(Look for red cover or “+” symbol—clean corrosion with wire brush first) - Connect black clamp to engine block ground
(Find unpainted metal bracket 12+ inches from battery—never to negative terminal) - Verify clamps have solid metal-to-metal contact
(Wiggle to ensure no paint or grease blocks connection)
Why ground to engine block? This routes potential sparks away from the battery where hydrogen accumulates. Never let clamps touch each other during connection—this creates dangerous short circuits.
Charging Timeline and Warning Signs
After connecting, plug in your charger and turn it on. Most 10A units take 8-12 hours for full recharge—don’t rush this. Monitor progress using indicator lights:
– Solid red: Charging actively
– Flashing green: Near full charge
– Solid green: Complete (switches to maintenance mode)
Check every 2 hours for danger signs:
– Hot battery case (too hot to touch = immediate shutdown)
– Hissing/bubbling sounds (indicates boiling electrolyte)
– Excessive venting (white vapor near caps)
If any warning appears, unplug charger immediately and let battery cool for 30 minutes. Recheck connections before resuming. Never leave charging unattended overnight with non-automatic chargers.
Starting Your Car After Recharging
Disconnect in reverse order to prevent sparks:
1. Turn charger OFF at the unit (not just unplug)
2. Remove black clamp from engine block
3. Detach red clamp from positive terminal
Now attempt to start:
– Turn ignition normally (don’t hold key excessively)
– If engine starts, let idle 30 minutes before driving
– If it fails, wait 30 minutes and try again—battery may need more charge
Critical: If your car starts but dies shortly after, your alternator isn’t maintaining charge. Drive directly to a mechanic—don’t risk being stranded again.
4 Deadly Charger Mistakes to Avoid

These errors destroy electrical systems:
– Connecting black clamp to negative terminal
(Creates spark risk near battery vents—always ground to engine block)
– Charging a frozen battery
(Let thaw indoors first—charging expands ice, cracking the case)
– Using damaged cables with exposed wires
(Causes short circuits—inspect clamps monthly for corrosion)
– Leaving charger connected for days
(Overcharging warps plates—set phone timer for 12 hours)
Pro tip: Place a folded towel over battery terminals during charging—it absorbs accidental sparks if clamps slip.
Post-Charge Battery Health Verification
A successful start doesn’t guarantee battery longevity. Test within 48 hours at any auto parts store (free service). They’ll measure:
– Cold cranking amps (CCA) vs. your battery’s rating
– Reserve capacity (how long accessories run with engine off)
– Internal resistance (indicates plate degradation)
Replace immediately if:
– CCA is below 70% of original rating
– Battery is over 5 years old with repeated failures
– Charge indicator shows yellow after full recharge
Ignoring these signs guarantees another roadside emergency.
Long-Term Charger Maintenance Secrets
Extend your charger’s life with these steps:
– Store indoors away from humidity (garage corners kill electronics)
– Coil cables loosely—tight wraps fracture internal wires
– Recharge lithium units to 60-80% for storage (not 100%)
– Test monthly—plug in for 1 hour to verify indicator lights work
For portable jump starters: Recharge after every use and top off every 6 months. Lithium units self-discharge 2-3% monthly—even when unused.
When to Call Professionals Immediately
Stop DIY attempts and call roadside assistance if:
– Engine cranks but won’t start after 24-hour charge
– You smell electrical burning (like hot plastic)
– Battery case is swollen or leaking
– Multiple jump attempts failed (indicates deeper electrical issues)
Professionals test alternator output (should read 13.8-14.4V running) and detect parasitic drains—common culprits like faulty infotainment modules that kill batteries overnight.
Final Note: Knowing how to jump a car with a battery charger transforms a stranded nightmare into a controlled recovery—when you follow the slow-recharge protocol. Remember: chargers rebuild energy reserves over hours, while jump starters deliver instant bursts. Always prioritize safety checks, use correct connection order, and verify battery health after charging. Keep your charger maintained and accessible; that next cold morning will arrive when you least expect it. Your future self will thank you when you avoid another clicking-engine panic at 6 AM.


