
That dreaded clicking sound when you turn the key. The dashboard lights dimming instead of brightening. A dead car battery strikes fear in every driver, leaving you stranded at the grocery store parking lot or your own driveway. The good news? Mastering how to jumpstart a car battery with cables takes just minutes and could save you a $100+ tow bill. This critical skill isn’t just for mechanics—any driver can safely revive their vehicle with the right steps and precautions. In this guide, you’ll learn the exact sequence that prevents dangerous sparks, the hidden grounding spots professionals use, and why connecting cables in the wrong order risks frying your car’s electronics.
Essential Safety Equipment You Must Check First
Skipping safety checks turns a simple jumpstart into a disaster. Before touching any cables, verify these non-negotiable items. Your how to jumpstart a car battery with cables attempt fails before it begins if you overlook battery damage. Inspect both batteries for cracks, leaks, or bulging cases—these indicate internal failure requiring professional replacement, not jumpstarting. Check for white or green corrosion buildup on terminals, which insulates connections and blocks current flow. In freezing temperatures, look for swollen battery cases signaling frozen electrolyte. Never attempt a jumpstart if you spot these issues; call roadside assistance immediately.
Critical gear checklist:
– Jumper cables: Minimum 4-6 gauge thickness (thicker for trucks/SUVs)
– Safety glasses: Protect eyes from potential battery acid spray
– Work gloves: Prevent accidental short-circuiting with jewelry
– Wire brush: Clean corrosion from terminals and clamps
– Owner’s manual: Confirm 12-volt compatibility (standard for modern cars)
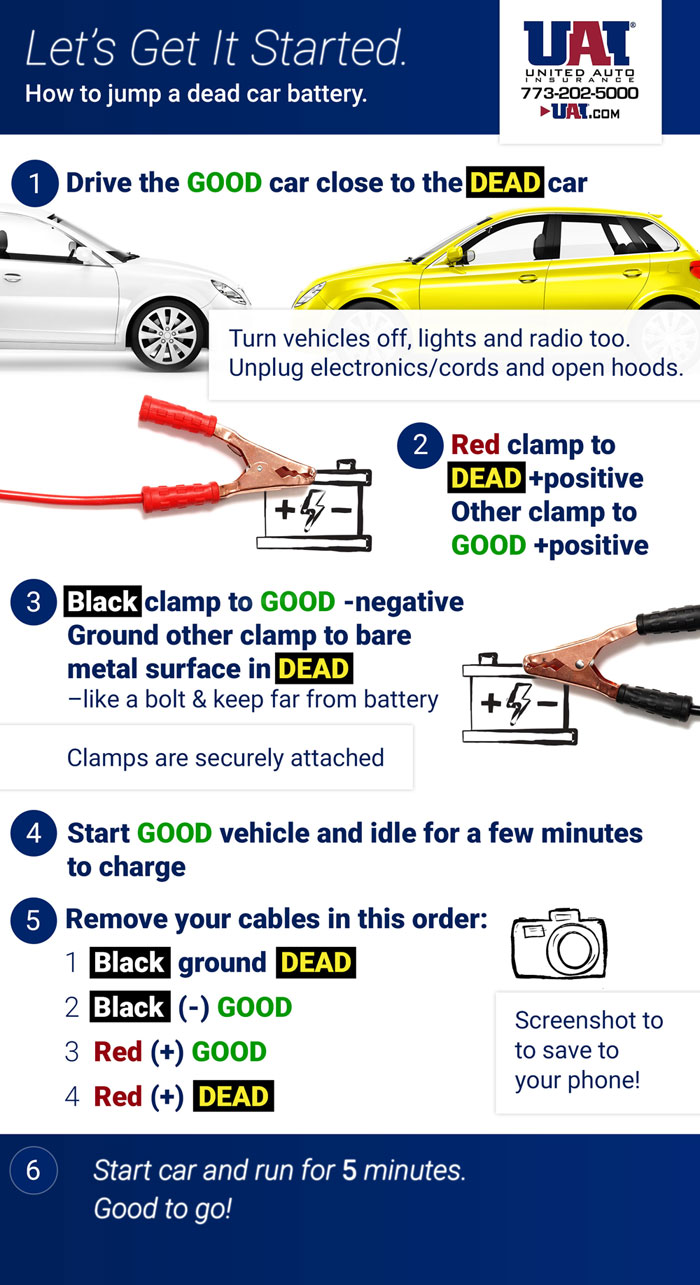
Position Vehicles for Safe Power Transfer
Improper positioning causes 30% of jumpstart failures. Park the donor vehicle nose-to-nose with the dead car, close enough for cables to reach but never letting bumpers touch. This prevents dangerous electrical grounding between chassis frames. Engage parking brakes on both vehicles and shift automatics to Park or manuals to Neutral. Turn off all engines completely and remove keys from ignitions. Open both hoods and secure them with prop rods. Clear the area of open flames, cigarettes, or metal tools that could accidentally bridge terminals. Remove rings, watches, and bracelets—these conduct electricity and cause severe burns if they contact live terminals.
Identify Cable Connections to Prevent Sparks

Jumper cables have color-coded clamps that must connect precisely. Red clamps always attach to positive terminals (+), marked with “POS” or a plus sign. Black clamps connect to negative terminals (-) or grounded metal. Before connecting, inspect cables for exposed wires or cracked insulation—damaged cables can melt or cause fires. Clean corroded clamps with a wire brush to ensure metal-to-metal contact. Verify cable thickness matches your vehicle size; thin cables overheat with large engines. For trucks or SUVs, use 2-4 gauge cables. Compact cars need 6-8 gauge. Never substitute household wires—improper gauge causes dangerous voltage drops.
Connect Cables in the Exact Sequence That Works
This order prevents explosive hydrogen gas ignition from sparks. Follow these steps precisely when learning how to jumpstart a car battery with cables:
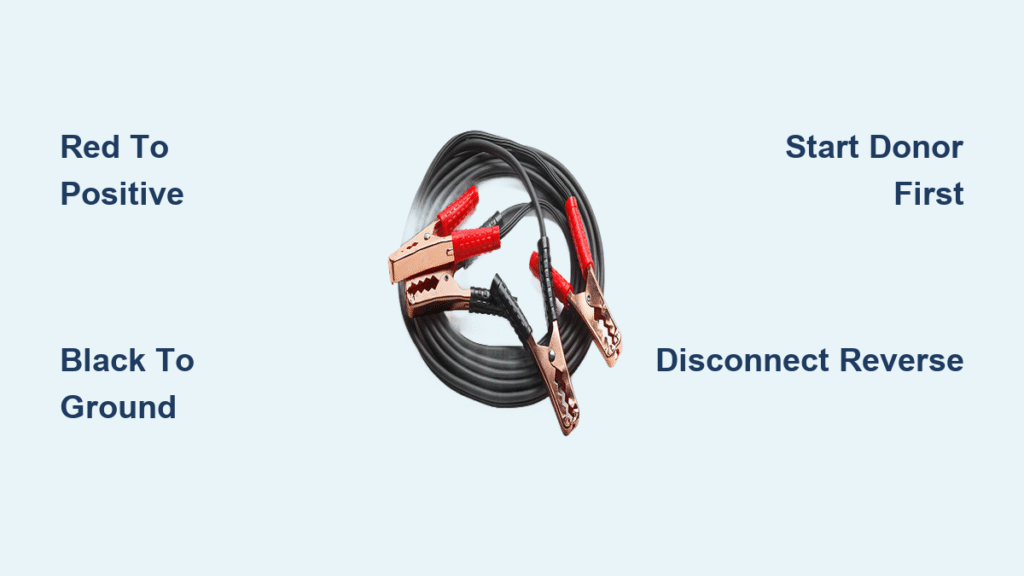
Red to Dead Battery Positive Terminal
Clip one red clamp firmly to the dead battery’s positive terminal. Scrape away corrosion with a cloth if needed. Ensure metal contact with the terminal post itself—not the cable wire.
Red to Donor Battery Positive Terminal
Attach the other red clamp to the working vehicle’s positive terminal. Double-check for solid connection before proceeding.
Black to Donor Battery Negative Terminal
Connect one black clamp to the negative terminal of the working battery. Watch for minor sparks—this is normal.
Black to Ground Point on Dead Vehicle

This is critical: Clip the final black clamp to an unpainted metal surface on the dead car’s engine block or chassis. Never connect to the dead battery’s negative terminal—this risks igniting hydrogen gas. Ideal spots include:
– Hood support struts
– Engine mounting bolts
– Chassis brackets (look for clean, rust-free metal)
Start the Revival Process Without Damaging Electronics
Charging the Dead Battery
Start the donor vehicle and let it idle for 1-2 minutes. Gently press the accelerator to 1,500 RPM for 3 more minutes—this boosts alternator output for faster charging. Avoid revving above 2,000 RPM to prevent voltage spikes.
Attempting the Start
Try starting the dead vehicle. If it cranks slowly or clicks:
– Wait 3 more minutes for additional charging
– Check all clamps for tight metal contact
– Limit attempts to 15 seconds each with 30-second breaks to cool the starter
Never let the donor vehicle run over 10 minutes—this drains its battery and strains the alternator.
Disconnect Cables Safely After Success
Removing cables in wrong order causes dangerous back-sparks. Follow this reverse sequence immediately after the dead car starts:
- Black from ground point on dead vehicle
- Black from donor battery negative terminal
- Red from donor battery positive terminal
- Red from dead battery positive terminal
Keep clamps separated and away from metal surfaces during removal. Never let red and black clamps touch each other while connected to batteries.
Drive Immediately to Recharge the Battery
Do not shut off the engine after a successful jumpstart. Your alternator needs time to recharge the depleted battery. Drive continuously for at least 20 minutes on surface streets—avoid stop-and-go traffic. Turn off non-essential accessories like heated seats, AC, and radio to maximize charging efficiency. Head directly to an auto parts store for free battery testing. If the battery is over 3 years old or shows slow cranking, replacement is likely needed. A healthy battery should hold charge for weeks without driving—if yours dies again within days, your alternator may be failing.
Troubleshoot Failed Jumpstarts Like a Pro
When the Engine Won’t Crank
- Check connections: Scrape corrosion from terminals until shiny metal appears
- Test cable gauge: Thin cables overheat with large engines—upgrade if needed
- Verify battery age: Batteries over 5 years rarely recover fully
- Listen for clicks: Rapid clicking means poor connections; single click indicates dead battery
Warning Signs to Stop Immediately
- Blue sparks or arcing: Disconnect and recheck all clamps
- Sulfur smell (rotten eggs): Indicates battery failure—replace immediately
- Swollen battery case: Stop procedure—battery is damaged beyond jumpstarting
Prevent Future Dead Batteries With Simple Habits
Monthly Maintenance Routine
- Clean terminal corrosion with baking soda/water paste and wire brush
- Tighten loose cable connections (shouldn’t wiggle on posts)
- Test voltage with a $10 multimeter (12.6V = full charge; below 12.2V needs attention)
- Check for parasitic drain: Disconnect negative terminal overnight—if dead next day, something’s draining power
Emergency Kit Essentials
- 4-gauge jumper cables (store in passenger compartment, not trunk)
- LED work light for nighttime emergencies
- Disposable gloves and safety glasses
- Small container of dielectric grease to prevent future corrosion
Special Vehicle Considerations You Can’t Ignore
Hybrids and EVs: Never use standard jumpstarting methods. Toyota hybrids require connecting to an auxiliary battery under the hood; Teslas have specific jump points. Consult your manual—improper attempts can brick the computer system. Luxury vehicles (BMW, Mercedes): Many have sensitive electronics that require load testers before jumpstarting to prevent $2,000+ control module damage. Extreme weather: Avoid jumpstarting in heavy rain—water conducts electricity and risks short circuits. Below 20°F, let the donor vehicle warm up 5 minutes first; cold batteries accept charge slower.
Final Note: While how to jumpstart a car battery with cables is a lifesaver, repeated dead batteries signal serious issues. After your successful jump, get a full charging system test—70% of “dead battery” cases actually stem from failing alternators or parasitic drains. A quality replacement battery costs $120-$200, but ignoring the root cause risks being stranded again tomorrow. Keep your jumper cables accessible, practice the steps once a year, and you’ll never pay for a tow job again. Your next dead battery won’t be an emergency—just a 10-minute pit stop.


