
Ever popped your hood only to find zero space for that turbo kit you’ve been planning? Or noticed your car pushing wide through corners during spirited drives? Moving your car battery to the trunk solves both problems while creating a cleaner engine bay. This critical upgrade shifts 30-70 pounds of weight rearward, improving handling balance by 1-2%—equivalent to moving your engine 5-10 inches backward. In this guide, you’ll learn exactly how to relocate your battery safely with proper wiring, mounting, and racing compliance. We cover everything from cable sizing to kill switch installation so you can execute this transformation in 2-3 hours with basic tools.
Why Relocate Battery to Trunk
Shifting your battery to the trunk delivers measurable performance gains beyond just tidying your engine bay. For rear-wheel-drive cars, moving 40+ pounds from over the front axle to behind the rear axle optimizes weight distribution, reducing understeer and improving traction during hard acceleration. Track enthusiasts report noticeably sharper turn-in and more balanced rotation through corners after completing this modification.
Engine bay clearance becomes immediately apparent when adding performance components. On vehicles like the 2009 Civic Si, relocating the battery provides direct access to the starter motor for maintenance while creating space for intercoolers or ignition upgrades. For show cars, hidden wiring and a clean engine compartment deliver that professional finish judges notice. Most importantly, NHRA, SCCA, and IHRA racing require batteries outside the passenger compartment—making the trunk your only compliant option for competition.
Choose Right Battery Type for Trunk Mounting

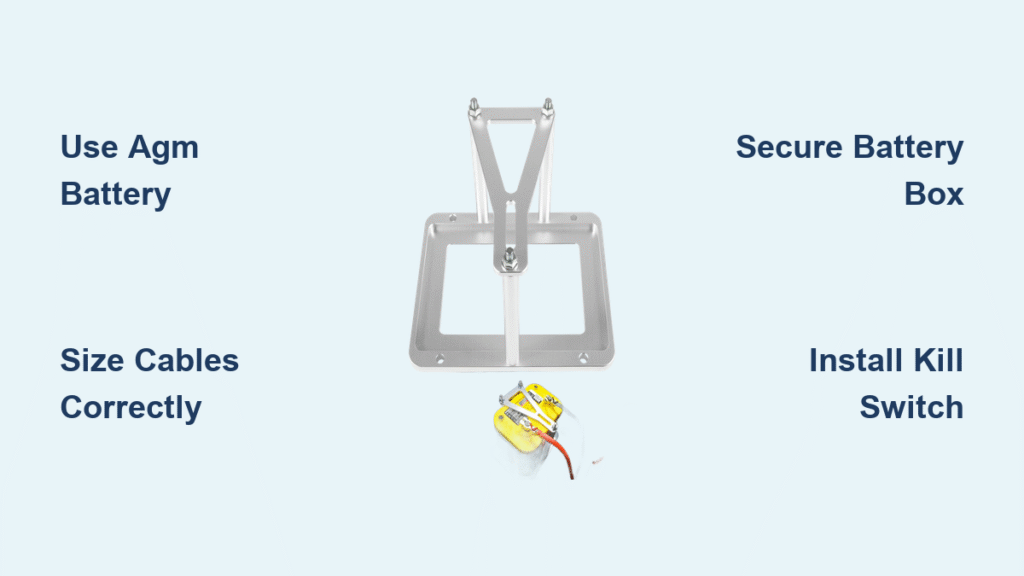
Your battery chemistry determines safety requirements and installation complexity. AGM batteries like the Optima Yellow Top provide the best street balance—sealed construction eliminates venting needs while handling 42-48 pounds of weight. These deep-cycle units deliver reliable cranking power even after accessory drains and cost $150-$250 for standard automotive sizes. Avoid flooded lead-acid batteries unless absolutely necessary; they require metal containment boxes and vent hoses routing outside the trunk.
Lithium batteries from Braille or Odyssey offer dramatic weight savings at 11-25 pounds but demand careful sizing. Their $400-$800 price tag may be justified for track cars, but undersized units struggle with high-draw lighting systems. Never use standard automotive lithium batteries—they lack the cold-cranking amps needed for reliable starts. For daily drivers, AGM remains the smartest choice balancing safety, cost, and performance when you move car battery to trunk.
Calculate Exact Cable Requirements
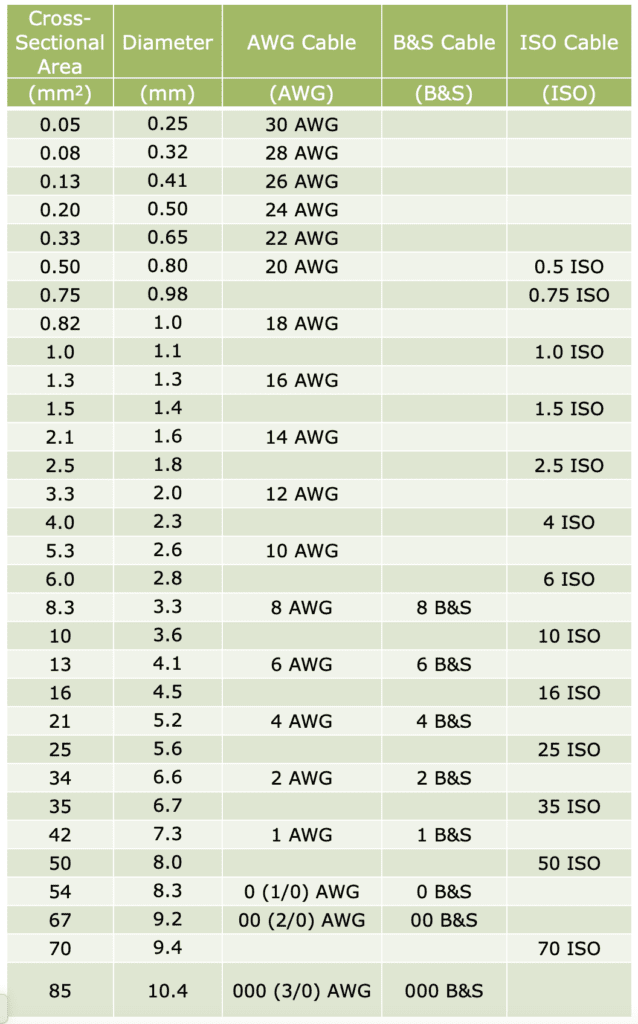
Undersized cables cause dangerous voltage drops that cripple starter performance. Measure your total cable run from battery positive terminal to starter solenoid—most trunk installations require 15-20 feet round trip. For standard 130-150A alternators, 1/0 AWG welding cable handles the load with minimal voltage drop. Upgrade to 2/0 AWG if you have high-output charging systems (270A+) or big-block V8s drawing massive cranking amps.
Here’s the critical math: Keep voltage drop under 0.12V (1% of 12V system). Multiply your cable length by expected current draw (typically 250-400A during cranking), then compare to copper resistance per foot. For example, 18 feet of 1/0 cable at 300A cranking current yields 0.09V drop—well within safe limits. When in doubt, go one gauge larger; the minimal weight penalty beats slow cranking or melted insulation.
Safety Requirements for Street and Race Compliance
Street legality hinges on proper component selection. Sealed AGM or lithium batteries with correctly sized fusing satisfy DOT inspectors in most states—no additional venting required. But racing changes everything. NHRA drag racing demands a metal battery box vented outside the trunk unless using sealed batteries, plus a rear-mounted kill switch interrupting the positive cable. Crucially, four-pole switches become mandatory if you retain an alternator to prevent load-dump spikes that fry engine computers.
SCCA road racing requires either a sealed battery or metal enclosure with firewall separation in hatchbacks. Position kill switches where track officials can reach them—typically at the rear bumper or windshield base. Always verify current rules in your sanctioning body’s latest rulebook before finalizing your how to move car battery to trunk project. One overlooked detail can disqualify your entire build.
Mount Battery Box Safely in Trunk

Optimal Placement Strategy
Position your battery box in the rear-right trunk corner whenever possible. This location optimizes weight transfer for right-hand turns while keeping mass away from fuel tanks and spare tires. Before drilling, place your battery in the box and check clearance over critical components—especially fuel lines and the spare tire well. Measure twice: a misplaced hole could puncture your fuel tank during installation.
Secure Mounting Process
- Outline the battery box footprint on the trunk floor using masking tape
- Drill 1/4-inch pilot holes at each corner, verifying no brake lines or wiring harnesses underneath
- Deburr holes and apply rust encapsulator like POR15 to prevent corrosion
- Install with Grade-5 bolts and oversized fender washers torqued to 25-30 ft-lbs
- Test-fit the battery while wiggling the box—zero movement should occur
Pro tip: Route cables before final mounting. Some Optima batteries position terminals differently, affecting your cable path. Never secure cables directly to the box—use rubber-lined Adel clamps every 12 inches.
Route Cables Like Professional Installers
Interior vs. Frame Rail Pathways
Interior routing through the cabin protects cables from road debris and exhaust heat but requires drilling through floor pans. Always use rubber grommets at every penetration point and secure cables with vibration-dampening clamps. Frame rail routing provides shorter cable runs but exposes wiring to elements—wrap cables in high-temp split-loom sleeve for protection. Avoid routing near exhaust components; temperatures exceeding 250°F melt standard insulation.
Firewall Pass-Through Essentials
Create your firewall entry using a 1-1/4-inch hole with dual protection: first install a rubber grommet, then seal edges with rust encapsulator. For moisture-proof installations, use mil-spec bulkhead connectors that maintain weather sealing. Never skip this step—water intrusion causes rapid corrosion and electrical faults. Ground your negative cable to the trunk floor within 6 inches of the battery, then run a separate 2 AWG strap to the engine block to eliminate ground loops.
Test and Troubleshoot System Immediately
Voltage Drop Verification
Connect your multimeter between the battery positive terminal and starter solenoid post. Crank the engine while monitoring the reading—any drop exceeding 0.1V indicates undersized cables or poor connections. Slow cranking typically means voltage drop over 0.3V; upgrade to larger gauge cable immediately. If your mega-fuse blows during testing, inspect every inch of cable routing for contact with sharp metal edges.
Critical Final Checks
- Verify kill switch operation interrupts all power (starter, ECU, fuel pump)
- Confirm alternator output at idle (13.8-14.4V) and 2000 RPM
- Apply dielectric grease to all terminals to prevent corrosion
- Tug-test every connection at 25 ft-lbs torque
Warning: Never use sheet-metal screws for grounding points. Star washers and through-bolts are mandatory for reliable electrical contact.
Maintain Trunk Battery System Long-Term
Perform these checks every six months to prevent failures:
– Inspect battery box bolts for loosening due to vibration
– Examine cable insulation at grommets for chafing or cracking
– Clean terminals with wire brush and apply corrosion-inhibiting spray
– Verify mega-fuse continuity shows less than 1 mΩ resistance
During oil changes, visually confirm no cable abrasion against suspension components. For lithium batteries, monitor state-of-charge monthly—deep discharges permanently damage cells. AGM units tolerate deeper cycling but still benefit from periodic voltage checks. Proper maintenance ensures your how to move car battery to trunk project delivers years of trouble-free performance.
Example Build: 2009 Civic Si Street Setup
This real-world relocation cost $400 and took 2.5 hours:
– Battery: Optima Yellow Top D35 (48 lb, 620 CCA)
– Box: Jaz 81500 sealed plastic with vent hose kit
– Cables: 18 ft 1/0 AWG TEMCO welding cable (positive), 3 ft 1/0 AWG to trunk floor (negative)
– Protection: 150A marine mega-fuse within 12 inches of battery
– Switch: Rear-mounted 4-pole kill switch with “PUSH OFF” label
The Civic gained immediate benefits—easier starter access, cleaner engine bay, and slightly improved turn-in response. Voltage drop measured 0.08V during cranking, confirming proper cable sizing. This setup satisfies NHRA street-legal requirements while providing daily-driver reliability.
Moving your car battery to the trunk transforms both performance and aesthetics when executed correctly. Prioritize cable sizing, secure mounting, and thorough testing to avoid common pitfalls. The result? A more balanced car, liberated engine bay space, and racing compliance—all achieved through this fundamental modification. Start planning your relocation today using the wire sizing chart and component checklist to ensure success on your first attempt.


