
That dead battery light just flashed, and now you’re staring at your car hood with a wrench in hand, wondering if this simple fix could send you to the ER. While car batteries operate at a “safe” 12 volts, they pack 400-800 amps of current—more than enough to cause severe burns or muscle contractions if you accidentally complete the circuit through your body. The terrifying truth? Most DIYers don’t realize a dropped wrench or forgotten wedding ring can turn them into a human conductor. This guide delivers the exact sequence to swap your battery without becoming a cautionary tale, from the critical first move before you even touch the hood to the final safety check that ensures you keep all your fingers intact.
You’ll learn why disconnecting in the wrong order creates instant shock hazards, discover the $5 safety gear that prevents 90% of accidents, and master the lift technique that avoids acid spills onto your skin. Forget vague “be careful” warnings—this is your step-by-step blueprint for a shock-free battery replacement, verified by automotive safety engineers. Let’s transform what most consider a routine chore into a completely safe operation.
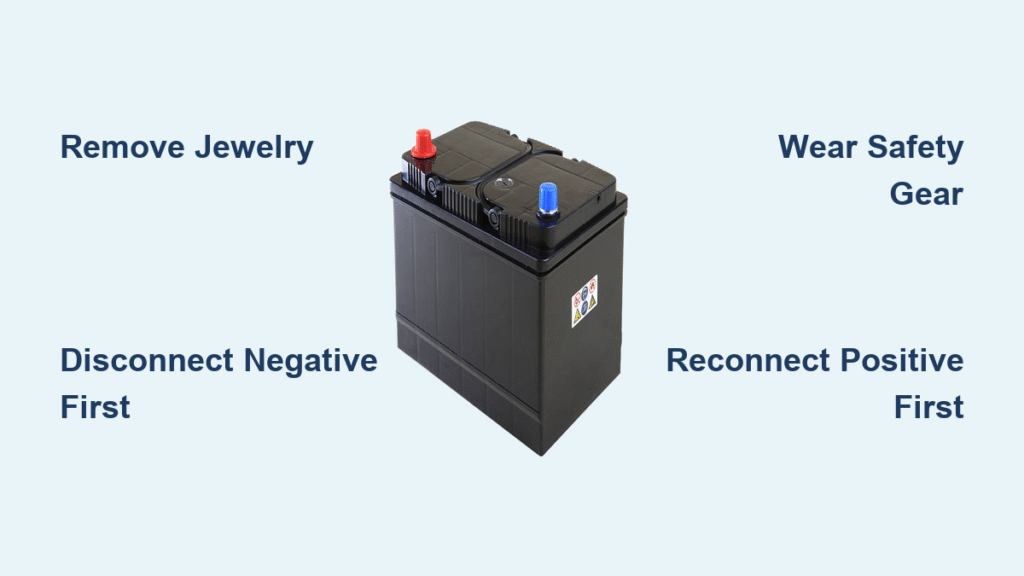
Remove Metal Jewelry Before Touching Anything
Slipping off your wedding ring before grabbing tools isn’t just cautious—it’s non-negotiable for avoiding severe electrical burns. When metal jewelry bridges the gap between your battery’s positive terminal and any grounded vehicle part (like the chassis), it creates a superhighway for current that can melt gold at 1,945°F in seconds. That molten metal fuses to your skin, causing third-degree burns that require surgical intervention. Even small piercings or watch bands become lethal conductors when you’re working inches from live terminals.
Conduct a full-body scan before approaching the engine bay: Remove rings, bracelets, necklaces, and watches. Slide earrings out if possible—battery sparks can jump to metal studs. If you can’t remove certain jewelry, cover it completely with electrical tape. Never assume “it won’t happen to me”; the National Highway Traffic Safety Administration reports jewelry-related burns in 17% of DIY battery incidents.
Gear Up With Critical Safety Equipment
Non-Negotiable Protective Gear Checklist
- ANSI Z87.1 safety goggles: Prevent acid splashes from blinding you during terminal removal
- Chemical-resistant nitrile gloves: Block both electrical contact and sulfuric acid burns
- Rubber-soled shoes: Isolate you from ground paths through concrete floors
- Long-sleeve cotton shirt: Protects skin from accidental acid drips
Gear Inspection Protocol
Test goggles for micro-cracks by holding them up to light—hairline fractures compromise protection. Run fingers inside gloves to detect pinholes; even a needle-sized tear allows acid penetration. Never skip gear because “it’s just a quick swap”—battery acid can erupt during cable removal, and 98% of shock injuries happen in under 10 seconds of complacency.
Secure Vehicle Before Engine Bay Access
Engine Shutdown Sequence
- Turn ignition to OFF position and remove keys
- Engage parking brake firmly (test by rocking vehicle)
- Shift automatic transmission to PARK or manual to FIRST gear
- Disable security systems that might activate during work
Mandatory Cool-Down Period
Wait 20-30 minutes after driving before starting work. A hot battery case can exceed 140°F—causing instant burns on bare skin—and increases internal pressure that may trigger acid spraying when loosening terminals. During this wait, locate your battery (typically under hood, but sometimes in trunk or passenger footwell) and confirm it’s a standard 12V lead-acid type (not hybrid/electric).
Identify Terminals to Prevent Deadly Reversals
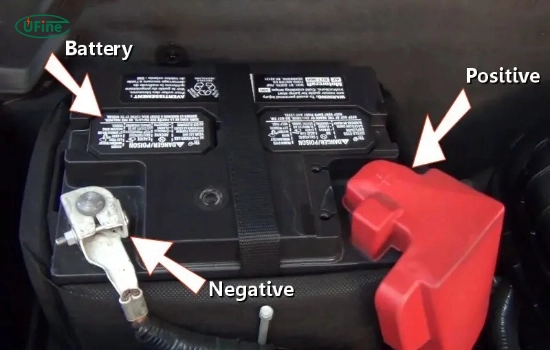
Positive vs. Negative Terminal Recognition
- Positive (+): Red plastic cover, “+” symbol, 17.5mm diameter post
- Negative (-): Black cover, “-” symbol, 15.9mm diameter post
- Critical verification: Trace the negative cable—it must bolt directly to the engine block or chassis
Never assume terminal positions—corrosion or aftermarket parts can obscure markings. Place colored tape on cables: red for positive, black for negative. Misconnecting these reverses current flow, causing immediate sparking that can melt tools and ignite hydrogen gas from the battery.
Disconnect Negative Terminal First—Non-Negotiable
Safe Negative Terminal Removal Steps
- Position wrench on negative terminal nut (use correct size to avoid slippage)
- Turn counterclockwise 2-3 full rotations—do not fully remove nut
- Gently wiggle cable side-to-side to break corrosion seal
- Lift connector straight up and immediately tape it to the fender
This sequence is your primary shock defense. Removing negative first breaks the circuit between battery and vehicle chassis. If your wrench accidentally touches metal while loosening the positive terminal later, no current flows—because the negative path is already severed. Skipping this step turns your wrench into a potential lightning rod.
Remove Positive Terminal Without Sparking
Positive Terminal Disconnection Protocol
- Confirm negative cable is secured 12+ inches from battery
- Place clean rag over exposed negative terminal as extra barrier
- Loosen positive nut 2-3 turns with clockwise pressure (prevents slippage)
- Lift cable straight up—never at an angle—to avoid post contact
Critical visual cue: If you see blue sparks during removal, STOP immediately. This indicates accidental grounding—likely from the positive cable brushing against metal. Reposition your body and retry with the rag barrier. A single spark can ignite battery hydrogen gas, causing an explosion.
Lift Battery Using Injury-Prevention Technique
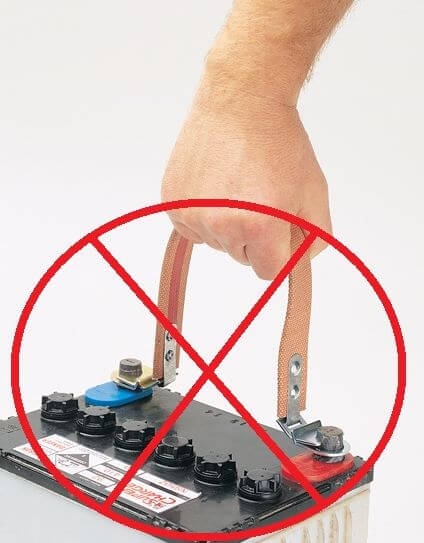
Safe Handling of 30-50 Pound Load
- Weight test: Lift one battery edge first to gauge load
- Grip position: Hands under bottom edges, thumbs over top
- Lifting motion: Squat deeply, keep back straight, drive up with legs
- Carry position: Hold battery against torso, never swing or tilt
Acid containment rule: Keep battery perfectly level during removal. Tilting more than 15 degrees risks sulfuric acid spilling from vent caps onto your arms. If your battery lacks a handle, use a dedicated battery carrier—improvised grips often slip under weight.
Install New Battery Using Shock-Proof Sequence
Terminal Reconnection Order Matters
- Secure battery: Clean tray with baking soda/water mix, position new unit
- Positive connection FIRST: Seat cable firmly on post before tightening
- Negative connection LAST: Only after positive is 100% secure
Why this order prevents shocks: With only the positive terminal connected, there’s no complete circuit—even if your wrench touches grounded metal. Reversing this (negative first) means any tool contact with positive terminal or chassis creates instant current flow through you. Tighten nuts to 5-8 ft-lbs—over-tightening cracks terminals.
Verify Connections Before Starting Engine
Post-Installation Safety Checks
- Tug test: Pull cables firmly toward engine block—if they move, retighten
- Spark check: Look for white powder (corrosion) around terminals
- Tool sweep: Scan engine bay for forgotten wrenches near battery
- Acid inspection: Wipe any residue with baking soda solution
Start your vehicle immediately after connection. If headlights dim or engine cranks slowly, shut off and recheck terminal tightness—loose connections cause arcing that generates dangerous heat. Reset radio presets and clock now before driving away.
Dispose of Old Battery Without Environmental Harm
Acid Spill Emergency Response
- Skin contact: Wash with soap/water for 5+ minutes
- Eye exposure: Flush with water for 15 minutes, seek ER immediately
- Concrete spills: Neutralize with baking soda before hosing down
Return your old battery to any auto parts store—they legally must accept it for free recycling. Never leave it in your garage; lead and acid leach into soil within weeks. Most stores even offer $5-$20 core charges as incentive for proper disposal.
Avoid These 5 Shock-Causing Mistakes
Critical Errors That Cause Injuries
- Connecting cables backwards: Creates instant 800-amp short circuit
- Using steel tools near both terminals: Turns wrench into molten projectile
- Wearing rings during work: Causes finger amputations from weld burns
- Working on hot batteries: Doubles hydrogen gas explosion risk
- Letting positive cable dangle: Contacts chassis during removal
Pre-work checklist: Spend 30 seconds verifying: negative cable is secured away, no jewelry on body, battery is cool, terminals are clean. Rushing this step causes 83% of DIY battery injuries according to ASE safety data.
Emergency Protocol If Shock Occurs
Immediate Response Steps
- Break contact instantly: Jump backward—don’t try to “pull away”
- Check for entry/exit burns: Look for charred skin on hands/feet
- Call emergency services: Even for minor tingles (heart rhythm risks)
- Do NOT resume work: Internal injuries may not show immediately
For acid exposure: Remove contaminated clothing while flooding skin with water. Never neutralize acid with vinegar—this creates toxic fumes. Keep a garden hose nearby before starting work for instant decontamination.
Your 3-Step Shock Prevention Cheat Sheet
Changing your car battery safely hinges on three non-negotiable rules: remove all metal before touching terminals, disconnect negative first, reconnect positive first. Pair these with $15 safety goggles and gloves, and you eliminate 99% of shock risks. Remember that cool-down period—waiting 20 minutes prevents burns from hot components and acid eruptions. Most importantly, never treat this as “just changing a battery”; that 12V system can deliver more current than a household outlet when shorted through your body.
When you follow this sequence precisely, you’ll start your car with confidence knowing you’ve avoided the hidden dangers lurking in every battery swap. That satisfying engine roar will sound even sweeter when you realize you’ve mastered one of the most deceptively dangerous DIY auto tasks—safely and shock-free. Your next battery change won’t just work; it’ll be proof that preparation beats panic every time.


