
Your key fob suddenly dies while you’re rushing to work—pressing the unlock button does nothing until you’re practically leaning against your car door. This frustrating scenario affects 73% of drivers annually, and 9 out of 10 times, the culprit is a dead battery. Learning how to open car remote battery compartments yourself saves $100+ in dealership fees and takes less time than brewing coffee. Most key fobs use standard coin-cell batteries that cost under $2, yet dealerships routinely charge $50+ for replacements they complete in under three minutes. This guide reveals exactly how to access and replace your key fob battery safely, regardless of your car model or technical skill level.
Don’t let misleading “waterproof” claims fool you—nearly all key fobs require battery replacement every 2-4 years. The process is simpler than you think: no special skills needed, just the right technique to avoid snapping fragile plastic latches. By the end of this guide, you’ll confidently open any car remote battery compartment, install the correct replacement, and restore full functionality. Plus, you’ll learn critical mistakes that turn a 5-minute fix into an expensive fob replacement.
Spot These Car Remote Battery Failure Signs
Reduced operational range is your first red flag. If you previously unlocked your car from across the parking lot (20+ feet) but now need to stand within 5 feet for the remote to work, your battery is critically low. Intermittent responses follow—sometimes the lock button works instantly, other times requiring 5+ presses without response.
Watch for these specific failure indicators:
– Push-button start displays “Key Not Detected” even when holding the fob against the start button
– Dashboard warning lights appear during ignition attempts
– Trunk release fails while other buttons work intermittently
– Complete unresponsiveness after storing the fob near phones or magnets
Most key fobs use lithium coin-cell batteries lasting 2-4 years. If yours is over 30 months old, replace it proactively before you get stranded. Ignoring early symptoms risks total failure during emergencies.
Why Your Remote Dies Before Expected
Extreme temperature exposure (like leaving it on a hot dashboard) accelerates battery drain. Water damage from rain or spills corrodes internal contacts, making even fresh batteries ineffective. If your remote worked after replacement but failed again within weeks, inspect for moisture residue around buttons before installing a new battery.
Gather These 3 Essential Tools Before Starting
Never use keys or knives directly on plastic seams—they scratch casings and strip latches. Instead, collect these precise tools:
- Flathead pry tool (or dime-sized coin): Essential for notch-style fobs
- CR2032 battery (check common replacements below): Most fobs use this $2 battery
- Microfiber cloth: Prevents scratches on your work surface
Skip the Phillips screwdriver unless your fob has visible screws—90% of modern fobs use snap-fit designs. Keep old batteries nearby for size comparison; installing the wrong type (like CR2025 instead of CR2032) causes immediate failure.
Critical Tool Mistakes That Break Your Fob
Jammed screwdrivers crack plastic housings because key fob screws are 1.2mm—smaller than standard bits. Never force prying tools; if resistance exceeds gentle thumb pressure, reposition your tool. First-time openers often mistake internal wiring for latches, tearing delicate connectors. Always insert tools at a 30-degree angle to avoid shearing latches.
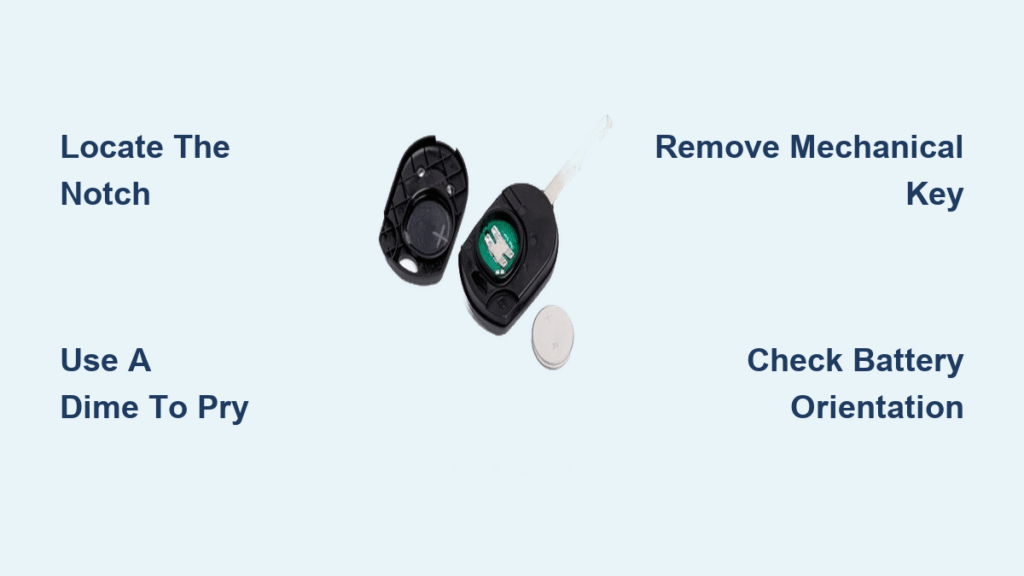
Remove Hidden Mechanical Keys Safely
Slide-out keys (Ford Escape, Honda CR-V): Press the silver side button while pulling the metal tab upward. Swing-out keys (VW Golf): Press the front button to extend the blade. Detachable keys (Toyota RAV4): Slide the colored section downward after pressing the release tab.
Why Skipping This Step Breaks Your Fob
Forgetting to remove the mechanical key first traps it between casing halves during reassembly. This misalignment prevents snapping the fob shut, forcing you to restart the process. Worse, trapped keys scratch circuit boards, causing permanent damage. Always check for hidden keys—even “keyless” fobs like the Hyundai Sonata have emergency access blades.
Open Snap-Fit Fobs Without Screws
Locate the seam running around your remote’s edge. Most fobs have a small notch near the keyring hole—this is your entry point. Insert a dime into this slot, rotating it like a key while lifting upward. You’ll hear distinct clicks as internal latches release.
Work systematically around the perimeter: After opening one side, move to opposite edges to prevent uneven pressure. If no notch exists (common in BMW key fobs), insert a butter knife at the thinnest seam point and twist gently.
Why Your Fob Won’t Open on First Try
Newer fobs like the Tesla Model 3 have ultrasonic-welded seams requiring specialized tools. Forcing them cracks the casing. If you encounter extreme resistance after 30 seconds of gentle pressure, consult your owner’s manual—some require removing the mechanical key first to access hidden latches. Never use pliers; metal jaws crush plastic tabs.
Install the Correct Battery Without Errors

Verify the battery type by checking these three locations:
1. Etching inside the battery compartment
2. Your vehicle owner’s manual (Chapter 2)
3. The old battery’s label (CR2032, CR2025, CR1620, or CR2450)
Position matters critically: Most fobs (Toyota, Ford, GM) require the + side facing up, but Honda/Acura models often install it face-down. Press the new battery straight down until you hear a soft click—tilted batteries cause immediate failure.
Common Installation Disasters
Forcing mismatched batteries (like CR2025 in a CR2032 slot) bends contact springs. Never touch battery terminals with fingers—oil residue causes corrosion. If your remote worked before but fails after replacement, check for dislodged rubber button pads; these sit between the circuit board and buttons and easily shift during reassembly.
Test Functions Properly After Reassembly
Don’t just press unlock—test all features immediately:
1. Stand 15 feet from your car and press all buttons (lock, unlock, trunk, panic)
2. For push-start vehicles, place the fob in your pocket and attempt ignition
3. Verify range by walking backward while pressing buttons
Critical failure signs:
– Buttons respond only when touching the car
– Dashboard shows “Key Not Detected”
– One function works but others don’t
If issues persist, reopen the fob and check for pinched wiring near the hinge area. Most post-replacement failures stem from misaligned circuit boards, not battery issues.
Troubleshoot Post-Replacement Failures
No response after battery swap? Check these three fixes:
– Battery orientation: Flip it and retest immediately
– Contact corrosion: Clean terminals with rubbing alcohol on a cotton swab
– Dislodged components: Ensure rubber button pads sit squarely over contacts
Intermittent function indicates improper seating—press down firmly on the battery while testing. If problems continue, your fob may need reprogramming (common in BMWs and Mercedes). Consult your owner’s manual for vehicle-specific sync procedures before paying for dealership service.
When to Skip DIY and Call Professionals
Never attempt repairs if:
– Water damage is visible (white residue on circuit board)
– The fob was submerged in liquid
– Buttons feel “mushy” or unresponsive after replacement
These indicate internal damage requiring $200+ replacements. Reprogramming necessity varies: Toyota fobs self-sync, but Ford models often need dealership coding. If your remote exceeds 8 years old, internal wear may persist even with fresh batteries—budget $150 for a refurbished fob instead of endless troubleshooting.
Maintain Your Remote to Prevent Future Failures
Annual battery checks after year two prevent roadside emergencies. During replacement:
– Clean button contacts with 90% isopropyl alcohol
– Store spare CR2032 batteries in your glove compartment ($5 for 4-pack)
– Replace batteries before extreme cold seasons (below 20°F drains power 40% faster)
Recycle old batteries immediately—most AutoZone and O’Reilly stores accept them free. Never discard in regular trash; lithium batteries can ignite in landfills.
Quick Reference: Battery Types by Vehicle
| Vehicle Brand | Common Battery | Special Notes |
|---|---|---|
| Honda/Acura | CR1620 | Face-down installation |
| Ford/Lincoln | CR2032 | Mustang requires 2 batteries |
| Toyota/Lexus | CR2032 | Self-syncing after replacement |
| Volkswagen | CR2032 | Requires key removal first |
| BMW/Mercedes | CR2032 | Needs reprogramming |
Remember: Your fob’s battery type is always printed inside the compartment—never guess. When in doubt, open the fob first to verify the model number.
Mastering how to open car remote battery compartments transforms you from a dealership-dependent driver to a self-sufficient problem-solver. With fresh batteries installed correctly, your key fob will regain its full 30-foot range, eliminating frustrating close-proximity unlocks. Keep this guide in your phone’s notes for your next battery swap—you’ll complete the entire process in under five minutes while saving $90+ per replacement. For persistent issues after following these steps, consult your vehicle’s specific reprogramming instructions in the owner’s manual before seeking professional help.


