
You’re stranded at the grocery store with rain pouring down, your car battery just died, and your driver’s side window is stuck halfway open. Water’s flooding your seat, your electronics are at risk, and you can’t wait for roadside assistance. This terrifying scenario happens more often than you’d think—but you don’t need a tow truck to save your vehicle from water damage. The good news is that most window failures during battery death aren’t actually broken; they’re simply disabled. With the right techniques, you can manually roll up your car window even when your battery is completely dead, protecting your interior from damage and restoring security to your vehicle.
Most modern cars rely on electrical systems to operate windows, but mechanical components remain functional even without power. Whether you’re dealing with a dead battery, blown fuse, or temporary electrical glitch, these proven methods require only basic hand techniques and simple household tools you likely already have. This guide delivers immediate solutions to seal your window shut fast, along with critical safety precautions and prevention strategies to avoid future emergencies.
Hand Pressure Method for Immediate Window Closure
When your window is partially down with a dead battery, your hands become your most effective tool. Position yourself outside your vehicle at the open door. Place one palm flat against the glass’s exterior surface and your other palm against the interior surface, creating firm contact on both sides. Apply steady, even pressure—not forceful jerking—and slowly slide both hands upward in unison to raise the window.
What to Do With Minimal Glass Exposure
If only a small portion of glass shows above the door frame, first grip the upper edge with your fingertips to pull it upward enough to establish full palm contact. The key is maintaining consistent pressure—too little won’t move the glass, while too much risks cracking it. This technique works best when you have at least 2-3 inches of glass exposed above the door frame. Work slowly and deliberately, pausing every few inches to reposition your hands as needed.
Critical Safety Warning: Keep your fingers clear of the window opening at all times. Should the motor unexpectedly engage from residual power or future repair attempts, the automatic upward movement could cause severe finger injuries or amputation.
Door Slam Realignment for Derailed Window Tracks
When you hear the window motor whirring without corresponding glass movement, your regulator has likely derailed from its track. This common issue requires mechanical realignment rather than electrical repair. Press and hold the window switch in the “up” position while forcefully slamming the car door closed. The combined mechanical shock plus motor engagement often repositions the window onto its proper track.
Targeted Striking Technique for Stubborn Motors
If door slamming fails, deliver controlled impacts to specific door locations while maintaining upward switch pressure. Using your palm or heel, strike the door’s central panel area where the window motor mounts—typically the lower third of the door structure. Alternative strike points include along the upper door panel adjacent to the window opening. These precise impacts can temporarily stimulate a failing motor by overcoming internal electrical resistance or dislodging minor obstructions. Apply firm, sharp impacts—not wild hammering—to avoid damaging interior door components.
Child Lock Check: The 30-Second Fix You’re Missing
Before assuming complete electrical failure, verify child safety locks haven’t inadvertently disabled window operation. These locks can prevent individual door switches from functioning even when master controls remain active. Cycle the child lock switch on and off several times, testing window response after each change. This simple step takes 30 seconds but solves approximately 15% of “dead window” cases—many drivers accidentally engage these locks without realizing it during normal operation.
Master Switch Override Testing Procedure
When a passenger window fails to respond to its dedicated switch, immediately test operation using the master control on the driver’s door. This diagnostic step determines whether the issue lies with individual switch circuitry or represents broader electrical failure. Successful operation from the master switch indicates localized problems rather than window motor or regulator failure. This knowledge saves hours of unnecessary troubleshooting and directs your efforts to the actual problem area.
Blown Fuse Replacement: The $2 Fix for Stuck Windows
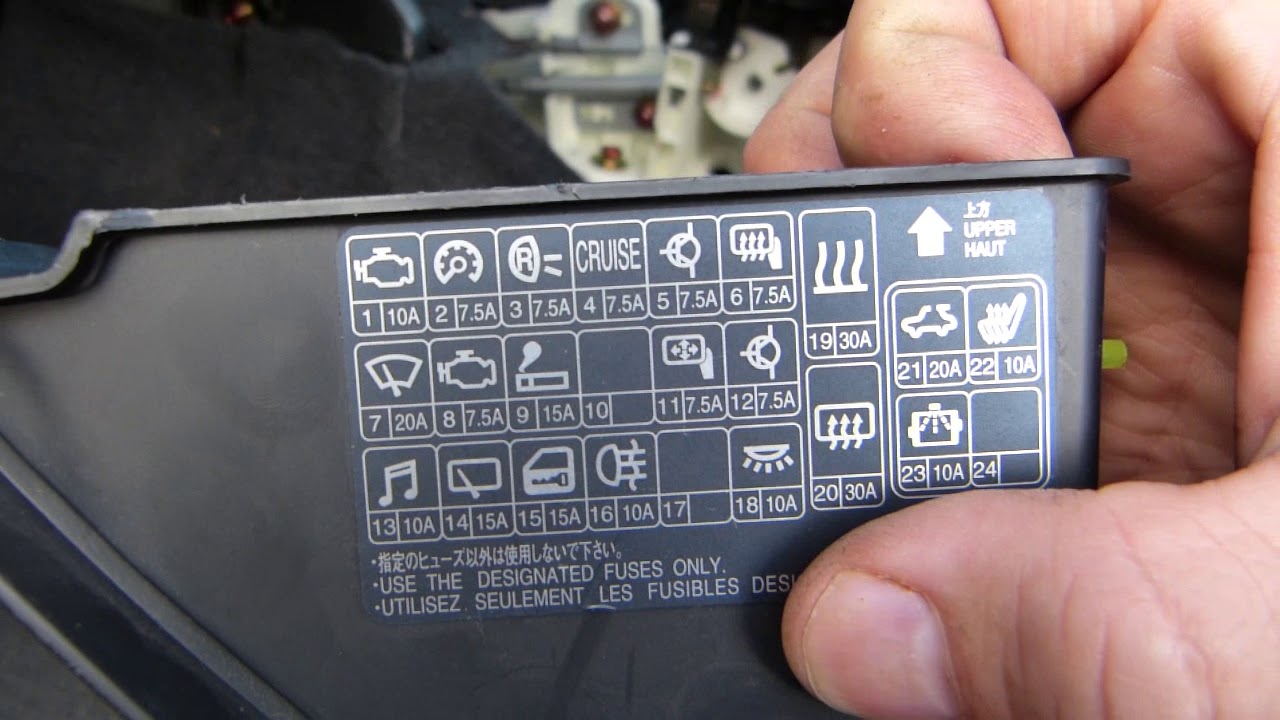
When complete electrical failure affects all windows simultaneously, check your vehicle’s fuse panel—typically behind a small access panel on the driver’s side dashboard or kick panel. Consult your owner’s manual fuse diagram to identify the specific fuse protecting window circuits. A blown fuse shows visible wire element melting or burning. Replacement fuses cost only a few dollars at auto parts stores and install through simple pull-and-snap insertion.
Fuse Replacement Step-by-Step
- Locate your vehicle’s fuse box (check both engine compartment and cabin locations)
- Identify the window circuit fuse using your owner’s manual diagram
- Remove the blown fuse with plastic fuse pullers or small needle-nose pliers
- Insert a new fuse of identical amperage rating (typically 15-30A)
- Test window operation immediately after replacement
This 5-minute fix resolves approximately 20% of complete window failures and requires no professional service. Keep a basic assortment of fuses matching your vehicle in your glove compartment for future emergencies.
Hard Battery Reset: Clearing Electrical Glitches Without Replacement

To potentially restore window function without battery replacement, perform a complete electrical system reset. First disconnect the negative battery terminal, followed by the positive terminal. Fully remove the battery from the vehicle to prevent accidental reconnection. Connect the positive and negative leads directly together using jumper cables if necessary, maintaining contact for 30 minutes to fully discharge residual system capacitance.
Why This Resets Window Operation
This process resets electronic control modules that may have locked windows in a “fail-safe” position after detecting electrical irregularities. It’s particularly effective after jump-starting a dead battery, when inconsistent power flow can trigger vehicle safety protocols. After completing the reset, reinstall the battery terminals (positive first, then negative) and immediately test window operation before starting the engine.
Door Panel Removal for Direct Regulator Access
When manual methods fail and electrical restoration attempts prove unsuccessful, direct access to the window regulator becomes necessary. Most door panels detach through concealed clips and screws—locations vary by year, make, and model. Search online for specific vehicle repair diagrams showing clip positions and fastener locations for your exact make and model before attempting removal.
Essential Panel Removal Steps
- Remove visible screws (often hidden under armrest covers or door handles)
- Start prying at the bottom corner using a plastic trim tool
- Work upward slowly, releasing clips progressively
- Disconnect electrical connectors before fully removing panel
- Locate the window regulator mechanism for manual manipulation
Once exposed, you can often manually crank the window up using the regulator’s manual override point—typically a small hexagonal or square drive located on the regulator assembly.
Post-Repair Safety Protocol: Avoiding Secondary Failures
After successfully raising your window through emergency methods, avoid operating it until identifying and permanently resolving the underlying failure cause. Consider temporarily covering the window switch with electrical tape to prevent habitual use that could cause re-failure or further damage. This precaution proves especially critical when using temporary fixes like motor stimulation or track realignment, as these solutions rarely provide long-term reliability.
When to Seek Professional Help
Schedule professional diagnosis within 1-2 days if your window fails to operate normally after battery replacement or if you notice any unusual noises during operation. A window that fails once will likely fail again without proper component repair or replacement. Persistent issues may indicate failing regulators, worn motors, or wiring problems requiring expert attention.
Battery Maintenance Strategies to Prevent Future Emergencies
Prevent future window failures by maintaining your car battery properly. Test battery voltage monthly using an inexpensive multimeter, especially before extreme weather seasons. Replace batteries every 3-5 years regardless of apparent condition—electrical failures often occur without warning signs. Clean battery terminals regularly to prevent corrosion buildup that can disrupt electrical flow to critical systems.
Essential Emergency Kit for Window Failures
Store these items in your glove compartment for future window emergencies:
– Basic fuse assortment matching your vehicle specifications
– Small flathead screwdriver for fuse removal and panel access
– LED flashlight for nighttime troubleshooting
– Work gloves for manual window lifting
– Emergency window wedge (prevents window from sliding back down)
Rolling up a car window with a dead battery isn’t just possible—it’s often surprisingly straightforward once you understand the mechanical systems at play. Whether you’re using simple hand pressure to lift the glass or performing a complete electrical reset, these techniques can save you from weather exposure and security risks. The key is acting quickly with the right method for your specific situation, following critical safety precautions, and scheduling proper repairs to ensure you won’t face this challenge again. With these emergency fixes in your toolkit, you’ll never have to panic when your window gets stuck with a dead battery.


