
Your car clicks but won’t start. The dashboard lights flicker weakly when you turn the key. These frustrating signs of a low battery can ruin your day if you don’t know how to handle them. Whether you’re facing a completely dead battery or one with just enough juice to crank without starting, knowing how to start a car with low battery will get you back on the road. This guide covers every proven method to revive your vehicle, from simple tricks you can try immediately to proper jump-starting techniques.
Most drivers encounter battery issues at least once, and understanding the specific failure pattern determines your best course of action. The right approach depends on whether you have zero power, hear clicking sounds, or experience cranking without ignition. By identifying your exact situation, you can apply the most effective solution without wasting time on methods that won’t work for your specific problem.
Three Distinct Battery Failure Patterns and Their Solutions
Complete Power Loss: Zero Response Scenarios
When your car shows zero response—no dashboard lights, no sounds, and no reaction to turning the key—the battery is completely drained. This typically happens after leaving lights on overnight or from a parasitic drain slowly killing your battery. In these situations, even the transmission selector trick won’t work because the entire electrical system lacks power. Your immediate focus should be on jump-starting options or calling professional assistance, as quick fixes require at least minimal battery charge to function.
Clicking Without Starting: The Starter Solenoid Problem
The rapid clicking sound when turning your key indicates your battery retains some charge but lacks the amperage needed for the starter motor. This clicking comes from the solenoid trying to engage repeatedly without sufficient power. Before reaching for jumper cables, try the transmission selector trick: press your brake pedal and move the shifter to neutral, then attempt to start. If unsuccessful, return to park and try again. This movement can restore electrical contact in the neutral safety switch, solving minor connection issues without external help.
Cranking Without Ignition: Fuel System Issues
When your engine turns over normally but refuses to start, your battery has enough power for the starter but insufficient voltage for proper ignition system operation or fuel injection. This scenario requires different tactics than standard jump-starting. Try pressing the accelerator halfway down while starting to force the computer into “clear flood” mode, which adds extra fuel to potentially overcome the weak battery’s limitations. You can also tap the fuel tank repeatedly with your shoe while someone attempts to start the car, which may activate a stuck fuel pump.
Emergency Quick Fixes to Try Before Calling for Help
Transmission Selector Trick for Neutral Safety Switch Issues
Before calling for help, try this simple fix that works surprisingly often. Press the brake pedal firmly and move your shifter to neutral position, then attempt to start. If nothing happens, return to park and try again. This movement can reestablish electrical contact in the neutral safety switch, solving minor connection issues without any tools. This method takes less than 30 seconds and often resolves problems that seem like a completely dead battery.
Terminal Connection Restoration Without Tools
When you hear clicks but the car won’t start, corroded terminals might be the culprit. Without proper tools, firmly tap each battery terminal with the heel of your shoe to dislodge corrosion and improve contact. This emergency technique can restore enough conductivity to start your engine, especially when you’re alone and without jumper cables. Be careful to avoid slipping and injuring yourself while applying this quick fix.
Key Cycling Method for Weak Batteries
For batteries with minimal charge, rapidly turn the ignition key to the start position at least ten times. Stop, wait five minutes, then repeat. This process can sometimes build sufficient surface charge in the battery plates to enable one successful start. While not guaranteed, this method requires zero equipment and often works when other quick fixes fail. Give it a try before moving to more complex solutions that require additional tools or assistance.
Safe Jump-Starting Procedure with Jumper Cables
Essential Safety Checks Before Connecting Cables
Never skip these critical safety steps:
– Look for battery damage: cracks, leaks, or swelling
– Inspect cables for exposed wire or damaged clamps
– Remove all metal jewelry: rings, watches, necklaces
– Ensure both vehicles are in park/neutral with parking brakes set
– Turn off all accessories: lights, radio, climate control
– Lower the driver’s window in the dead vehicle as a precaution
Correct Cable Connection Sequence (Step-by-Step)
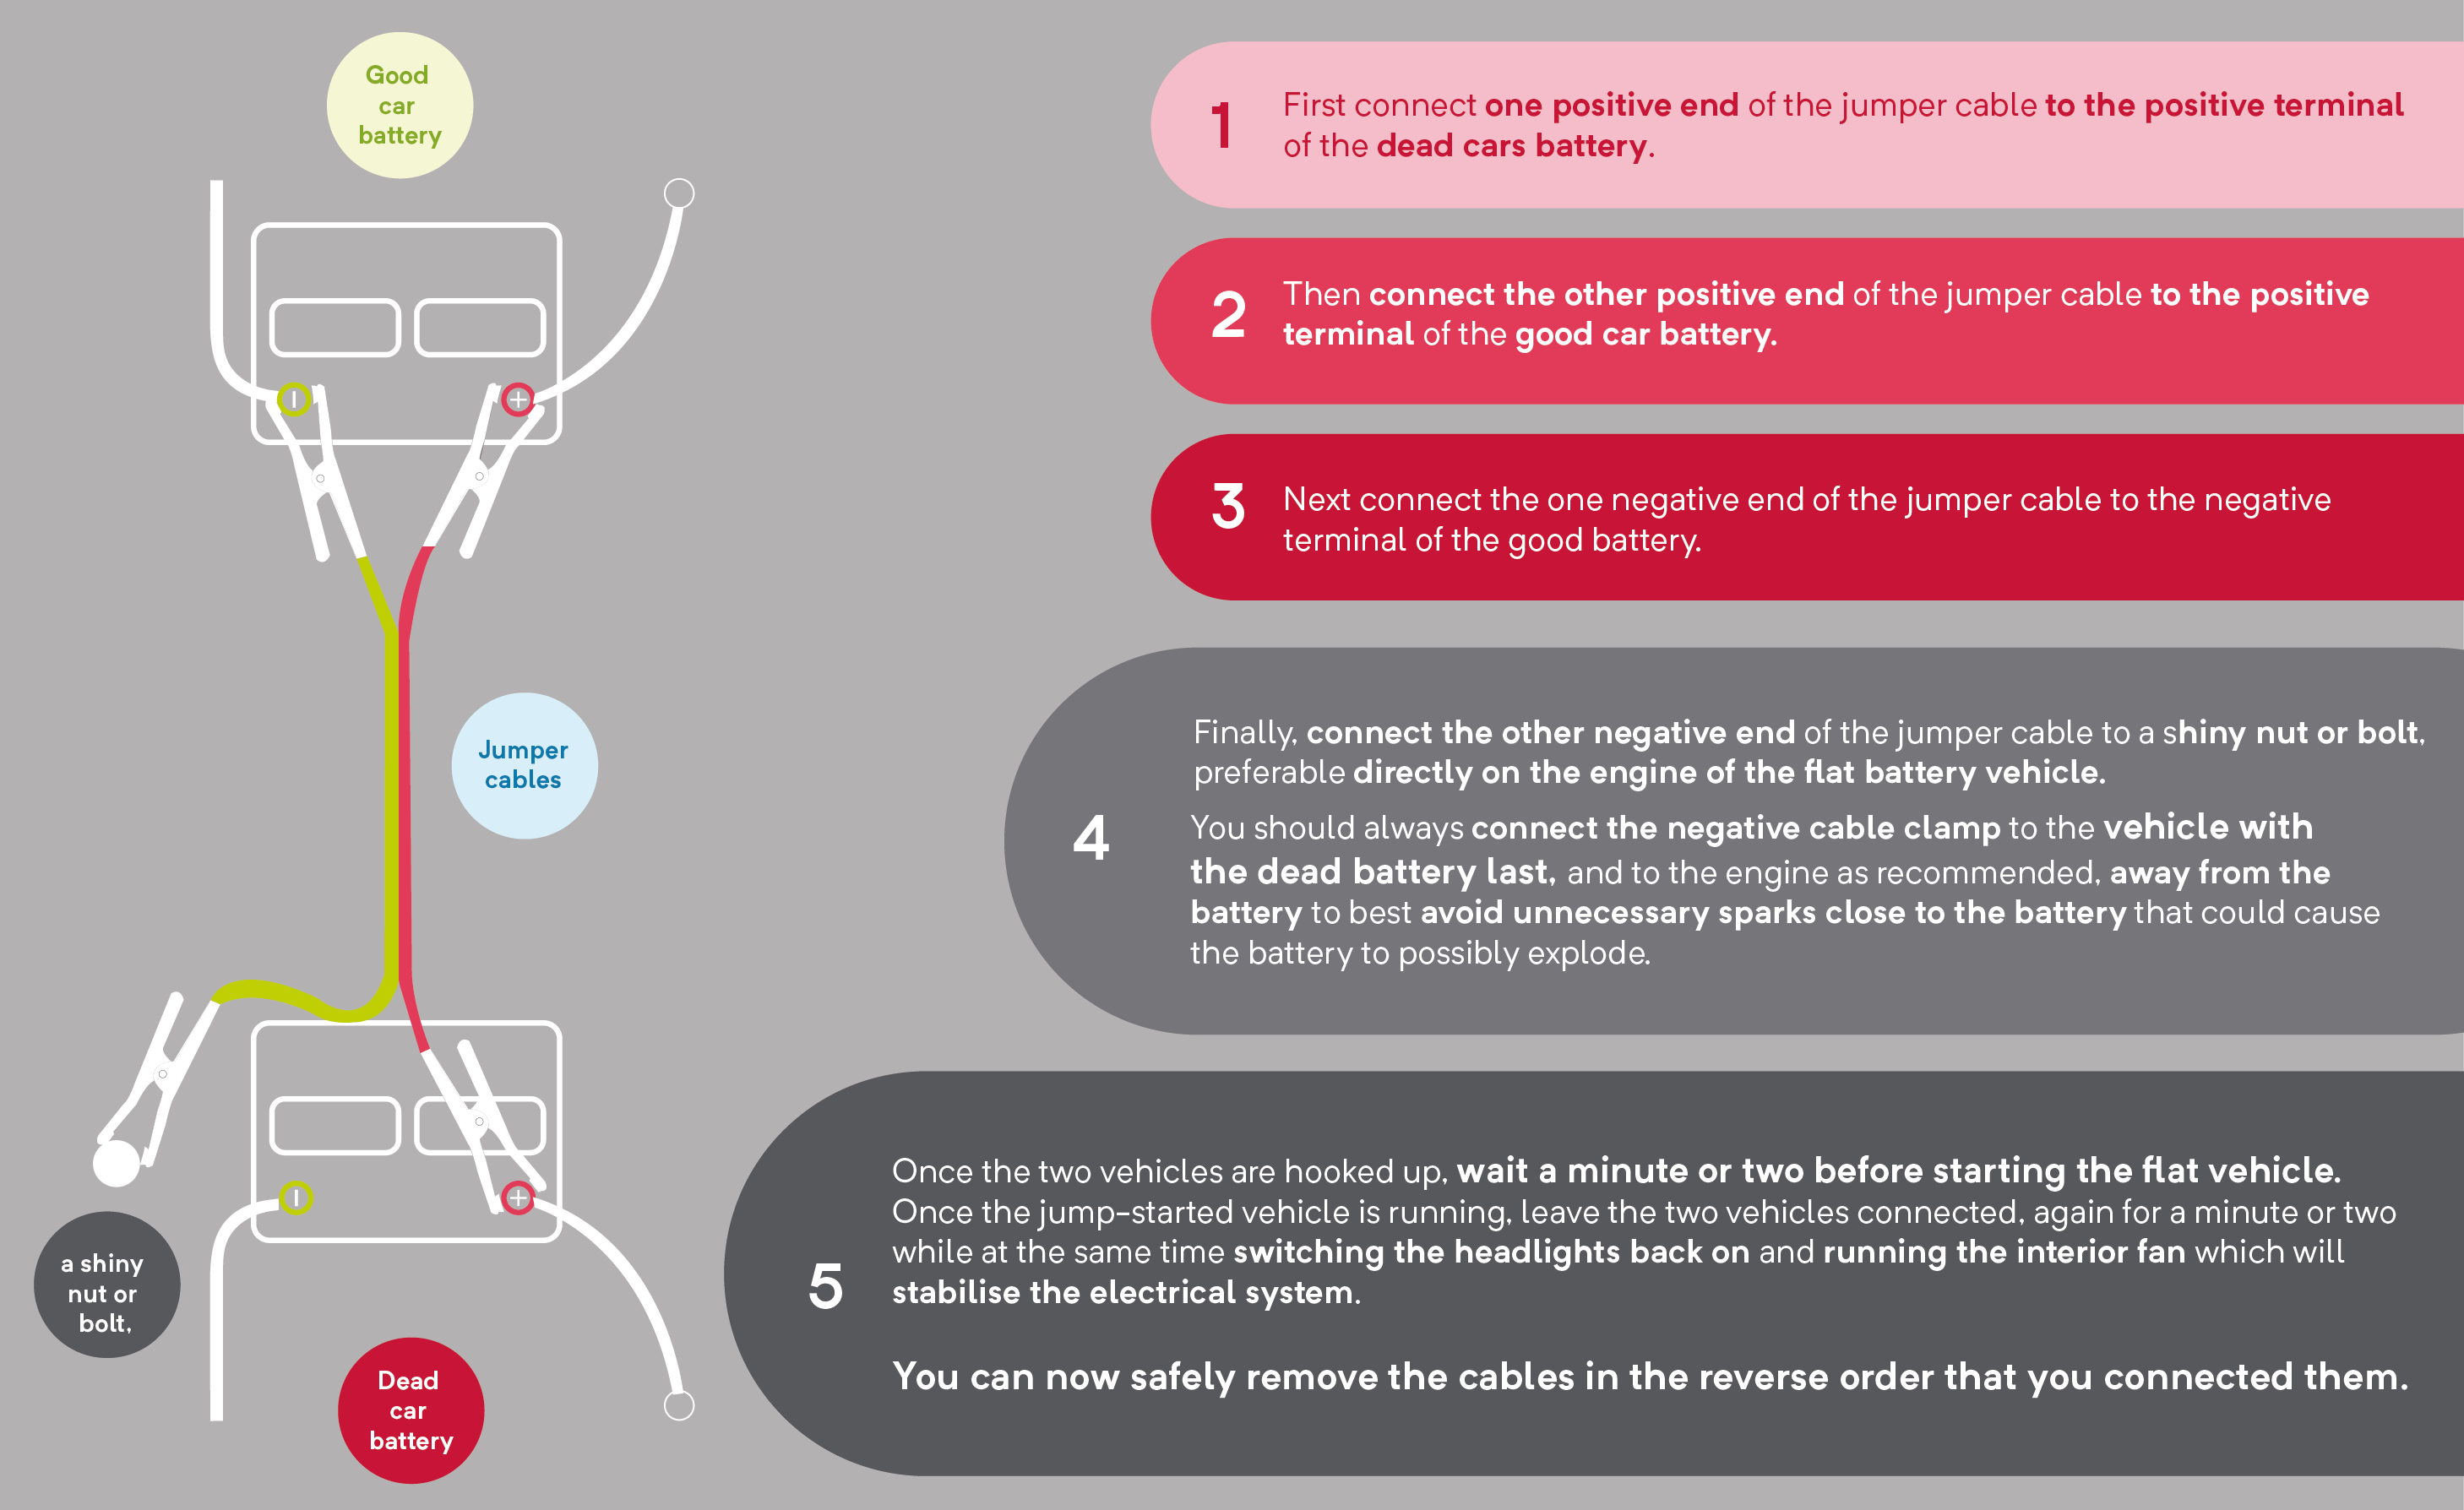
Follow this exact order to avoid dangerous sparks:
- Position vehicles close but not touching (side-by-side or front-to-front)
- Clean terminals with wire brush or aluminum foil to remove corrosion
-
Connect cables in precise sequence:
– Red clamp to dead battery positive (+)
– Red clamp to good battery positive (+)
– Black clamp to good battery negative (-)
– Black clamp to unpainted metal on dead car’s engine block (NOT battery) -
Start donor car and let idle for 2-3 minutes
- Attempt to start dead vehicle
- Wait 5 minutes if unsuccessful, then retry
- Keep both running for 5 minutes after successful start
Safe Disconnection Protocol to Prevent Damage
Remove cables in exact reverse order:
1. Black clamp from engine ground
2. Black clamp from donor battery negative
3. Red clamp from donor battery positive
4. Red clamp from dead battery positive
Connecting or disconnecting in the wrong sequence can cause dangerous sparks or damage sensitive electronics. Take your time with this process—the few extra minutes could prevent costly repairs.
Portable Jump Starter Method Without Another Vehicle
:max_bytes(150000):strip_icc()/howtoconnectajumpbox-5b4a54c0c9e77c001a913ad7.jpg)
When to Use a Battery Pack Instead of Jumper Cables
Portable jump starters eliminate the need for donor vehicles, making them essential for solo drivers. They’re especially valuable in isolated locations or when you don’t want to inconvenience others. Ensure your pack has at least 50% charge before attempting to jump-start, as weaker packs often fail to deliver sufficient power to crank modern engines.
Step-by-Step Process for Portable Jump Starters
- Connect positive lead (red) to battery positive (+) terminal
- Connect negative lead (black) to engine grounding point
- Place pack on ground – never on engine where it could fall
- Activate pack and attempt starting
- Run engine 5 minutes after successful start
- Power down pack and disconnect in reverse order
This method takes less than two minutes once you’re familiar with the process and keeps you completely self-sufficient when battery problems strike.
Push-Starting Manual Transmissions as Last Resort
Requirements for Successful Push-Starting
This method only works with manual transmissions and requires:
– Downhill slope or 3-4 people to provide pushing force
– Minimum speed of 8-10 km/h (5-6 mph)
– Ignition key in “on” position before starting
Proper Gear Selection and Clutch Technique
- Depress clutch and shift to second gear (optimal balance)
- Release parking brake while holding foot brake
- Achieve speed (8-10 km/h minimum) through pushing or gravity
- Release clutch quickly while applying gentle throttle
- Immediately clutch again once engine starts to prevent stalling
Warning: Never attempt push-starting with automatic transmissions—this will cause severe transmission damage.
Modern Vehicle Considerations for Low Battery Starts
Keyless Entry Systems with Dead Batteries
When your key fob dies:
– Find hidden key – usually inside fob
– Locate key slot – often behind door handle covers
– Check manual for ignition override procedures
Hybrid Vehicle Jump-Starting Protocols
Hybrids have dual battery systems:
– 12-volt battery powers accessories (can be jump-started)
– High-voltage battery drives wheels (cannot be jump-started)
– Check manual – 12-volt batteries often in trunk or under seats
– Use designated terminals when provided in fuse box
When Jump-Starts Fail: Diagnostic Next Steps
Systematic Troubleshooting for Persistent Issues
If jump-starting fails:
1. Verify connections are secure and correct
2. Clean terminals thoroughly
3. Test donor battery capacity
4. Check for starter issues – single click vs. no click
5. Listen for fuel pump – should hum for 2 seconds when key turns
Signs You Need Professional Assistance
Seek help immediately when you notice:
– Electrical burning smells
– Cracked battery case
– Repeated jump-start needs
– Complete silence when turning key (possible starter failure)
Post-Jump Battery Recovery and Prevention Strategies
Essential Drive Time After Successful Jump
After any successful jump:
– Drive continuously for 20-30 minutes
– Avoid stop-and-go traffic
– Use battery charger when possible for complete restoration
– Test battery – most auto parts stores offer free testing
Monthly Maintenance to Avoid Future Failures
- Keep terminals clean and tight
- Test battery annually after year 3
- Drive longer trips to ensure full charging
- Use battery maintainer for stored vehicles
A dead battery doesn’t have to ruin your day. Try the quick fixes first, then proceed to jump-starting methods. Remember: repeated jump-start needs signal battery replacement time. Keep quality jumper cables or a portable jump starter in your vehicle, and you’ll never be stranded by a low battery again. With these techniques in your toolkit, you’re prepared for any battery emergency that comes your way.


