
That sickening click when you turn the key. Dim headlights that barely illuminate the road. A car that refuses to start despite your best efforts. These frustrating scenarios happen to 1 in 3 drivers annually—most stemming from an overlooked battery charge issue. Knowing exactly how to check car battery charge puts you in control, transforming guesswork into actionable solutions before you’re stranded roadside.
This isn’t just about preventing inconvenience—it’s about avoiding $150+ tow bills and emergency replacement costs. In the next few minutes, you’ll master multiple verification methods using nothing but your headlights or a $15 multimeter. You’ll learn to interpret voltage readings like a mechanic, spot hidden battery killers, and implement simple maintenance that extends battery life by up to 30%. Let’s transform your battery anxiety into confidence.
Quick Battery Health Assessment
No-Tools Visual Inspection
Pop your hood and locate your battery—typically in the engine bay’s front corner, though some European models tuck it in the trunk. Immediately check for white, crusty buildup on the terminals. This corrosion forms when battery acid releases hydrogen gas, creating a barrier that blocks power transfer and forces your battery to work 30% harder.
Grab an old toothbrush dipped in baking soda paste for light corrosion removal. For heavy, long-term buildup that’s eaten into the terminals, replacement is often necessary—permanent damage has likely compromised internal connections. While inspecting, verify both terminal connections are tight and cables show no cracks or fraying. A loose negative cable can mimic complete battery failure.
Headlight Load Test Method
Your headlights reveal more than road conditions—they’re instant battery health indicators. With engine off, turn headlights to “ON” and let them burn 10-15 minutes. Now attempt to start while watching the lights.
Critical observations:
– Steady brightness: Battery maintains charge under load
– Noticeable dimming: Failing battery can’t sustain power demand
– Rapid clicking sounds: Critical discharge requiring immediate action
This real-world stress test exposes weaknesses a simple voltage check might miss. Even if your car starts, significant dimming during cranking means your battery has lost 40%+ of its capacity and won’t survive cold weather.
Decode Voltage Readings

Essential Voltage Benchmarks
Your battery communicates through precise voltage numbers. Always test after 8+ hours of rest—recent driving creates surface charge that masks true condition. Morning testing provides the only accurate reading.
- 12.6-12.7 volts: Fully charged (100% capacity)
- 12.4 volts: Half-charged (50% capacity—monitor closely)
- 12.2 volts: Danger zone (immediate replacement needed)
- Below 12.0 volts: Deep discharge causing permanent sulfation damage
Pro tip: AGM batteries (common in luxury vehicles) often read 12.7V when fully charged—don’t mistake this for overcharging.
Professional Multimeter Testing
Transform into a battery diagnostic expert with a $15 digital multimeter. Set it to DC voltage (20V range), locate your battery terminals (red = positive, black = negative), and touch probes to corresponding terminals.
Step-by-step execution:
1. Turn ignition OFF and remove keys
2. Clean terminal surfaces with wire brush
3. Set multimeter to “20V DC” setting
4. Press red probe to positive terminal
5. Press black probe to negative terminal
6. Read display (ignore negative sign—it just means reversed probes)
A healthy resting voltage reads 12.6V or higher. Anything below 12.4V indicates significant capacity loss. Warning: Never let probes touch each other while connected—this causes dangerous sparking.
Alternator Performance Check
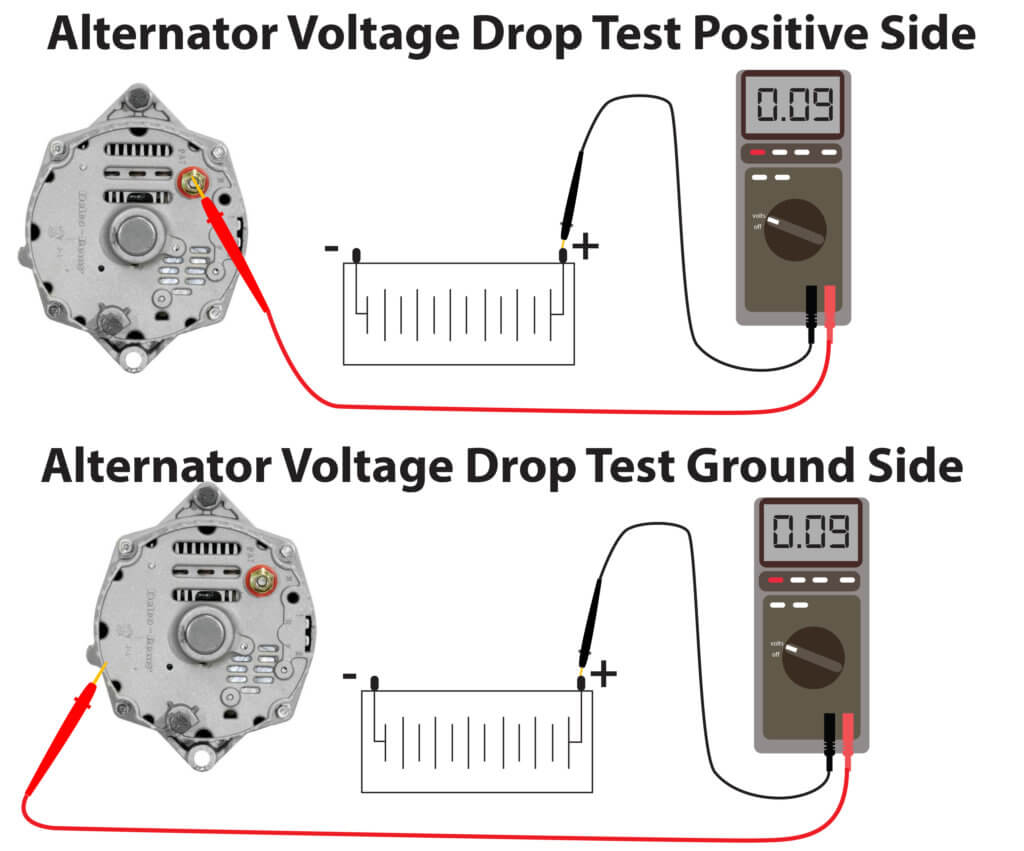
Engine Running Voltage Test
Your alternator should maintain 13.6-14.4 volts while idling—this narrow range keeps your battery optimally charged. Testing reveals charging system health in 60 seconds:
- Start engine and let idle
- Place multimeter probes on terminals
- Normal reading: 13.6-14.4V
- Critical deviations:
– Below 13.6V = Undercharging (battery never reaches full charge)
– Above 14.4V = Overcharging (boiling electrolyte, shortening battery life)
Key insight: A deeply discharged battery can’t recover fully through driving alone—it requires 8+ hours on a dedicated charger. Your alternator only provides surface charge during normal operation.
Hidden Battery Killers

Parasitic Drain Detection
Modern vehicles constantly drain power for computers, alarms, and radio memory—even when “off.” This parasitic drain becomes critical during storage:
Storage survival test:
1. Fully charge battery
2. Disconnect negative terminal overnight
3. Reconnect and test voltage
4. Healthy loss: <0.1V drop
5. Problem drain: >0.5V drop indicates faulty component
For vehicles stored over 30 days, disconnect the negative terminal completely. Weekend cars should get 20-minute drives weekly to maintain charge.
Dead Cell Warning Signs
Batteries fail cell by cell—not all at once. The first symptom? Slow, labored engine cranking even after recent driving. Since most modern batteries are sealed, voltage testing replaces traditional hydrometer checks:
Dead cell red flags:
– Resting voltage consistently below 12.4V
– Immediate voltage plunge when starting
– Inability to hold charge overnight
– Corroded terminals with one terminal significantly hotter than others
Emergency Troubleshooting Guide
Sound Diagnosis
Your starter motor broadcasts battery health through distinct sounds:
- Strong, rapid crank: Healthy battery (12.6V+)
- Slow, grinding crank: Weak battery (12.2-12.4V)
- Single loud “CLUNK”: Likely starter failure
- Rapid “click-click-click”: Critical battery discharge (<12.0V)
Critical note: Jump-starting a deeply discharged battery provides only temporary relief—permanent damage has likely occurred.
Immediate Action Steps
When stranded with a dead battery:
- Turn off all accessories (radio, A/C, lights)
- Check terminal tightness—wiggle connections firmly
- Attempt jump start using proper cable sequence
- Drive 30+ minutes continuously to build charge
- Test voltage at home using multimeter method
Pro warning: Know your stereo anti-theft code before disconnecting the battery—many systems lock permanently without it.
Maintenance Prevention Tips
Monthly Monitoring Routine
Spend five minutes monthly preventing 90% of battery failures:
- Weekly: Check for terminal corrosion
- Monthly: Perform quick voltage spot-check
- Seasonally: Clean terminals with baking soda paste
- Biannually: Tighten terminal connections
Time-saver: Keep a multimeter in your glove compartment—testing takes 90 seconds.
Storage Best Practices
Preserve battery health during extended storage:
- Under 30 days: Drive 20 minutes weekly
- 1-3 months: Disconnect negative terminal
- 3+ months: Use battery maintainer ($20-$30)
- Winter storage: Maintain 70-80°F temperature
Critical reminder: Never store batteries directly on concrete—it creates temperature differentials accelerating discharge.
Your battery’s voltage reading tells the complete story of its health. A 12.6V resting measurement means reliable starts for another season, while 12.2V signals imminent failure requiring immediate replacement. Implement these checks monthly—especially before road trips—and you’ll eliminate 95% of unexpected breakdowns.
Don’t wait for failure. This weekend, grab that multimeter and test how to check car battery charge using the precise methods outlined here. That 30-second voltage check could save you from a $200 emergency service call when temperatures drop. Your future self will thank you when your engine roars to life on the coldest morning of the year.


