
You turn the key, hear a single click, and watch your dashboard lights fade to nothing—your car battery is completely dead. Before you call for expensive roadside assistance or assume you need a replacement, know that many “dead” batteries can be revived with the right approach. This guide shows you exactly how to fix a dead car battery when you’re stranded, whether it’s from sulfation, parasitic drain, or simply being left unused.
Most car battery failures aren’t permanent death sentences. With proper diagnosis and the right techniques, you can often restore enough power to get back on the road today. We’ll cover proven roadside fixes that work immediately, advanced DIY recovery methods for truly dead batteries, and crucial tests to determine if your battery deserves revival or needs replacement.
Diagnose Why Your Battery Actually Died
Check for Visible Damage Before Attempting Fixes
Don’t waste time trying to fix a battery that’s beyond repair. Inspect for cracks, leaks, or bulging in the case—these mean immediate replacement is your only safe option. White or blue crust around the terminals indicates corrosion, which often mimics dead battery symptoms but can be cleaned. If you smell sulfur (like rotten eggs), this signals internal damage requiring replacement, not repair.
Test Voltage to Confirm Battery Status
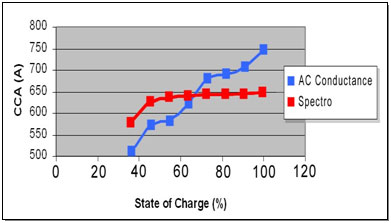
Grab a multimeter and check resting voltage with everything turned off. A healthy battery reads 12.6 volts or higher. At 12.2 volts, you’re down to 50% charge capacity. Below 11.8 volts means your battery is fully discharged. If you see less than 10.5 volts after charging, you likely have a shorted cell requiring replacement. Most auto parts stores offer free load testing that measures if your battery can deliver its rated cranking power under stress.
Identify the Failure Pattern for Targeted Fixes
Sulfation occurs when batteries sit discharged for weeks, forming hard sulfate crystals that block normal operation—this is often reversible. Parasitic drain from modern electronics slowly kills batteries during storage. Age-related failure typically hits after 3-5 years as internal components degrade. Extreme temperatures accelerate both heat damage (causing electrolyte loss) and cold-weather failures (reducing chemical reaction rates). Knowing your failure type determines whether how to fix a dead car battery is worth attempting.
Immediate Roadside Fixes That Get You Moving
Jump-Start with Proper Jumper Cable Technique

Keep quality 8-gauge cables in your trunk—they deliver more current than thin, cheap alternatives. Position vehicles close but not touching, turn off both ignitions. Connect red clamp to dead battery positive, then donor positive. Connect black to donor negative, then ground the final black clamp to unpainted metal on the disabled car—not the negative post—to prevent sparks near hydrogen gas. Start donor car, wait 1-2 minutes, then attempt to start yours. Let it run 20+ minutes to recharge before shutting off.
Portable Jump Pack Method That Works Without Another Vehicle
Modern lithium jump packs like Noco Genius Boost fit in your glove box and eliminate the need for another car. Ensure your pack reads 75% charge or higher. Connect red to positive, black to negative or ground, wait 30-60 seconds, then crank. Some packs won’t recognize completely dead batteries showing 0 volts—try connecting a trickle charger first to wake the battery to 3+ volts. After starting, drive for at least 30 minutes to allow the alternator to recharge your battery.
Smart Charger Revival for Truly Dead Batteries
A quality 10-amp smart charger with desulfation mode works overnight miracles. Disconnect battery cables first to protect vehicle electronics. Set charger to repair mode for severely sulfated batteries. Expect 8-12 hours for standard charging, longer for desulfation cycles. Never attempt to charge a frozen battery—thaw it completely first to prevent explosion risks. This method is your best how to fix a dead car battery approach when you have time and access to power.
Advanced DIY Recovery for Severely Discharged Batteries
Epsom Salt Electrolyte Treatment for Sulfated Batteries

This works best on serviceable batteries showing low capacity but accepting charge. Remove battery from vehicle and work in ventilated area. Mix 1 tablespoon Epsom salt with 3 tablespoons warm distilled water per cell. Add solution to each cell, charge slowly at 2 amps for 24 hours. Expect partial recovery—not new performance. Overfilling can cause acid spillage during charging, so add only enough to cover plates initially.
Distilled Water Top-Up for Dried-Out Batteries
When plates are exposed due to evaporation, add distilled water (never tap water) to cover plates, then slow charge. This simple fix often restores batteries that appear completely dead from low fluid levels. Check electrolyte levels every 6 months in serviceable batteries to prevent this issue. After adding water, charge at 2 amps for 8-12 hours before retesting capacity.
Desulfation Charger Results from Real-World Testing

Field tests show variable success depending on battery condition. A Duralast Prius battery at 2.89 volts revived to 12.8 volts after 24 hours in pulse mode. An Everstart battery reading 0.0 volts required two days plus initial jump pack assistance to wake the charger. Both started reliably for weeks afterward, though capacity remained reduced. Always operate desulfation chargers outdoors—these processes produce toxic hydrogen sulfide gas.
Post-Revival Testing Protocol Before Trusting the Battery
Voltage Stability Check After Revival
After any revival attempt, let the battery rest 12 hours disconnected from chargers. It should maintain 12.4 volts or higher. Anything lower indicates cell damage requiring replacement. A battery that holds voltage but drops rapidly under load has high internal resistance—replace it even if it seems to work initially.
Real-World Load Testing for True Reliability
Turn on headlights for 10 minutes with engine off, then attempt to restart. The battery should still crank the engine within 3 seconds, even at freezing temperatures. Most auto parts stores offer free CCA testing comparing actual performance to rated capacity. If your revived battery delivers less than 50% of its original cold cranking amps, replacement is smarter than continued repair attempts.
When Replacement Beats Continued Repair Efforts
Critical Failure Signs That Mean Immediate Replacement
Replace your battery immediately if it shows resting voltage below 10.5 volts after full charge, fails load testing at 40% of original CCA, or exhibits physical damage. Repeated failures shortly after successful jumps indicate end-of-life. Batteries over 5 years old rarely justify extensive revival attempts—their internal components are too degraded.
Cost vs Risk Analysis for Daily Drivers
A $120 replacement battery costs less than one missed workday from another failure. Revived batteries typically deliver 50-70% original capacity—acceptable for emergency use but unreliable for daily transportation. Consider your commute: if you drive in extreme temperatures or rely on your car for work, replacement delivers peace of mind that how to fix a dead car battery techniques can’t match.
Essential Prevention Strategies to Avoid Future Failures
Daily Driving Habits That Maintain Battery Health
Take 30-minute drives twice weekly minimum to maintain charge—short trips drain batteries faster than alternators can recharge them. Use a battery maintainer for cars parked over 2 weeks. In hot climates, park in shade to reduce heat damage; in cold climates, ensure your battery is fully charged before freezing temperatures hit.
Terminal Maintenance Routine That Prevents False Failures
Clean corrosion annually with baking soda solution (1 tablespoon per cup of water), then apply dielectric grease to prevent future buildup. Ensure cables are tight—loose connections mimic dead battery symptoms. Check hold-down clamps regularly; excessive vibration shortens battery life significantly.
When to Call It Quits and Replace Your Battery
Clear Indicators That Repair Isn’t Worth the Effort
If your battery shows physical damage, fails load testing consistently, or is over 5 years old, replacement is your most reliable solution. Batteries with internal short circuits (voltage below 10.5V after charging) cannot be safely revived. Modern vehicles with complex electronics often require specific battery registration after replacement—check your owner’s manual before DIY installation.
Cost Comparison: Revival vs Replacement
Economy flooded batteries cost $80-120 with 3-year warranties, while premium AGM units run $180-250 with 4-5 year coverage. Portable jump packs ($60-150) and smart chargers ($30-130) make sense as preventative tools but rarely justify extensive revival attempts on aging batteries. Consider your time value—spending hours trying to fix a 5-year-old battery costs more in lost productivity than replacement.
Final Note: Knowing how to fix a dead car battery saves you from unnecessary replacements when simple revival works, but requires honest assessment of your battery’s condition. A 2-year-old battery drained by lights left on often recovers completely, while a 4-year-old unit showing 10 volts likely needs replacement. Always test thoroughly after revival attempts—your safety depends on reliable starting power. Keep quality jumper cables or a portable jump pack in your vehicle as your first line of defense against unexpected battery failures.


