
Your car sits idle for two weeks while you’re on vacation. You turn the key—nothing but a faint clicking sound. Another dead battery. Instead of calling for jump-starts or replacing batteries every year, installing a battery tender solves this problem permanently. This guide shows you exactly how to install a battery tender on a car so your vehicle starts reliably after months of storage—no more dead batteries, no more frustration.
Most drivers don’t realize their car’s battery drains at 1% per day when not in use. Within three weeks, that healthy battery becomes a dead weight. A properly installed battery tender maintains optimal charge without overcharging, extending battery life by 2-3 years. Whether you drive a classic car, daily commuter, or seasonal vehicle, this step-by-step guide covers every connection method for your specific vehicle.
Match Your Connection Method to Your Driving Habits
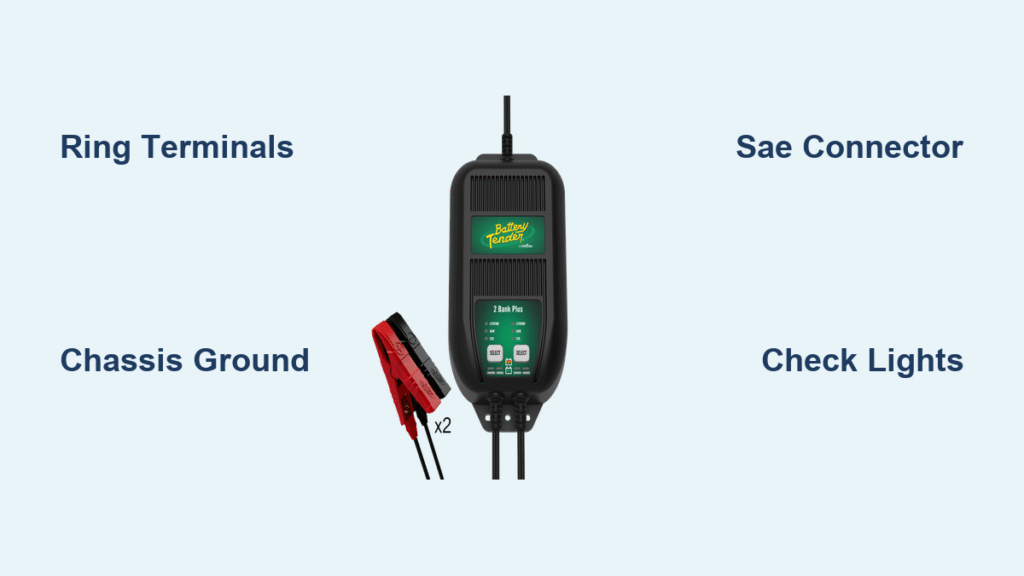
Ring Terminals for Set-and-Forget Convenience
Ring terminals create a permanent connection that stays hidden under your hood. Once installed, you never touch battery posts again—just plug the SAE connector into your tender unit. This method works best for vehicles stored for weeks or months, daily drivers in tight garages, or anyone who hates opening the hood repeatedly.
The smart approach uses Battery Tender’s combo cable system with both ring terminals and alligator clips. Install the ring terminals first, then conceal them under the alligator clip bolts with a hex wrench. When you need temporary use on another vehicle, simply switch back to clips in 30 seconds. This dual-purpose setup gives you maximum flexibility without buying multiple kits.
Alligator Clips for Quick Temporary Connections
Alligator clips work best when you share a tender between multiple vehicles or only need occasional charging. The red clip attaches to the positive battery post while black connects to chassis ground—not the negative battery terminal. Proper installation requires biting through surface corrosion for metal-to-metal contact.
Critical mistake to avoid: Never clamp both clips directly to battery posts on modern vehicles. This triggers battery monitoring errors that reset radio presets and fuel trims. Instead, connect black to an unpainted metal bolt on the fender or engine block within 18 inches of the battery. Test clip security with a firm tug—loose connections cause intermittent charging failures.
Gather Essential Tools Before Starting
- Battery Tender 021-0123 12V, 800mA maintainer (ideal for most cars)
- Combo ring terminal/alligator clip cable set
- 10mm socket wrench (most common battery terminal size)
- 6-inch wire loom and electrical tape
- Zip ties (minimum 8-inch length)
- Wire brush for terminal cleaning
- Pro tip: Keep dielectric grease handy—it prevents terminal corrosion during storage
Execute Safe Vehicle Preparation in 3 Steps
Park on level ground with parking brake engaged and engine completely cooled. Remove all metal jewelry that could accidentally bridge battery posts and create dangerous sparks. Modern batteries vent hydrogen gas during charging—work in a well-ventilated area with a Class ABC fire extinguisher within arm’s reach.
Locate your battery—many 2010+ models hide it under plastic covers, in the trunk, or beneath rear seats. Consult your owner’s manual if you can’t find it immediately. Once located, inspect for corrosion on terminals. A white, crusty buildup indicates acid leakage that must be cleaned before installation.
Connect Ring Terminals Without Damaging Modern Batteries
- Disconnect negative first: Loosen the 10mm nut on the black cable but don’t remove it completely. This breaks the circuit safely.
- Attach red ring terminal: Slide it over the positive post, then reposition the factory cable on top. Tighten just until snug—over-tightening cracks soft lead posts.
- Secure negative connection: Route the black cable to a chassis ground bolt instead of the battery terminal. Clean the bolt spot with a wire brush until shiny metal appears.
- Final tightening: Snug both connections with quarter-turn increments while holding the post steady. A helper prevents cable twisting during tightening.
Warning: Modern positive terminals often have sliding wedge clamps that can’t be removed without damage. If yours won’t budge, follow the positive cable to the first junction block and attach there instead.
Route Wiring to Prevent Engine Damage

Tuck the SAE connector cable along factory wiring harnesses using zip ties every 6-8 inches. Wrap sections near sharp metal edges with wire loom for abrasion protection. Leave 6 inches of slack near the battery to accommodate engine movement.
Critical clearance zones: Maintain 3-inch minimum distance from exhaust manifolds, belts, and pulleys. The tender unit itself must sit away from direct heat sources—position it on a cool fender well secured with Velcro. Close the hood slowly to check for wire pinching before finalizing your route.
Install External Power Access for True Convenience
For plug-and-play operation without opening the hood, mount a NOCO GCP1 120V inlet in your front bumper:
- Drill a 2-inch hole in plastic bumper material (avoid metal reinforcement)
- Insert the weatherproof inlet and secure with included nut
- Route the AC cord through the engine bay to your mounted tender unit
- Seal entry points with silicone caulk to prevent moisture intrusion
This $25 upgrade lets you connect from your driveway using any extension cord. No more reaching under the hood in freezing weather or struggling with tight engine compartments.
Solve Modern Vehicle Installation Challenges
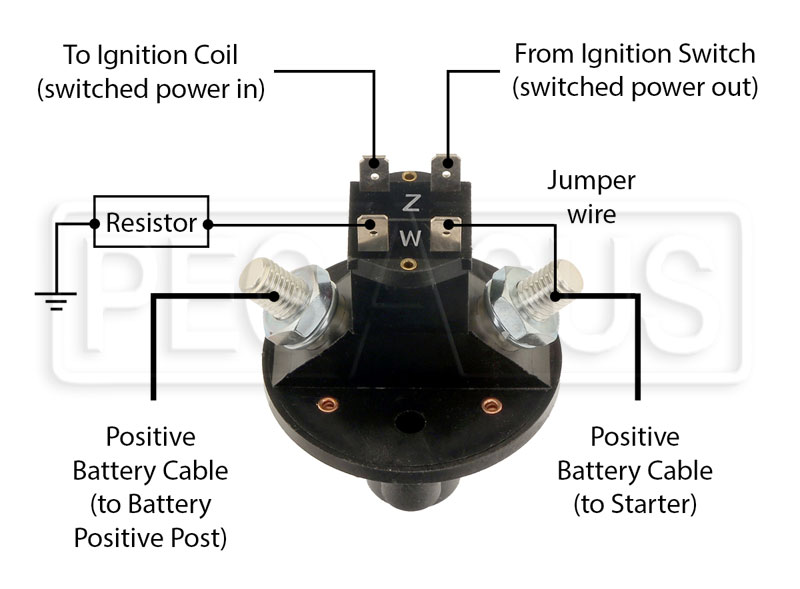
Bypass Complicated Positive Terminals
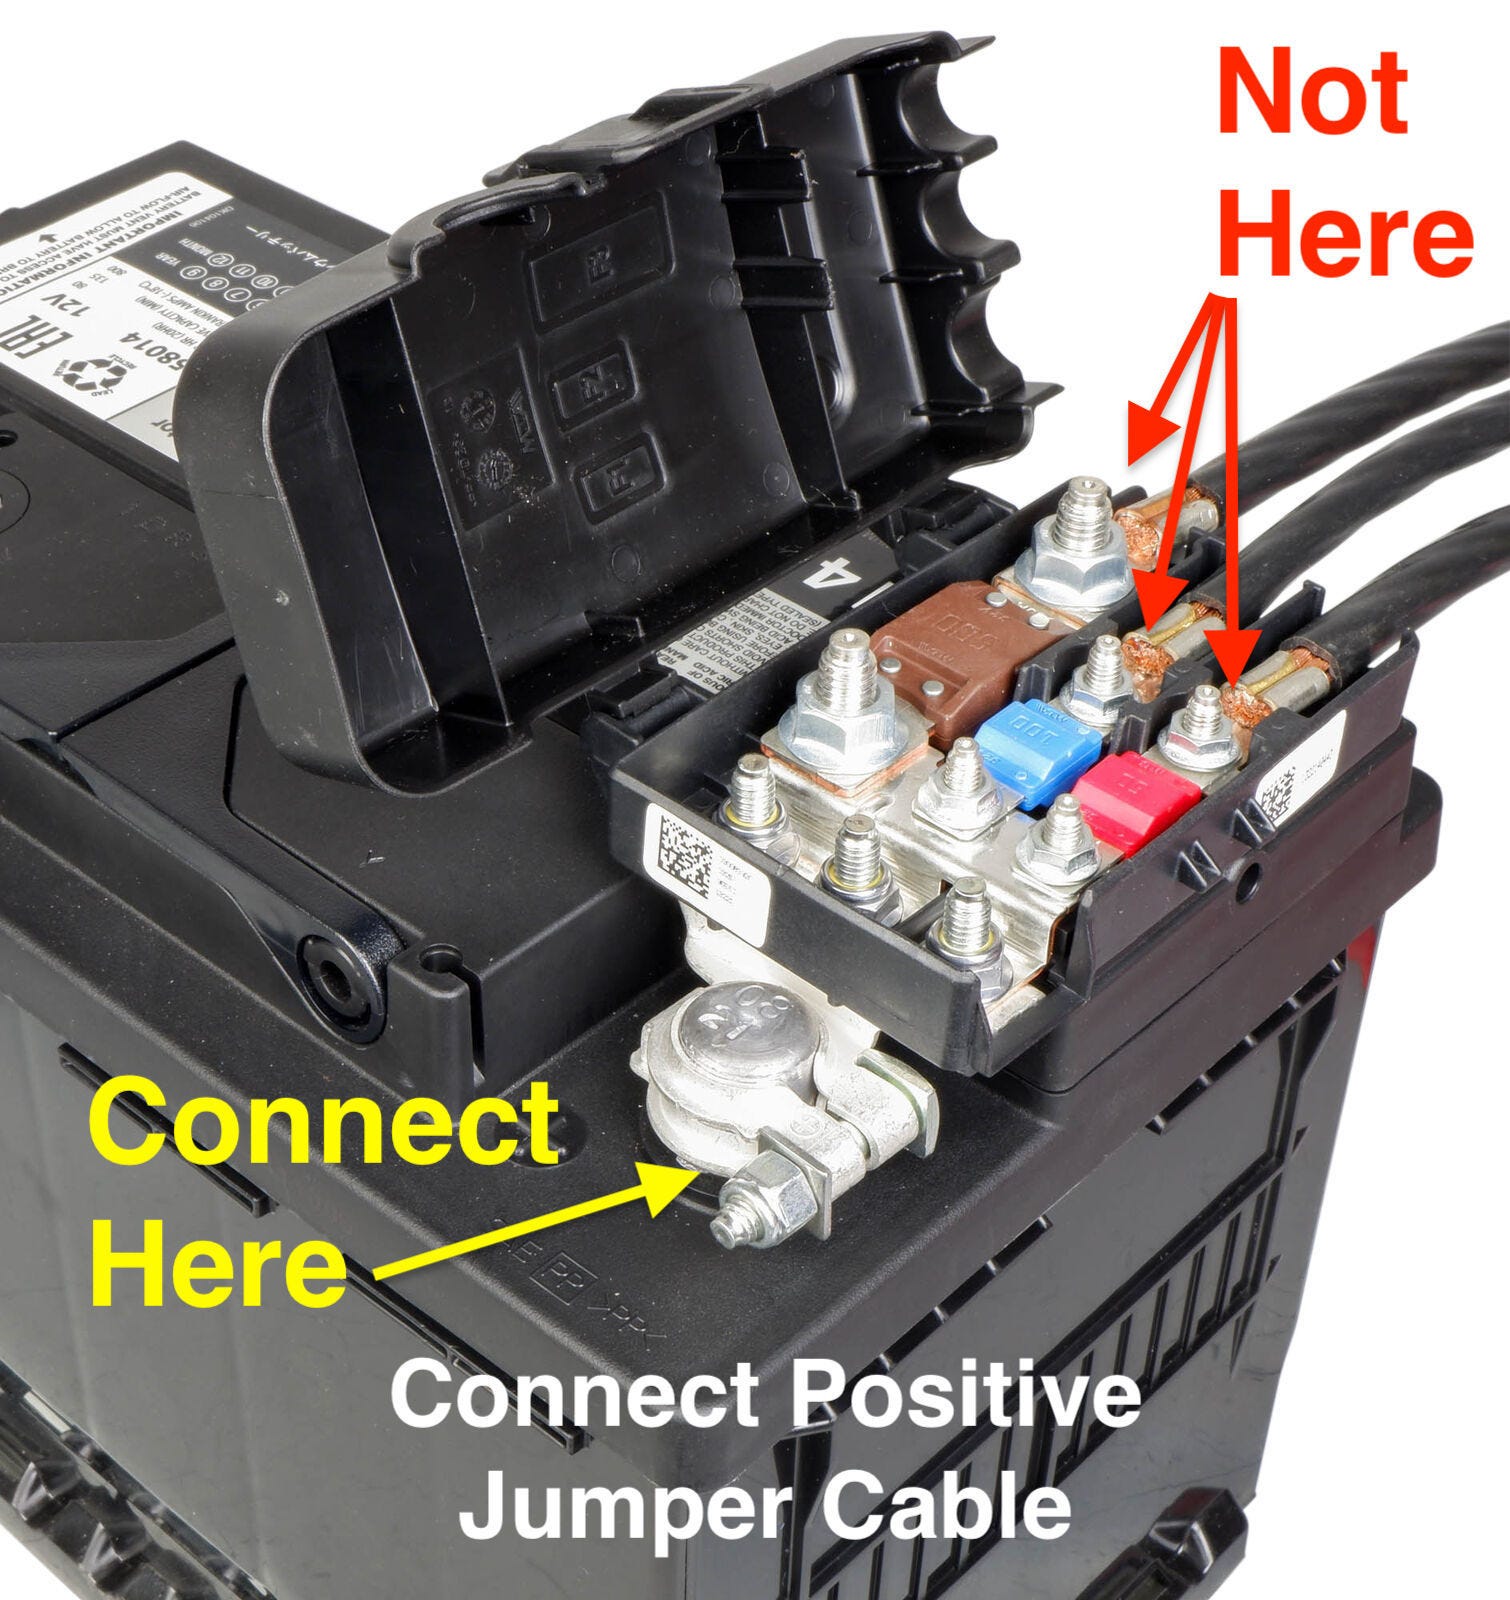
Many 2020+ vehicles have positive terminals trapped under fuse panels you can’t remove. Instead:
- Trace the positive cable from the battery to its first connection point
- Loosen the nut on this junction block stud
- Slide your red ring terminal underneath the factory cable
- Re-tighten while maintaining cable tension (a helper makes this easier)
This method preserves your vehicle’s factory connections while adding charging capability.
Prevent Battery Monitoring Errors
Direct negative terminal connections trigger false error codes on vehicles with battery monitoring systems (common since 2015). Always connect black to chassis ground using these steps:
- Find an unpainted bolt within 18 inches of the battery
- Remove the bolt and clean both surfaces with wire brush
- Reinstall with ring terminal sandwiched between washer and metal
- Apply dielectric grease to prevent future corrosion
This maintains your vehicle’s computer memory settings and prevents check engine lights.
Verify Your Installation in 4 Critical Steps
- Reconnect the negative battery cable last and ensure tight connection
- Plug tender into SAE connector, then into wall outlet
- Check indicator lights: solid red (charging), blinking green (80% charged), solid green (maintenance mode)
- Test after 24 hours—voltage should read 12.6V with engine off
Pro tip: Unplug for 24 hours, then attempt a cold start. If successful, your installation works perfectly. If not, check for loose connections or improper grounding.
Troubleshoot These 4 Common Installation Issues
| Symptom | Likely Cause | Immediate Fix |
|---|---|---|
| No lights on tender | Blown fuse or dead outlet | Test outlet with phone charger |
| Blinking red light | Poor ground connection | Clean chassis bolt with wire brush |
| Tender unit overheating | Too close to exhaust | Relocate to cooler fender area |
| Error codes after install | Black lead on battery post | Move to proper chassis ground |
Maintain Your Installation for Long-Term Reliability
Inspect connections monthly by wiggling ring terminals—re-tighten if loose. Clean terminals annually with a baking soda/water solution and wire brush, then apply dielectric grease. Check cable sheathing for cracks every six months, especially near sharp edges. Cap the SAE connector with its rubber boot when not in use to prevent dirt buildup.
A properly installed battery tender lasts 8-12 years. For seasonal vehicles, this single $40 investment prevents $150+ battery replacements and endless jump-start hassles. Park your car for winter, plug in your tender, and it will fire up instantly when spring arrives—guaranteed.


