
You turn the key, but instead of the engine roaring to life, you hear that dreaded clicking sound. Dim headlights confirm your suspicion—your car battery is failing. Before you call for help or rush to replace it, knowing how to accurately read your car battery health indicator could save you from unnecessary expenses or prevent being stranded when you least expect it.
Modern vehicles demand more from their batteries than ever before, with constant parasitic drains from computers, sensors, and entertainment systems. A battery showing “good” on a basic test might still leave you stranded in cold weather, while one appearing weak could simply need a proper charge. This guide reveals exactly how to interpret every battery health indicator so you can make confident decisions about maintenance and replacement.
Spot Critical Warning Signs Through Visual Inspection
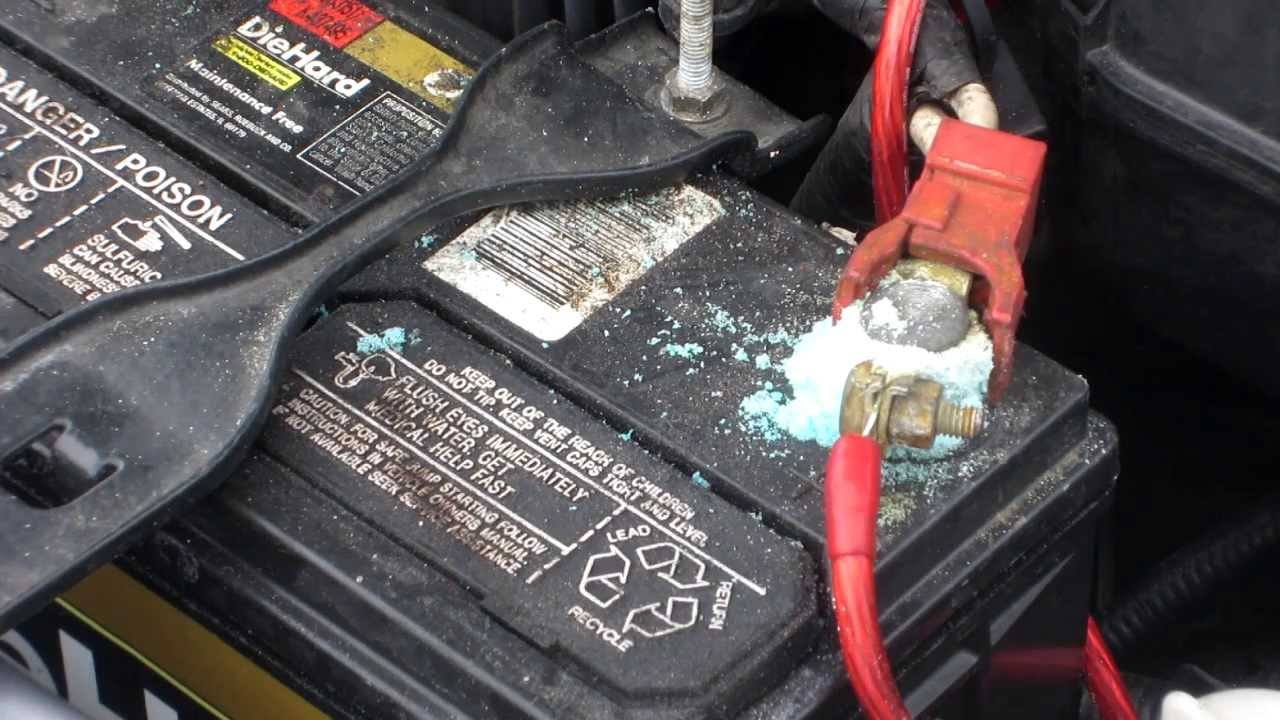
Start your assessment by examining the battery case and terminals before any tools come out. Corrosion buildup—that white, green, or blue crust around terminals—can cause starting issues even in otherwise healthy batteries. Bulging cases signal dangerous overcharging from a failing alternator, while cracks or leaks require immediate replacement to avoid acid exposure.
Pay special attention to terminal connections. Loose or broken terminals create dangerous arcing conditions and intermittent electrical failures. Even slight wiggling indicates replacement is needed, as vibration damage worsens rapidly during driving. For traditional flooded batteries, remove vent caps if accessible. Low electrolyte levels expose plates to air, causing permanent sulfation damage. Top up only with distilled water and ensure plates remain fully submerged. Dark brown electrolyte indicates severe contamination and imminent failure, requiring battery replacement.
Decode Magic Eye Indicator Colors Accurately

The magic eye provides a quick—but dangerously limited—snapshot of one cell’s condition. When you see a green ball visible, it means that specific cell is well-charged (not the entire battery). A dark appearance indicates under-charged electrolyte in that compartment, while clear or yellow signals critically low electrolyte level requiring immediate attention.
Never trust the magic eye alone. This indicator monitors just one of five or six cells. Your battery can show green while other cells fail catastrophically, creating dangerous false confidence. Always combine magic eye readings with voltage and load testing for accurate assessment. If the magic eye shows clear or yellow, check electrolyte levels immediately and top up with distilled water if plates are exposed.
Master Resting Voltage Interpretation
Measure voltage after your car sits unused for several hours to get an accurate reading. A 12.6V – 12.8V reading indicates a healthy, fully charged battery. 12.4V – 12.6V means your battery is weak but functional and needs recharging. At 12.2V – 12.4V, your battery is partially discharged and requires immediate charging. Anything below 12.0V suggests your battery is either deeply discharged or failing and needs replacement soon.
Before testing, eliminate surface charge that skews readings. Turn your headlights on high beam for 10-15 minutes with the engine off, or let the battery rest 6-12 hours after charging. With the engine running, voltage should read 13.7V – 14.7V. Readings below 13.5V indicate charging system problems, while above 15V risks overcharging and battery damage. This running voltage check is essential when diagnosing why your battery keeps draining.
Test Cold Cranking Amps with Precision
Cold Cranking Amps (CCA) measure your battery’s ability to start your engine in cold temperatures—the most demanding condition for any battery. Using a conductance tester (available at most auto parts stores), compare your measured CCA to the battery’s rated CCA. 90%+ of rated CCA means your battery provides reliable starting power. 80-89% of rated CCA enters the warning zone—monitor closely. Below 80% of rated CCA means schedule replacement within months.
For traditional load testing:
1. Ensure your battery is fully charged (12.6V minimum)
2. Apply load equal to 50% of CCA rating for 30 seconds
3. Healthy batteries maintain voltage above 9.6V throughout
4. Failing batteries drop below 9.6V—replacement needed
5. Failed batteries show immediate voltage collapse indicating a dead cell
Measure Internal Resistance for Hidden Problems
Rising internal resistance signals approaching failure even when voltage tests pass. Healthy batteries exhibit low internal resistance, enabling strong current delivery without significant voltage drop during startup. Measure resistance using specialized conductance testers, considering temperature variations.
Increasing internal resistance manifests as:
– Slower engine cranking despite good voltage readings
– Headlights dimming noticeably during startup
– Electronics resetting when you attempt to start the engine
This subtle degradation often goes unnoticed until cold weather reveals the weakness, making regular resistance testing crucial for preventing unexpected breakdowns.
Read Electric Vehicle Battery Health Metrics Correctly
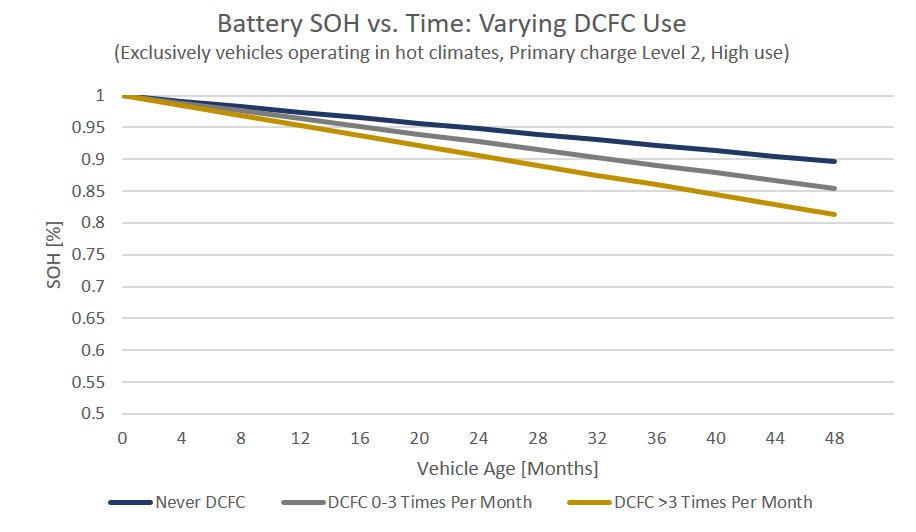
EV batteries use different health indicators than traditional 12V systems. State of Health (SOH) measures usable capacity compared to new:
– 90-100% SOH: Like-new performance with full range
– 80-89% SOH: Normal degradation, range slightly reduced
– 75-79% SOH: Noticeable range loss, monitor closely
– Below 75% SOH: Performance issues likely, warranty claim possible
Healthy EV battery packs maintain cell voltage differences within 10 millivolts. Wider gaps indicate individual cell degradation, cooling system failures, or potential warranty issues. Check your vehicle’s diagnostic system for cell balance reports whenever you notice reduced range or performance.
Use the Right Tools for Accurate Battery Testing
For basic battery health checks, you need just three essential tools:
– Digital multimeter: For accurate voltage readings ($10-20)
– Conductance tester: Measures CCA and resistance ($30-50)
– Terminal cleaning brush: Removes corrosion safely ($5-10)
Professional shops use advanced equipment including battery analyzers for comprehensive health reports and specialized readers for hybrid/EV diagnostics. Most auto parts stores offer free basic testing—ask specifically for CCA measurement rather than just a voltage check, as this gives the most accurate picture of your battery’s true starting capability.
Follow This Testing Schedule to Prevent Breakdowns
Test your battery before winter when cold weather reveals weaknesses, before road trips to prevent vacation disasters, and annually after 3 years regardless of symptoms. If you make frequent short trips without allowing full charging cycles, test every six months.
Don’t ignore these critical warning signs:
– Slow cranking: Engine turns over sluggishly
– Dim headlights: Noticeable brightness changes
– Clicking sounds: Starter relay activation without engine turnover
– Rapid corrosion return: Quick buildup after cleaning
– Electronic glitches: Random system resets or warning lights
Prevent Premature Battery Failure with Daily Habits
Extend your battery life by minimizing short trips that prevent full charging cycles. Reduce electrical load by turning off accessories before starting your engine. Take regular longer drives (30+ minutes weekly) to maintain proper charge levels. Clean terminals quarterly to prevent connection issues that strain the battery.
Replace batteries showing:
– CCA below 80% of rating
– Resting voltage consistently below 12.4V
– Age approaching 4-5 years in extreme climates
– Rapid performance decline in cold weather
Track Results Over Time for Early Failure Detection
Maintain a simple log of test results to spot degradation trends. A 10% CCA drop between oil changes signals replacement needed within 6 months, allowing planned replacement versus emergency situations. Temperature significantly affects readings—cold weather temporarily reduces capacity by 20-50%, while heat accelerates aging.
Always follow this comprehensive evaluation protocol:
1. Conduct visual inspection for damage/corrosion first
2. Measure resting voltage after eliminating surface charge
3. Perform conductance testing (CCA and resistance)
4. Conduct load testing if results are borderline
5. Verify charging system functionality
6. Compare results to historical measurements
Understanding how to read car battery health indicator transforms replacement from guesswork into data-driven decisions. Rather than waiting for complete failure, you’ll recognize the subtle signs that prevent being stranded with a dead battery. Most importantly, combining multiple testing methods ensures accurate assessment—because a battery that tests “good” today but shows declining trends will likely fail when you need it most. Remember: batteries rarely fail without warning signs. Learning to interpret these health indicators gives you the power to choose when replacement happens, not leave it to chance on a cold winter morning.


