

Your car sputters to life on a frigid Monday morning, then dies instantly. The dashboard flashes a mysterious battery symbol as you twist the key again—silence. This scenario strands over 2 million drivers annually due to preventable battery failures. Knowing how to check car battery indicator systems transforms guesswork into actionable diagnostics before you’re stranded with a dead vehicle.
Most drivers ignore subtle battery warnings until complete failure occurs. Modern vehicles broadcast critical health data through multiple indicator systems—dashboard lights, physical battery markers, and voltage readings. This guide reveals exactly where to look and what numbers mean, using methods ranging from free visual checks to professional-grade testing. You’ll learn to diagnose issues in under 10 minutes with tools you likely own.
Decoding Dashboard Battery Warning Lights
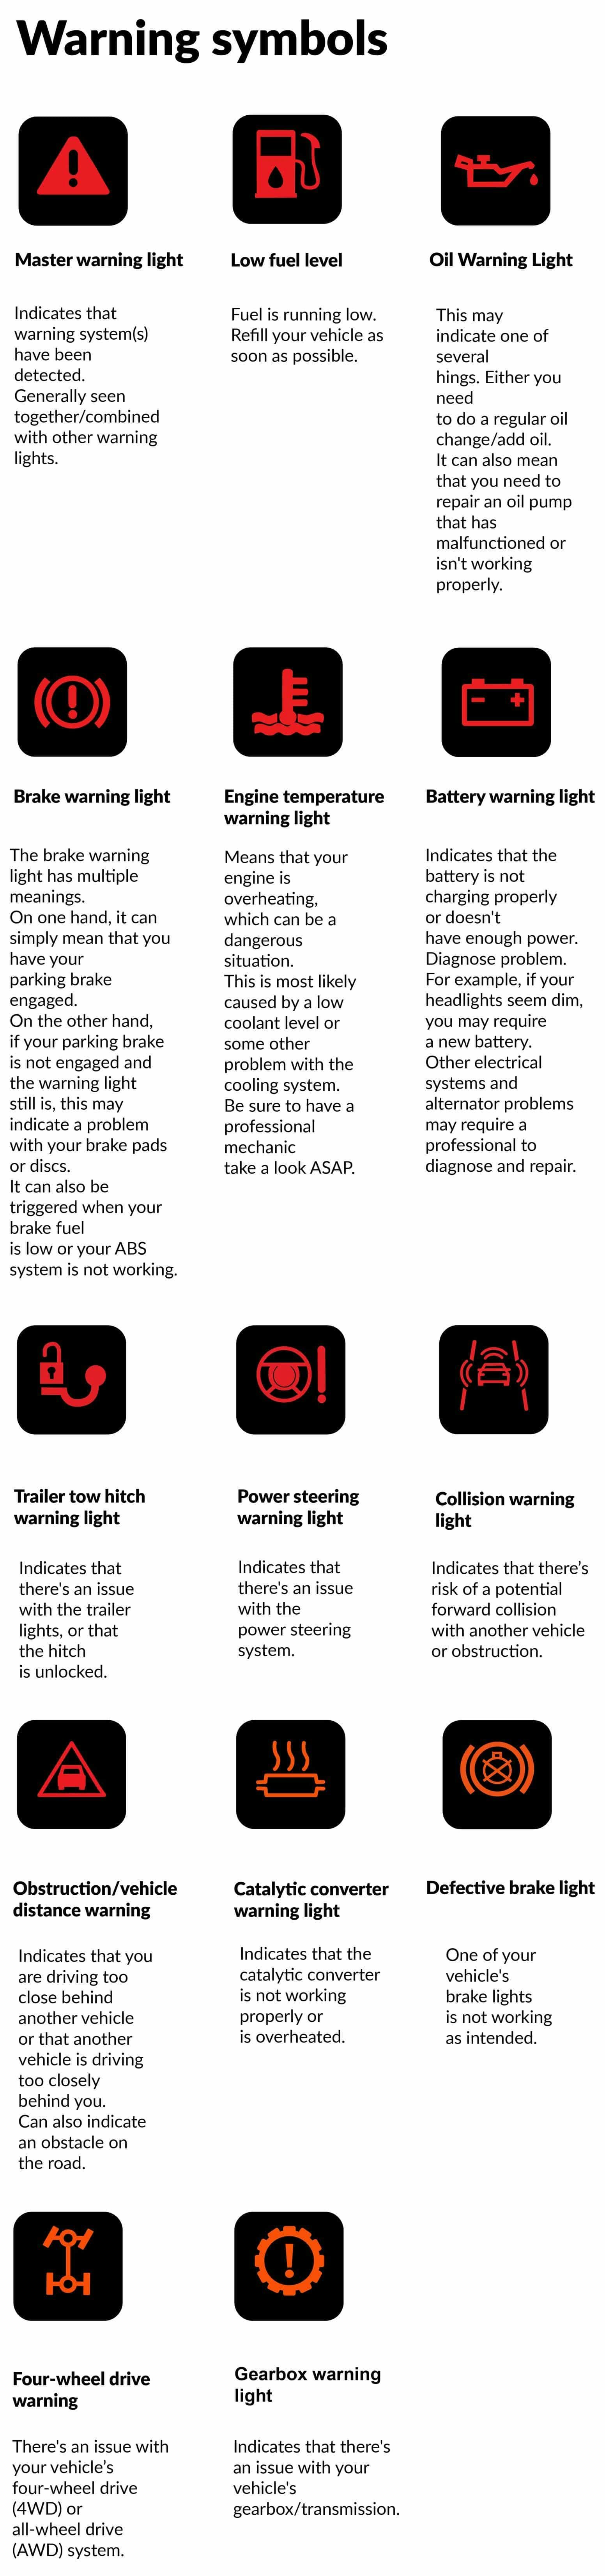
That glowing battery symbol isn’t just another dashboard decoration—it’s your vehicle’s urgent alert system for charging failures. Ignoring it risks sudden electrical shutdown within 30-60 minutes of driving. Modern vehicles (2012+) often display actual voltage readings, eliminating guesswork about your battery’s condition.
Solid Red Battery Light While Driving
Immediate action required: A constantly illuminated red battery light means your alternator isn’t charging the battery. Your car now runs solely on stored battery power. Turn off non-essential electronics (radio, climate control) and pull over safely within 15 minutes. Continuing to drive risks complete electrical failure, leaving you stranded with zero power for lights or signals. This condition often stems from a snapped serpentine belt or failed alternator.
Intermittent Blinking Battery Symbol
Flickering battery warnings signal unstable voltage output—typically from loose alternator connections or failing diodes. Unlike solid warnings, this problem may seem intermittent but indicates imminent system collapse. Schedule professional inspection within 72 hours; delaying risks permanent damage to sensitive electronics like your ECU. Check serpentine belt tension immediately—visible slippage or cracks confirm the culprit.
Interpreting Digital Voltage Readings
Newer vehicles display real-time voltage on instrument clusters. These numbers provide precise diagnostics:
– 14.0-14.4V: Healthy charging system output
– 13.8V or lower: Undercharging (alternator or belt issue)
– 15.0V+: Dangerous overcharging (immediate shutdown required)
Anything below 13.8V while driving indicates insufficient charging. Top auto shops consider readings under 13.5V an emergency requiring alternator replacement. Overcharging above 15.0V can fry your radio, navigation, and safety systems within hours.
Reading Physical Battery Indicators Correctly
Pop your hood—your battery itself broadcasts health status through built-in visual indicators. These require no tools but demand proper interpretation to avoid false confidence in failing units. Always combine these checks with voltage testing for accurate diagnosis.
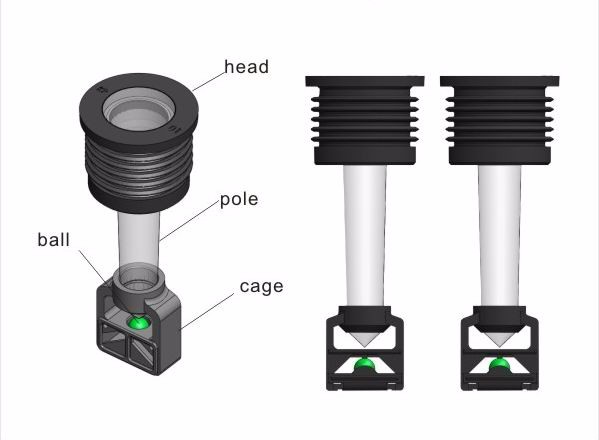
Magic Eye Color Meanings Explained
The small circular “magic eye” on your battery cap reveals electrolyte health through color changes:
– Bright green: Sufficient charge (65%+ capacity)
– Dark gray/black: Needs immediate charging
– Clear or pale yellow: Critical electrolyte loss (replace battery)
This hydrometer works via a floating colored ball—charged electrolyte lifts it into view. But crucially, it monitors only one cell in a 6-cell battery. A green reading could mask dead cells in other compartments, giving dangerously false reassurance. Always verify with multimeter testing.
Gel Battery Indicator Variations
Modern gel batteries use different color-coding systems printed directly on the case:
– Green-to-red windows: Green = full charge, red = failure
– Multi-color bars: Progressive color shifts indicate charge levels
– Digital displays: Some premium AGM batteries show percentage
Never assume standard color meanings—your specific battery’s legend is molded onto its casing. For example, some German vehicles use blue indicators where green would normally appear. Ignoring manufacturer-specific charts leads to misdiagnosis.
Why Visual Checks Alone Fail
Relying solely on magic eyes risks catastrophic misjudgment. These indicators:
– Monitor only 1 of 6 internal cells
– Cannot detect sulfation (crystallized lead plates)
– Provide zero data on cranking amps (CCA)
– May show “green” despite 50% capacity loss
A 2019 AAA study found 38% of batteries with “healthy” magic eyes failed load testing. Always treat visual indicators as preliminary clues—not definitive diagnostics.
Precise Multimeter Testing Protocol
Essential Tools for Accurate Measurement
Grab these before testing:
– Digital multimeter ($10-$20 at auto stores)
– Terminal cleaning brush (for corroded posts)
– Safety glasses (battery acid protection)
– Dielectric grease (for reassembly)
Avoid cheap analog meters—they lack the precision for modern vehicle electronics. Ensure your meter probes aren’t frayed to prevent short circuits during testing.
Step-by-Step Voltage Testing
Follow this sequence for reliable results:
1. Turn off all electronics and wait 60 minutes after driving
2. Set multimeter to 20V DC (look for ⎓ symbol)
3. Touch red probe to positive terminal (+)
4. Connect black probe to negative terminal (-)
5. Record reading immediately (voltage drops when testing)
Critical mistake: Testing within 10 minutes of driving inflates readings by up to 0.5V. For true resting voltage, test after an overnight park. Corroded terminals also distort results—clean them with a wire brush first.
Voltage Diagnostic Chart
| Reading | Condition | Action Required |
|---|---|---|
| 12.6V+ | Fully charged | Monitor monthly |
| 12.4-12.5V | 75% charged | Test charging system |
| 12.2V | 50% charged | Recharge immediately |
| 12.0V | Discharged | Replace or professional service |
| Below 11.8V | Critical failure | Replace battery NOW |
Now test your charging system:
– Start engine and retest at idle
– 13.8-14.4V: Healthy alternator output
– Below 13.8V: Failing alternator (replace)
– Above 14.4V: Overcharging (immediate shutdown)
Emergency Load Testing Without Tools
Headlight Brightness Assessment
This no-equipment test reveals battery health in 30 seconds:
1. Turn headlights ON with engine OFF
2. Observe beam intensity for 30 seconds
3. Steady bright beams: Adequate charge
4. Rapid dimming: Low charge or failing battery
5. Brightening after 20 seconds: Alternator not charging
Pro tip: Perform this at night for clearer observation. Dimming within 10 seconds indicates critical discharge—recharge before attempting to start. Note: AGM batteries may maintain brightness longer despite internal damage.
Engine Crank Voltage Drop Test
This real-world simulation catches hidden failures:
1. Connect voltmeter to battery terminals
2. Have helper crank engine for 2 seconds
3. Watch minimum voltage during cranking
4. 9.6V+ sustained: Healthy battery
5. Drops below 9.6V: Immediate replacement needed
Weak batteries often show normal resting voltage but collapse under load. This test mimics actual starting conditions—where voltage plummets below 9.6V, the starter motor lacks power to turn the engine. A failing battery might show 12.4V at rest but crash to 8.2V during cranking.
When to Seek Professional Testing
Free Auto Parts Store Diagnostics
Most major chains provide instant battery assessments:
– AutoZone: 3-minute load test with printed report
– O’Reilly: Full charging system analysis (free)
– Advance Auto: Cold-cranking amp (CCA) measurement
Bring your battery’s group size (stamped on top) for accurate testing. These stores use conductance testers that measure internal resistance—detecting failures invisible to voltage tests. Their machines also simulate -18°C conditions to expose cold-weather weaknesses.
What Mechanics Test Beyond Voltage
Professionals evaluate four critical factors:
– Actual vs. rated CCA (must be 75%+ of original spec)
– Alternator ripple voltage (excess AC current damages batteries)
– Parasitic drain (excessive overnight power loss)
– Internal resistance (detects plate sulfation)
A battery showing 12.6V might still fail if its CCA rating has dropped from 650 to 300. Only professional testers replicate engine-starting amperage demands (300-600+ amps).
Recognize Early Failure Symptoms
Digital System Glitches
Modern cars broadcast battery distress through electronics:
– Radio presets resetting daily
– Power windows moving sluggishly
– Bluetooth disconnecting randomly
– Interior lights pulsing at idle
These occur because weak batteries can’t maintain stable voltage for computers. A 2022 Bosch study found 68% of “check engine” lights in vehicles over 3 years old related to battery voltage issues.
Temperature-Sensitive Starting Issues
Notice your car struggles when temperatures drop just 5°C? This signals critical battery weakness. Healthy batteries start engines reliably at -17°C (0°F). If your vehicle requires 3+ crank attempts below 10°C (50°F), replace the battery immediately—winter will strand you.
Safety Protocol Before Testing
Critical Pre-Check Steps
Avoid dangerous mistakes:
– Remove metal jewelry (watches, rings)
– Work in ventilated areas (batteries emit explosive hydrogen)
– Disconnect negative terminal first when removing battery
– Know your radio code (disconnecting resets anti-theft)
Battery explosions cause 50+ serious injuries yearly. Always wear safety glasses—acid can blind you instantly during terminal cleaning. Never lean over the battery while testing.
Terminal Cleaning Procedure
Corrosion causes 30% of “dead battery” misdiagnoses:
1. Disconnect negative terminal first
2. Scrub posts with wire brush until shiny metal shows
3. Clean terminal clamps the same way
4. Reconnect positive terminal first
5. Apply dielectric grease to prevent future corrosion
Use a baking soda/water paste (1 tbsp soda per cup water) to neutralize acid buildup. Rinse thoroughly with water—never let residue contact battery vents.
Create Your Battery Testing Schedule
Age-Based Testing Frequency
- Under 3 years: Test during oil changes
- 3-4 years: Test monthly in winter
- Over 4 years: Replace proactively (even if testing “good”)
- Hot climates: Test every 6 months (heat accelerates degradation)
Batteries in Phoenix fail 50% faster than in Seattle due to thermal stress. Short trips (under 15 minutes) prevent full charging—test twice as often if you commute less than 3 miles.
Final Diagnostic Decision Tree
Replace immediately if:
– Load test drops below 9.6V during cranking
– Battery is 4+ years old with any symptoms
– Case shows swelling or acid leaks
– Fails two consecutive professional tests
Monitor closely if:
– Voltage holds 12.4V+ at rest but drops under load
– Magic eye shows green but headlights dim
– Over 3 years old with temperature sensitivity
Your ability to how to check car battery indicator systems efficiently prevents roadside emergencies. Combine dashboard alerts, physical indicators, and multimeter tests for complete diagnosis. For batteries over 3 years, schedule professional testing before winter—it takes 5 minutes but saves hours of freezing frustration. Remember: when your battery indicator warns you, your car isn’t complaining—it’s begging for help.


