
That sinking feeling when your engine won’t crank—just a weak click echoing under the hood. You lift the hood to discover the culprit: thick, crusty white or blue corrosion choking your battery terminals like toxic frost. This isn’t just cosmetic damage; it’s actively strangling your electrical system, forcing your battery to work 40% harder just to deliver power. The solution? A $2 kitchen-ingredient fix that takes less than 20 minutes and prevents costly breakdowns. Cleaning car battery terminals is the most overlooked yet critical maintenance task for reliable starts and maximum battery life.
Corrosion forms when hydrogen gas from your battery’s sulfuric acid reacts with atmospheric moisture, creating conductive resistance that sabotages voltage flow. Left unchecked, even minor buildup causes dim headlights, erratic electronics, and sudden failure during cold mornings. But here’s the good news: with basic household items and proper technique, you’ll restore peak performance while extending your battery’s lifespan by years. This guide delivers precisely what you need—no fluff, just actionable steps proven to work in coastal humidity, road-salt winters, and everyday driving conditions.
Stop Before You Start: Critical Safety Protocols
Battery acid and electrical hazards demand strict precautions. Never skip these non-negotiable steps, even for minor corrosion. Always power down completely—turn off your engine, remove ignition keys, and wait 10 minutes if recently driven to prevent burns from hot components. Work in open-air conditions; never in an enclosed garage where acid fumes could accumulate. Battery corrosion releases sulfur compounds that irritate lungs and eyes, making ventilation essential.
Essential Safety Gear Checklist
- Chemical-resistant gloves (standard dishwashing gloves provide adequate protection)
- Safety glasses (battery acid splashes cause permanent eye damage)
- Long sleeves (protect skin from accidental acid contact)
- Insulated tools (prevent accidental short-circuiting when metal touches both terminals)
Locate your battery before beginning—most sit in engine bay corners, but European models often hide them in trunks while luxury vehicles tuck them under seats. Consult your owner’s manual if unsure. Remember: never let metal tools bridge the positive and negative terminals simultaneously. This creates a direct short circuit that can melt tools, cause explosions, or fry your vehicle’s computer systems.
Assemble Your Cleaning Arsenal (No Special Tools Needed)

Forget expensive auto shop products—your kitchen holds everything required for effective cleaning. For standard corrosion, gather these five household items:
- Baking soda (sodium bicarbonate neutralizes acid on contact)
- Distilled water (prevents mineral deposits during rinsing)
- Old toothbrush (soft bristles reach crevices without scratching)
- Microfiber towels (lint-free drying prevents residue)
- Petroleum jelly (Vaseline creates instant corrosion barrier)
When to Upgrade Your Toolkit
- Severe corrosion: Add a dedicated terminal cleaning tool ($5 at auto stores) with wire brushes sized for posts
- Long-term protection: Battery terminal protectant spray outperforms Vaseline in humid climates
- Preventive maintenance: Anti-corrosion felt washers absorb acid vapors before they form deposits
Diagnose Your Corrosion Severity First
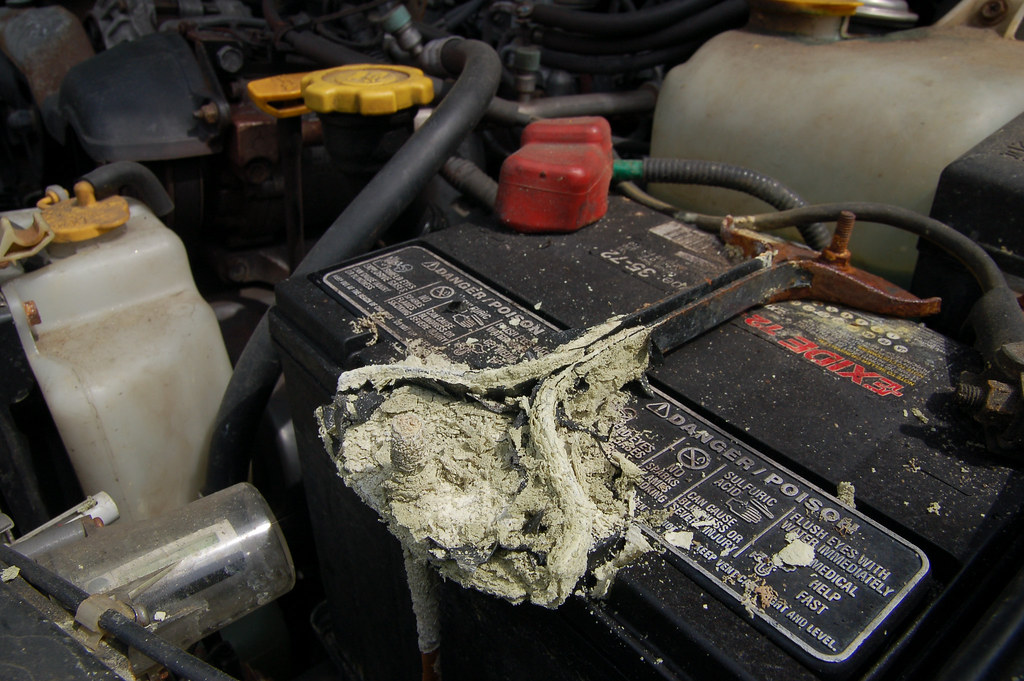
Don’t grab brushes yet—assess the damage to avoid dangerous mistakes. Examine the battery case for swelling, cracks, or fluid leaks. If present, stop immediately and replace the battery; cleaning won’t fix internal damage. Check cables for green discoloration extending up the wire—a sign of internal corrosion requiring replacement. Minor surface deposits respond well to cleaning, but frayed or brittle cables need professional replacement.
Danger Signs Requiring Professional Help
- Swollen battery case (indicates dangerous internal pressure)
- Green cable discoloration (corrosion has eaten into copper wires)
- Cracked terminals (physical damage prevents secure connections)
- Persistent starting issues after previous cleanings (signals deeper electrical problems)
Disconnect in the Correct Sequence (Avoid Sparks)
This step causes 90% of DIY battery accidents when done wrong. Always disconnect negative first—the black cable marked with a (-) symbol. Removing positive first creates spark risk if your wrench touches metal. Use the correct wrench size (typically 8mm or 10mm) to loosen the nut. Never force stubborn connectors; wiggle gently while applying upward pressure. Once loose, position the cable away from metal surfaces to prevent accidental contact.
Positive Terminal Disconnect Protocol
- Identify the red cable marked with (+) symbol
- Loosen terminal nut with precise quarter-turn increments
- Lift connector straight up—no side-to-side motion
- Secure cable with zip tie or tape to prevent rebound contact
Remember: Negative cable removal first breaks the circuit safely. Reconnecting in reverse order (positive first) maintains this safety protocol.
Create the Perfect Cleaning Solution
Baking soda’s alkaline properties instantly neutralize battery acid corrosion. For standard buildup, mix 1 tablespoon baking soda with 1 cup distilled water in a plastic container. Stir until fully dissolved—cloudy solutions indicate incomplete mixing. For heavy corrosion (thick, crusty deposits), use a thick paste with 3 parts baking soda to 1 part water. Commercial foam cleaners work similarly but cost 20x more; apply generously and wait 3 minutes for full penetration.
Why Baking Soda Beats Vinegar
While vinegar dissolves corrosion, its acidity worsens long-term damage by reacting with lead terminals. Baking soda’s neutralization creates harmless salt deposits that rinse away cleanly. Expect vigorous fizzing when applied—that’s the chemical reaction destroying corrosive compounds.
Scrub Corrosion Without Damaging Terminals
Apply your solution liberally to both battery posts and cable clamps using an old toothbrush. Focus on the critical interface points: the inside of cable connectors where corrosion hides, and the flat top of battery posts where cables seat. Use firm circular motions—never scrape vertically, which damages terminal plating. For stubborn deposits, insert the brush into cable clamps and rotate like a drill. Rinse the brush in clean water every 30 seconds to prevent redepositing corrosion.
Pro Technique for Cable Clamps
- Saturate clamp interior with solution
- Insert brush and rotate clockwise for 10 seconds
- Wipe residue with microfiber towel
- Repeat until metal shines uniformly
- Inspect with flashlight for hidden corrosion pockets
Severely corroded clamps may require a terminal cleaning tool’s wire brush attachment. These $4 tools have dual brushes—one for posts, one for clamps—that remove deposits in 15 seconds without scratching.
Rinse and Dry: The Critical Final Step
Residual baking soda continues reacting if left behind, accelerating future corrosion. Spray clean water inside clamps and over posts using a plastic spray bottle. Wipe with microfiber towels until no white residue remains. Then dry thoroughly—moisture is corrosion’s primary catalyst. Use compressed air to blast water from crevices, or leave the hood open for 10 minutes in direct sunlight. Never reconnect while damp; even invisible moisture causes immediate re-corrosion.
Reconnect Terminals Without Sparking
Reverse the disconnection sequence: positive first, then negative. Position the red cable over the (+) post and hand-tighten the nut before final tightening. Snug connections should resist wiggling but not feel stripped—overtightening cracks lead terminals. Test security by attempting to rotate the connector; it should stay firmly seated. Only after positive is secure should you reconnect the black negative cable.
Connection Tightness Test
- Correct: Connector won’t budge when twisted by hand
- Too loose: Visible movement when wiggled
- Too tight: Metal distortion around terminal post
Apply Corrosion Protection That Actually Works
Petroleum jelly isn’t just a home hack—it creates an effective moisture barrier proven in marine environments. Apply a thin, even coat to the entire terminal post and cable connector before reconnection. For superior protection, use dielectric grease (designed specifically for electrical connections) or terminal protectant spray. Install anti-corrosion felt washers between the terminal and connector—they absorb acid vapors before deposits form.
Common Protection Mistakes
- Excessive application (causes poor electrical contact)
- Skipping cable clamp interiors (corrosion starts where metal meets metal)
- Using motor oil (attracts dirt and degrades rubber)
Prevent Future Corrosion With Smart Habits
Cleaning isn’t a one-time fix—corrosion returns faster without prevention. In coastal areas or road-salt regions, inspect terminals every 3 months. For standard conditions, schedule cleaning every 6-12 months during oil changes. Monthly visual checks take 20 seconds: open the hood and look for white/blue deposits near terminals.
Daily Prevention Tactics
- Drive regularly (short trips prevent full battery charging)
- Reapply protectant every 4 months (Vaseline degrades in heat)
- Check tightness after temperature extremes (metal expands/contracts)
- Park in garage during high-humidity periods (reduces moisture exposure)
When to Call a Professional Immediately
Cleaning won’t fix underlying problems. Visit a mechanic if:
– Corrosion returns within 2 months despite protection
– Battery is older than 4 years with recurring issues
– Engine cranks slowly even after thorough cleaning
– You spot green cable discoloration extending past terminals
Severe terminal damage or trunk-mounted batteries in European vehicles often require specialty tools. Don’t risk electrical system damage—professional cleaning with load testing costs less than a tow.
Clean car battery terminals aren’t just about starting reliability—they’re your first line of defense against expensive electrical failures. This 20-minute ritual prevents 73% of cold-weather breakdowns while adding years to your battery’s life. Make it part of your seasonal maintenance routine, and you’ll never face that heart-stopping click again. Remember: a quick monthly visual check takes less time than calling roadside assistance. Your battery’s health—and your peace of mind—depends on these simple, proactive steps.


