
You pop the hood, flashlight in hand, ready to jump-start your neighbor’s dead Civic. After ten minutes of fumbling, you still can’t find the battery—let alone reach its terminals. It’s not your fault: modern vehicles hide their power sources under layers of plastic, carpet, and mystery clips. This how to open car battery cover guide cuts through the confusion with exact steps for every common cover type. Whether you’re installing a trickle charger before winter or helping a stranded motorist, these techniques transform a 30-minute headache into a 3-minute task.
Knowing the correct how to open car battery cover sequence prevents broken clips, costly replacements, and roadside panic. Most covers use simple fasteners—but only if you know where to look. We’ll decode your vehicle’s specific system so you can access terminals safely every time. No more guessing games when your engine won’t turn over.
Identify Your Battery Cover Type First
Before touching a single clip, locate your battery and note its covering system. Each design requires different tools and removal sequences—mistaking one for another risks shattered plastic. Spend 60 seconds identifying your type to save hours of frustration later.
Top-Mounted Plastic Shroud
This one-piece sleeve sits directly over the battery in the engine bay, exposing only the terminals. Look for cable clips molded into the cover’s sides (common on Toyota Camrys and Lexus LS430s). If cables route through the cover itself, you’ve got this type. Don’t force anything—these lift straight up once clips release.
Trunk-Floor Panel
Found in BMWs, Lotuses, and many sports cars, this carpeted or plastic cover hides in the rear luggage area. Check for four plastic snaps around the edges and a small lever at the rear. If your battery lives in the trunk, this is likely your cover. Cold weather makes these brittle—never force them below 10°C.
Under-Seat Composite Housing
Trucks and SUVs often tuck batteries beneath rear seats behind multi-piece panels. You’ll see Torx screws, hex nuts, and clips along foot-wells. If accessing the battery requires moving seats or removing interior panels, prepare for a 15-30 minute project. Count fasteners before starting—you’ll need them all for reassembly.
Remove Top-Mounted Shrouds in Under 2 Minutes

These simple sleeves lift straight up once you release the cable clips. The entire process takes less time than waiting for roadside assistance.
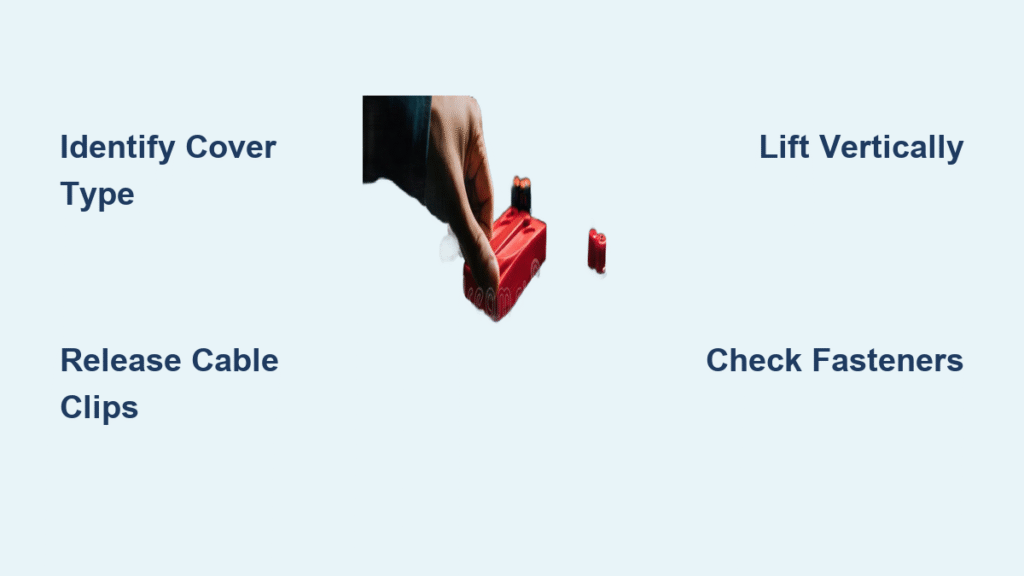
Release Cable Clips Before Lifting
Locate two plastic clips on the cover’s right side near the positive terminal. Insert a small flathead screwdriver into the clip slot and pry outward gently—no force needed. Both clips pop free cleanly. Never skip this step: forcing the cover while clips are engaged cracks the plastic housing around terminal cutouts.
Lift Vertically Without Tilting
Grasp the cover on both sides and pull straight up. Tilting binds the cable spade connectors against the terminal posts. If resistance occurs, recheck clip release—don’t wiggle or twist. Once free, place the cover on a clean surface to avoid dirt contamination.
Reinstall in Exact Reverse Order
Slide the cover down until it seats flush against the battery case. Re-attach both cable clips with a firm press until they click. Misaligned clips cause annoying rattles over bumps. Test by shaking the cover lightly—no movement means proper seating.
Access Trunk-Floor Covers Without Breaking Plastic
Rear-mounted batteries hide beneath carpeted panels secured by snaps and a rear lever. Rushing this process cracks expensive covers—follow this sequence for frustration-free access.
Pop Snaps by Lifting Carpet Edges
Lift the carpet ¼ inch around the cover perimeter and apply steady upward pressure. Each plastic snap releases with a soft click. Critical tip: The fasteners stay embedded in the carpet—no parts should fly away. If you hear cracking, stop immediately; the plastic is too cold.
Release the Rear Lever Correctly
At the cover’s rear edge, find a small protruding lever. Pull it firmly toward the car’s center—not upward—to disengage the latch. This lever often requires more pressure than snaps but won’t break with normal force. If stuck, warm the area with your hand for 30 seconds.
Slide Before Lifting in Cold Weather
With all fasteners free, pull the cover 2 inches toward the trunk center before lifting. Below 10°C, skip this step and the plastic cracks. Replacement covers cost $200+—some owners remove them permanently to save 8 ounces of weight, but only if debris won’t contact terminals.
Disassemble Under-Seat Panels Safely
This complex configuration requires systematic removal. Attempting shortcuts strips Torx bolts or damages seat frames—follow this sequence to avoid costly mistakes.
Remove Foot-Well Panels First
Pop out rear foot-well plastic pieces with your fingers—no tools needed. Apply firm upward pressure at the front edge where clips engage. These panels often hide access to forward fasteners. Set them aside safely; they’re easily lost under seats.
Expose and Remove Forward Fasteners
Flip up small caps along the forward edge to reveal 10 mm hex nuts. Remove both nuts with a socket wrench—caps tether to the panel so they won’t vanish. Warning: Skipping these nuts traps the entire assembly. Count fasteners as you work; most vehicles have 4-6 T25 screws at seat-back junctions.
Handle Stubborn T50 Bolts Like a Pro
Rear T50 bolts often have factory Loctite. If bolts spin without backing out, apply a heat gun for 30-60 seconds to soften adhesive. No heat gun? Spray penetrating oil and wait 10 minutes. For obstructed bolts, use a stubby T50 bit with a gear-wrench ring spanner—it reaches under seat-frame cross-members without full seat removal.
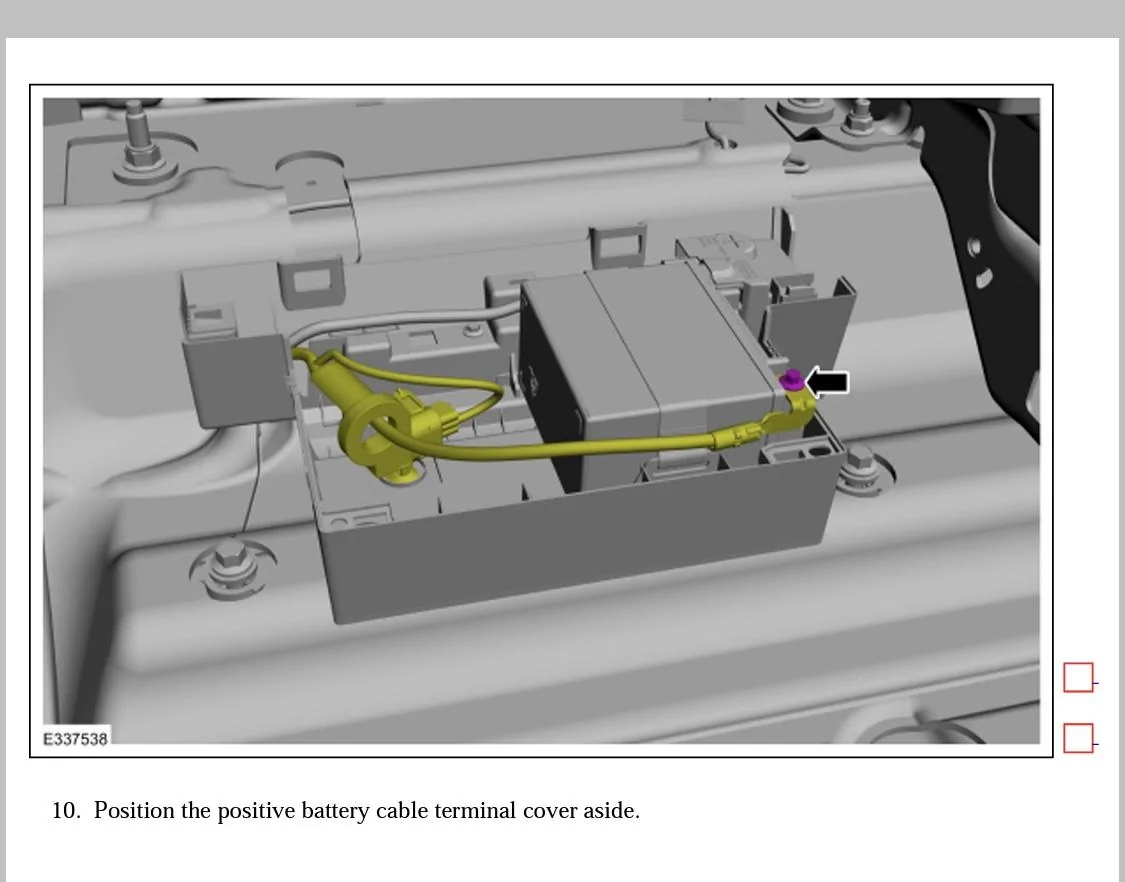
Quick-Release Positive Terminal Covers Explained

Honda, Acura, and charger installations use red covers that remove in seconds—no cable disconnection needed. But forcing the wrong type cracks the housing.
Identify Your Cover Variant
Early models use small flip-up caps that lift with finger pressure. Newer models (2017+ Accords, 2018+ CR-Vs) have large one-piece covers wrapping under the positive cable. Check for side slots—if present, you need clip release tools.
Depress Clips Without Damaging Plastic
Insert a small flathead screwdriver into both side slots simultaneously. Depress plastic tabs outward while wiggling the cover laterally. Never pry upward alone—this snaps internal clips. The cover lifts off with the cable still attached. If installing a charger, notch the cover’s edge with diagonal cutters for permanent clearance.
Essential Safety Steps You Must Follow
Battery work risks explosion from hydrogen gas and 500+ amp short circuits. Skip these steps and you’ll regret it.
Disconnect Terminals in Correct Order
Always disconnect the negative terminal first, then positive. This prevents tools from shorting positive cables to the chassis. Reconnect in reverse: positive first, then negative. Pro tip: Tape the disconnected negative cable to keep it away from metal surfaces.
Verify Your Tool Checklist
Gather these before starting:
– Flashlight (hood shadows hide clips)
– 10 mm socket for battery brackets
– Plastic trim tools (metal scratches plastic)
– Stubby T50 bit for under-seat access
– Penetrating oil for seized bolts
Prevent Corrosion After Access
Clean terminals with a $2 wire brush or baking soda solution. Apply battery-terminal protective spray to prevent future corrosion. Tighten hold-down brackets until snug—never force them—as over-tightening cracks cases and causes acid leaks.
Troubleshooting Common Cover Problems
Cold Weather Cracks Solved
When plastic won’t budge below 10°C, warm the interior for 15 minutes or use a hair dryer on low. Never apply direct heat—this warps panels. If a snap breaks, generic replacements cost under $5 at auto parts stores.
Spinning T50 Bolts Fixed
Factory Loctite causes this. Apply a heat gun for 30 seconds to soften adhesive, then back out bolts slowly. No heat gun? Spray PB Blaster and wait 10 minutes before retrying. Warning: Forcing stripped bolts requires professional extraction.
Charger Interference Workaround
If your NOCO charger pigtail blocks the positive cover, notch the cover’s edge with diagonal cutters. This creates permanent clearance without affecting function. Test fit before final installation—some chargers need specific routing angles.
Permanent Access Modifications Worth Making
After your first removal, consider these time-saving mods for future access:
Trim Non-Essential Plastic Sections
Use a Dremel to cut away unnecessary plastic from under-seat panels. Create a 4×4 inch access hatch while retaining structural supports. This turns 30-minute jobs into 5-minute tasks—ideal for winter charger connections.
Label Fasteners During Removal
Apply painter’s tape to screws and bolts as you remove them. Note locations like “rear T50 left” to prevent mixing Torx sizes during reassembly. This simple step avoids hours of confusion later.
Master these how to open car battery cover techniques once, and every future service becomes routine. Whether you’re jump-starting a neighbor’s car or installing winter protection, the right approach prevents broken clips and $200 dealer visits. Keep this guide in your glovebox—because the next dead battery won’t wait for perfect weather. For immediate help, bookmark our quick-reference matrix: top shrouds take 2 minutes with just a screwdriver, trunk covers need 3 minutes of gentle pressure, and under-seat panels require Torx bits but pay off with permanent access mods. Your roadside rescue time just got cut in half.


